Send readings from Arduino to raspberry via radio
There are tons of tutorials on the internet about sending and receiving values via radio or comunicating Arduinos and Rapsberrys, most of them are too complex or they are incomplete (missing schemas or code). In this post we just want to show a simple and minimalistic way to do so with simple and cheap components using two nRF24L01 (RF24 from now on) radio modules (one in an Arduino, and the other in a Raspberry).
The final code of this post and more advanced examples and schematics are available in github.
RF24
First of all, you should get any RF24 module available on the internet, here you have a few stores:
“The nRF24L01+(nRF24L01p) is a single chip 2.4GHz transceiver with an embedded baseband protocol engine (Enhanced ShockBurst™), suitable for ultra low power wireless applications (source).”
That allows you to send and receive messages using some standard libraries without specifying any protocol in both the raspberry and the Arduino.
Connecting the RF24
Connecting the RF24 is not that hard if you follow any of the schemas below:
  __________________
  |_1_| 2         ~ |
  | 3 | 4  [_]    ~ |
  | 5 | 6         ~ |
  | 7 | 8  (   )  ~ |
  ‾‾‾‾‾‾‾‾‾‾‾‾‾‾‾‾‾‾
  NRF24L01    Arduino  Raspberry

  1           GND      GND
  2           3.3v     3.3v
  3           D9       22
  4           D10      CS0
  5           D13      SCLK
  6           D11      MOSI
  7           D12      MISO
or download the fritzing schematic
Some of the connections may vary, but we will use those values in the scripts, so once they are working you can change them if you want.
Coding the RF24
Arduino
First you need to download the RF24 libraries for Arduino, you can find them here, just copy the whole folder into your Arduino libraries.
Once the libraries are copied, you can run the following code in your Arduino. This code will send a message (lifetime).
Download the full code here
#include <SPI.h>
#include <nRF24L01.h>
#include <RF24.h>

int CHANNEL = 1; //MAX 127
RF24 radio(9,10);
byte pipes[][6] = {"1Node","2Node"};

void setup() {
  Serial.begin(9600);
  Serial.println("Setup radio\n\r");

  // Setup and configure rf radio
  radio.begin();                          // Start up the radio
  radio.setChannel(CHANNEL);
  radio.setAutoAck(1);                    // Ensure autoACK is enabled
  radio.setRetries(15,15);                // Max delay between retries & number of retries
  radio.openWritingPipe(pipes[1]);
  radio.openReadingPipe(1,pipes[0]);
  radio.printDetails();                   // Dump the configuration of the rf unit for debugging
  radio.stopListening();
}

void loop(void){
  radio.powerUp();
  int time = (int) millis();
  Serial.println("Sending message");
  radio.write(&time , sizeof(int) );
  radio.powerDown();
  delay(1000);
}
Keep it running while we work on the Raspberry PI listener.
Raspberry
First, download the c++ library for your Raspberry PI available here , install them with make and make install.
You can also compile and test the examples.
Then compile and run the following code using g++ -lstdc++ -lrt -lrf24-bcm rf24.cpp -o rf24.out and ./rf24.out
Download the full code here
#include <iostream> //for usleep
#include <time.h> //for CLOCK_REALTIME
#include <RF24/RF24.h> //for radio
#include <stdio.h> //for printf

using namespace std;

// Setup for GPIO 22 CE and CE0 CSN with SPI Speed @ 8Mhz
RF24 radio(RPI_V2_GPIO_P1_15, RPI_V2_GPIO_P1_24, BCM2835_SPI_SPEED_8MHZ);

// Radio pipe addresses for the 2 nodes to communicate.
const uint8_t pipes[][6] = {"1Node","2Node"};

int main(int argc, char** argv){
  timespec time;
  // for some reason read() reads 8 bytes, not 1, so make sure we allocate
  // enough memory; otherwise it scribbles over other memory
  int paylad[8];

  radio.begin();
  radio.setChannel(1);
  radio.setRetries(15,15);
  radio.printDetails();

  radio.openWritingPipe(pipes[1]);
  radio.openReadingPipe(1,pipes[0]);
  radio.startListening();

  while (1) {

    if ( radio.available() ) {

      radio.read( paylad, sizeof(int) );
      clock_gettime(CLOCK_REALTIME, &time);
      printf("Received: %i at %i.%i \n",paylad[0],time.tv_sec,time.tv_nsec);
    }
    usleep(100 * 1000);
  }
  return 0;
}
And that should be it.
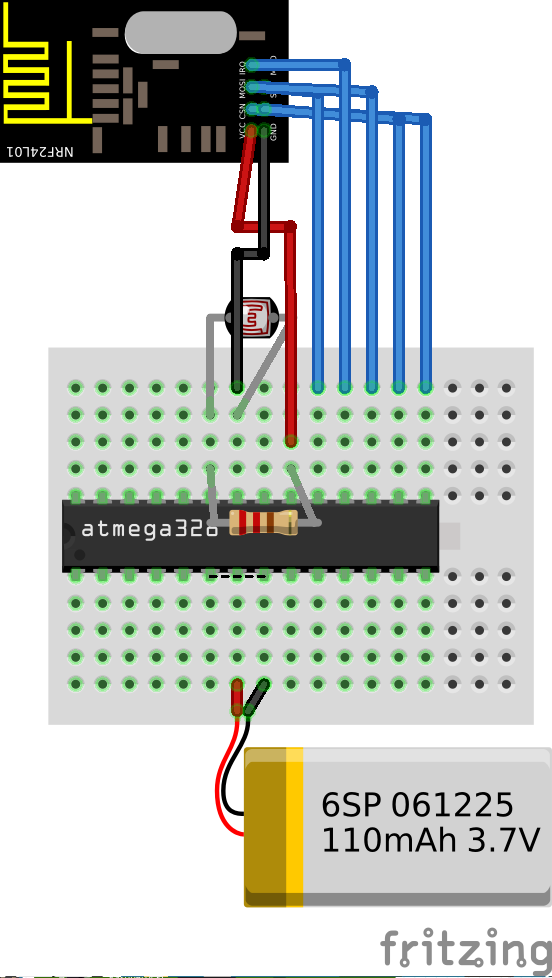
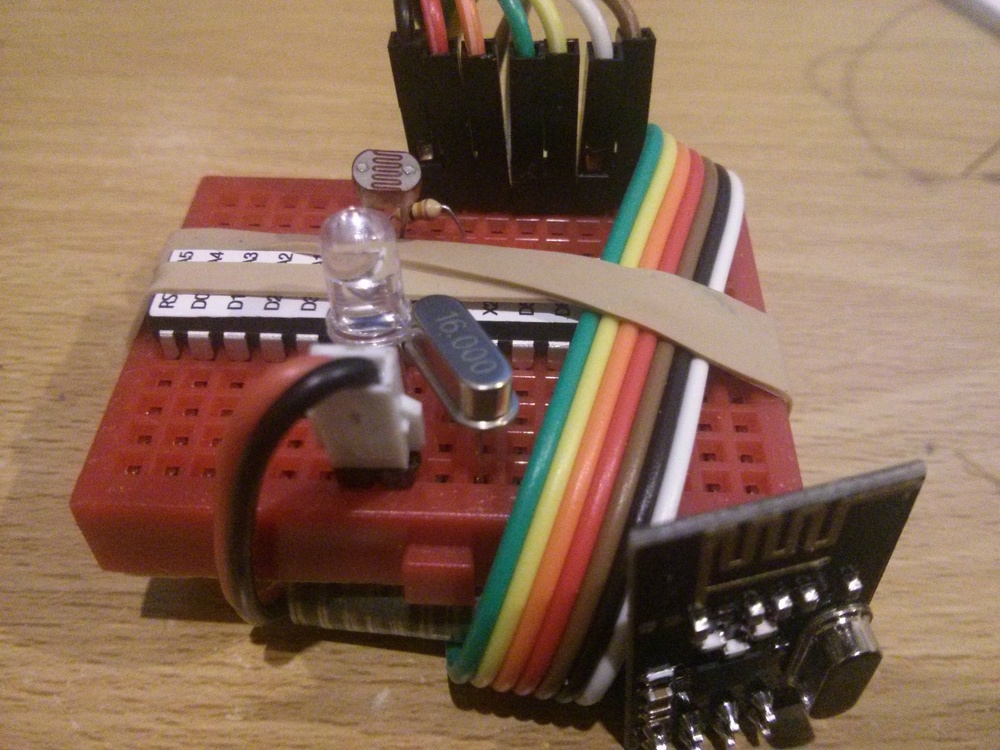
Creating a portable sensor
Now you have the basic library running you can add a simple sensor (light sensor) to it.
Just follow the previous schematic, write the code, add an external battery and place it wherever you want.
See how the messages are coming to the raspberry PI.
Power consumption
The code mentioned is not power efficient , and its consumption may vary between 10mA and 20mA (using a minimal atmega328 configuration). However, there are a few ways to drop that consumption up to 0.5mA.
First you need to use the JeeLib library to sleep the arduino (rather than using delay). That will drop the consumption up to 8mA while idle.

However, this is not enough and the reason why the consumption is not ~0 is because the RF24 chip is consuming even if it is in the powerdown mode. To solve this, I hackily added a NPN Transistor to turn off the device completely while it is sleeping. This reduces its consumption up to 0.8mA, which means it can run during 5 days using a 240mAh battery. More improvements can be performed to drop its consumption.
If you want to see more details, have look at the arduino-lowpower script
What’s next ?
Obviously, this offer endless possibilities, we could write those messages in a queue system, or a database (redis, mysql, sqlite, etc) and run another python app in the raspberry with whatever behaviour we want.

Show those records in a graph so it looks like this:

Or we could attach a tiny solar panel to the portable sensor and place it outside, so the battery will last “forever”.
Do you have any other idea ? Contact us and tell us, we may do it in our next project.