This is the first post in a series, in which we will detail several aspects of the creation of the music of Super Time Bomb. In this post we’ll show you how we created the music for the game (which happens to be chiptune-style) using free software available for the Ubuntu platform. The tools that we are using are however pretty generic, and there should be alternatives (if not even direct ports) available for your platform.
What do I mean by chiptune
I think there’s no better way to explain than to show:
In this tutorial I’ll be calling chiptune music, or 8-bit music, or “beeps and boops” music, to the kind of music games had when they couldn’t afford to store and play recorded music and they had to synthesize it themselves, using what nowdays we consider very modest hardware.
Be warned though, that this is not a very technical definition of the term. There are purists out there who will only call chiptune music to that coming out of an old Amiga-style tracker in the form of a MOD file, or to that manually handcrafted from bending real physical chips. In our case though, our only requirement is that it sounds like it comes from an old Nintendo game, and that’s about it.
Now for the interesting part: to make it! There are several approaches you can follow to create this kind of music, from the purist way of using chiptune trackers, to synthesize it directly in your game code. But there’s really no need to make chiptune music the way it was done 20 years ago, when today we have very powerful software for audio creation, and ready-made high quality virtual instruments: including chiptune-sounding ones.
Making chiptune with LMMS and VSTi plugins
The music of Super Time Bomb was made using LMMS, which is an open source alternative to the popular Fruity Loops Studio. It’s free, multiplatform, and easy to use. And in recent versions it will let you import VSTi plugins (a very popular format for instrument and audio effects), even if you are using it on Linux (it will rely on Wine to run them).
We will be using the following selection of free VSTi plugins, that will provide us with a handful of chiptune-style instruments and sounds:
- Peach and Triforce will provide you with a decent set of NES-style instruments.
- Toad is a NES-style percussion set.
- There’s also Magical 8-Bit, but unfortunately I couldn’t make that one work on my setup (don’t let that stop you from trying it yourself though!)
Make sure you download the Windows version of the plugins (in the cases where there are more available), even if you are using Linux. Each of them comes in the form of a zipped package, containing a dll plus potentially some other files (texts, sounds…) inside. Extract the dll for each of them (as this is actually the VST plugin) to any directory of your choice.
After you have the dlls, you’ll have to install them in your workstation software to be able to use them to make awesome music. For LMMS on Linux the process is not so straightforward, but it can be done.
LMMS is available on the repos, but unfortunately the version that we can find there (at least on Ubuntu 14.10) is old, and doesn’t come with VSTi support. To get a newer version you have two alternatives. Some months ago, what I did was compiling the latest version (there’s some trickery to be done to get VSTs to work, which basically involves compiling the VeSTige plugin first. Here’s the instructions I followed). However this should not be necessary anymore, as there’s now the official KXStudio ppa repository which you can add to Ubuntu to be able to install everything from the package manager.
To add the KXStudio ppa:
sudo add-apt-repository ppa:kxstudio-debian/kxstudio
sudo apt-get update
sudo apt-get install kxstudio-repos
sudo apt-get update
Then install LMMS and the VST support:
sudo apt-get install lmms lmms-vst-full
You may also need to install wine first, if you don’t have it already, as LMMS relies on it to run the Windows VST plugins that we are using.
Then open up your newly installed LMMS, and say yes to all default options if prompted with them. After that, you will be shown an empty workbench. On the left side, you’ll see a column with icons. Click on the first one, which is the instrument plugins, and a sidebar will open showing all available instruments. There should be there one called “VeSTige” (if it’s not there, it means you didn’t install LMMS correctly, as you are missing the VST support). Drag and drop this instrument into the song editor, and then click on the instrument name. A new window should open showing the instrument controls. Here’s an image showing the process:
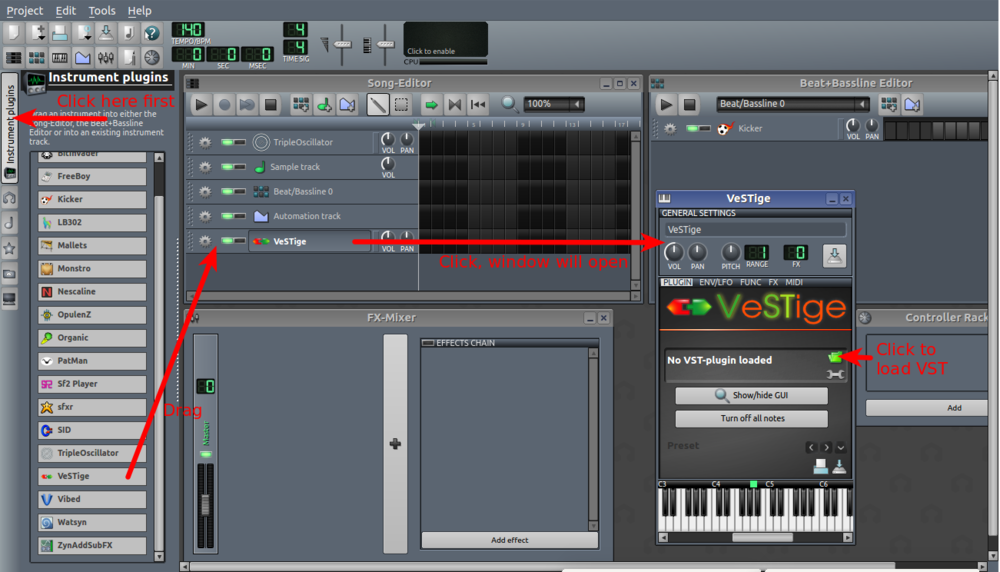
VeSTige is not really an actual instrument, it’s simply a loader for Windows VSTi plugins (it will run them using Wine). If you click on the little green folder on the interface, a file browser will come up, and then you can select one of the dlls for the instruments you have downloaded. When you do so, after a few seconds of loading, you should see the VST instrument controls pop up in a new window, and the name of the instrument in the song editor will also be different. You can then select your sound from the VST interface, and start adding notes on the piano roll to create your music!
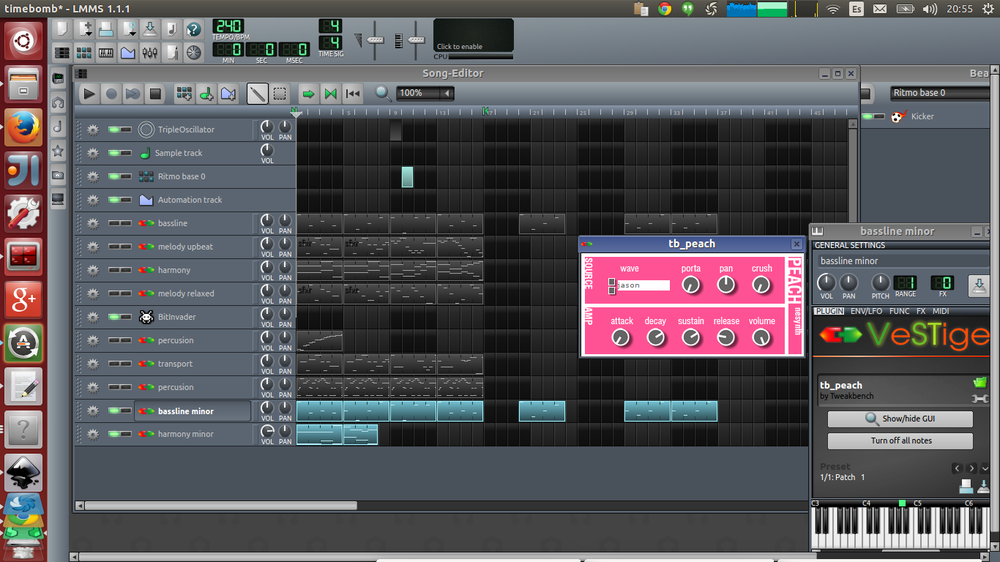
For every VST instrument you want to load, you’ll have to use an independent VeSTige instance, so simply repeat the process over and over as needed. Since the VSTs we are using let you select from various instruments you will probably want to load several of them in separate tracks, to be able to use several sounds independently. To do so, you’ll simply have to add several VeSTiges loading the same VST in each of them, and use the instrument GUI to select the sound you want that track to use. This is how my workbench looks like after loading a bunch of Peach + Toad tracks with VeSTige:
After you are done, you’ll be able to export your music to any common audio format (like ogg or mp3), and then you can use it in your game.