<![CDATA[Coconauts]]>2021-01-13T11:45:50+00:00https://coconauts.net/Octopress<![CDATA[Hiring Demystified]]>2020-11-25T12:00:14+00:00https://coconauts.net/blog/2020/11/25/hiring-demystifiedIt’s not secret that the hardest problems in computer science are cache invalidation and naming things… oh, and hiring. In our industry we’ve developed a culture and a mysticism around hiring, with certain rituals and practices which are often so detached from reality that you see numerous jokes and memes about the subject.
Hiring is a difficult problem, yet important to get right. Many developers are faced with the challenge of hiring other team members, without much clue into how to proceed, and end up just copying the well known rituals without stopping to analyse their effectiveness or implications. Often, this results in hindering both companies and candidates, especially those of under represented demographics.
In this talk I gave at PyconES2020, I share my experiences and personal opinions both as a candidate and as an interviewer, analyze the implications of popular hiring tactics, and discuss what I consider effective ones, in order to hire the right developers for your team with minimum hassle for both sides.
]]><![CDATA[Microservices: The Small Print]]>2020-11-18T12:00:14+00:00https://coconauts.net/blog/2020/11/18/microservices-the-small-printMicroservices get a lot of sales talk, which leads many teams to adopt them eagerly. However, people are not always aware that they come at a price.
In this talk I gave at PyconES 2018 I discuss the basic theory around microservices architectures, and go over the common pain points that they bring, and how they often get you in the opposite direction than you intended with them.
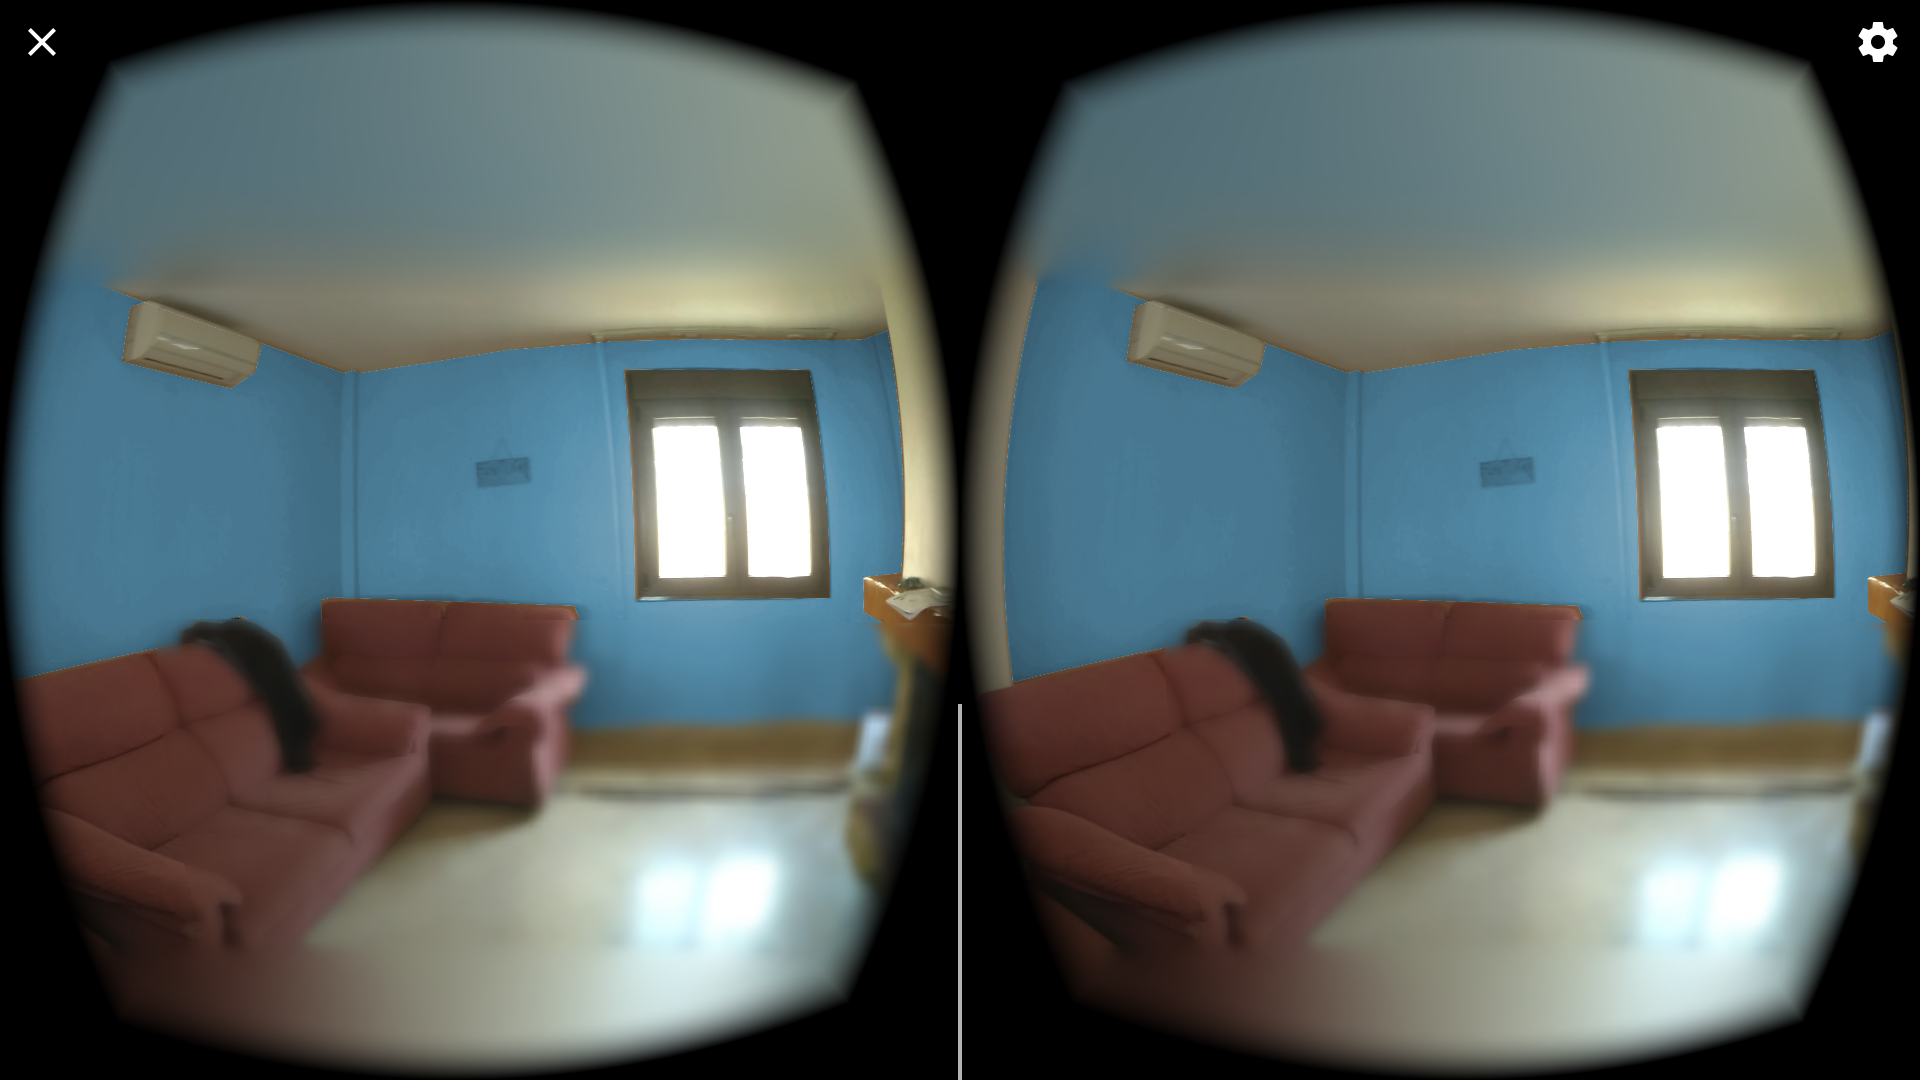
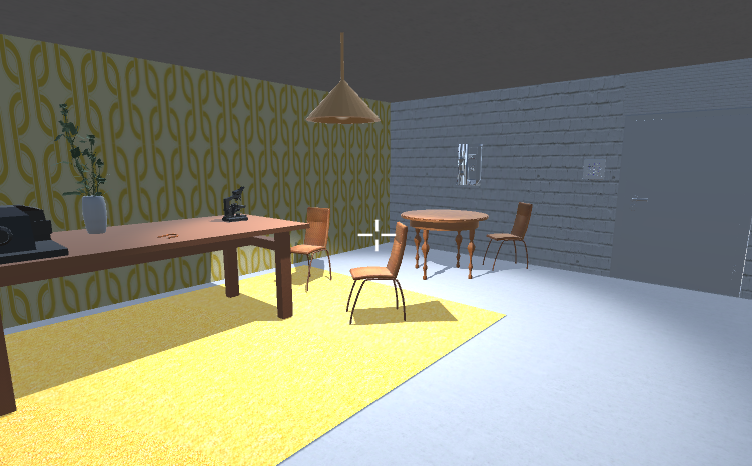
]]><![CDATA[Paint Walls in VR]]>2019-01-19T01:00:14+00:00https://coconauts.net/blog/2019/01/19/paint-rooms-vrHave you ever wanted to paint a room but did not decide which color to choose ?
We found an easy and cool solution, all you need is a phone (mainly an Android, but if you IOS, just replace the apps and locations with the IOS equivalent) and an image editor to paint your room in Virtual Reality.
Open the app, (after a few configuration steps), and go to cardboard camera and take the picture by rotating the phone slowly.
The picture will be stored in sdcard/DCIM/CarboardCamera with a .vr.jpg extension. Copy that file into your computer.
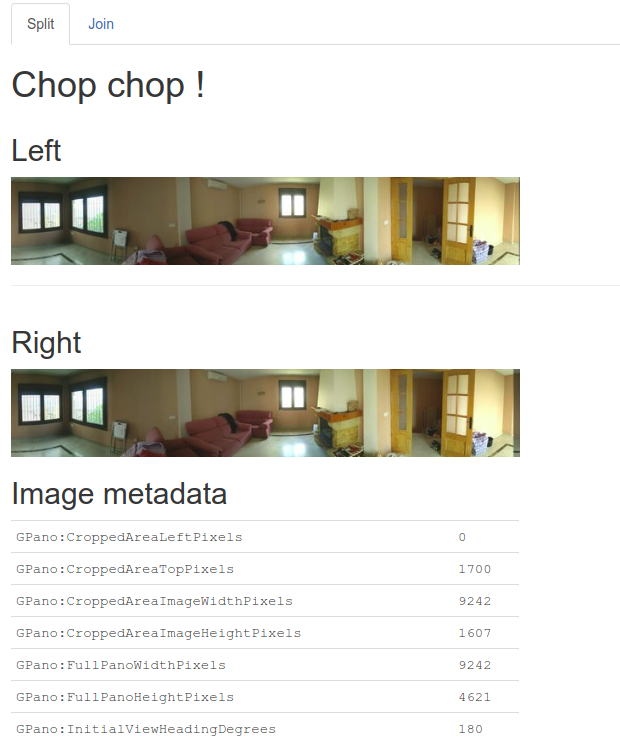
Export _left and _right images
Although the image taken by the cardboard camera looks like a normal jpg image, it contains some metadata that allows the app to support VR.
Because of this, we need to export the .vr.jpg into two separate images using https://cctoolkit.vectorcult.com/#, this step is key to the whole process.
Upload your picture into that website and it will get splitted into two (one for each eye). Right click on the images and save them on your computer with _left and _right names.
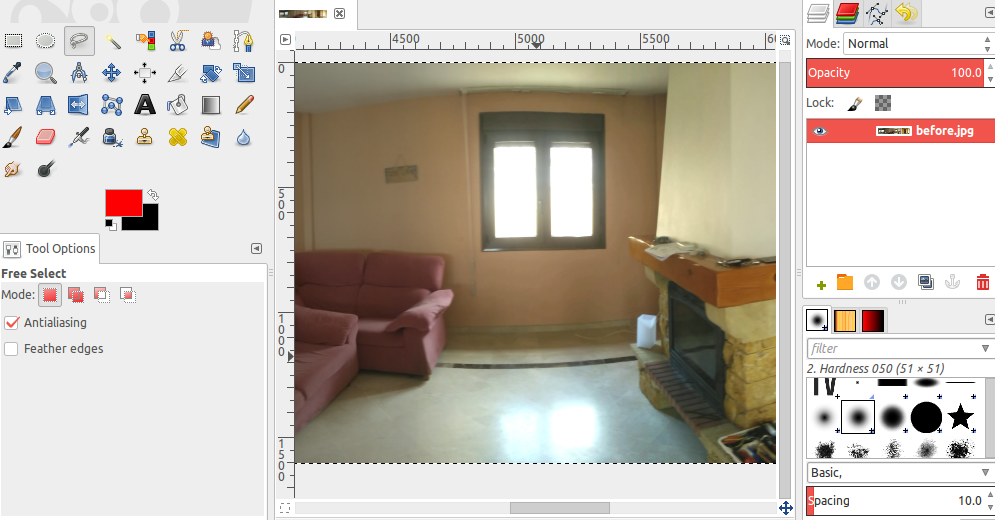
Editing the VR picture
We used GIMP to edit the image, but you can use photoshop or any other image editor, just open both _left and _right images you exported before with it and you will see a plain wide image.
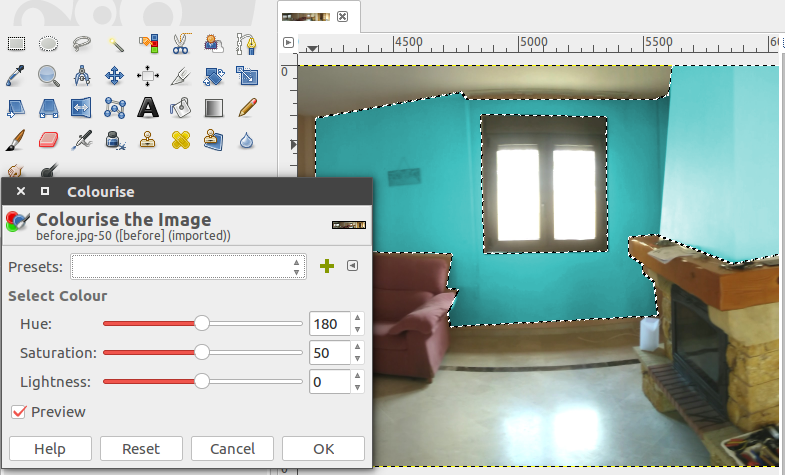
Now you can edit the images in any way you want, what I did was to use the different select tools to select just (and only) the walls on the room, then move it to another layer (for easier management) and then used the colourise tool to change the color.
You need to repeat this operation for both images. Once you’re done, save both images and be ready to combine them together again.
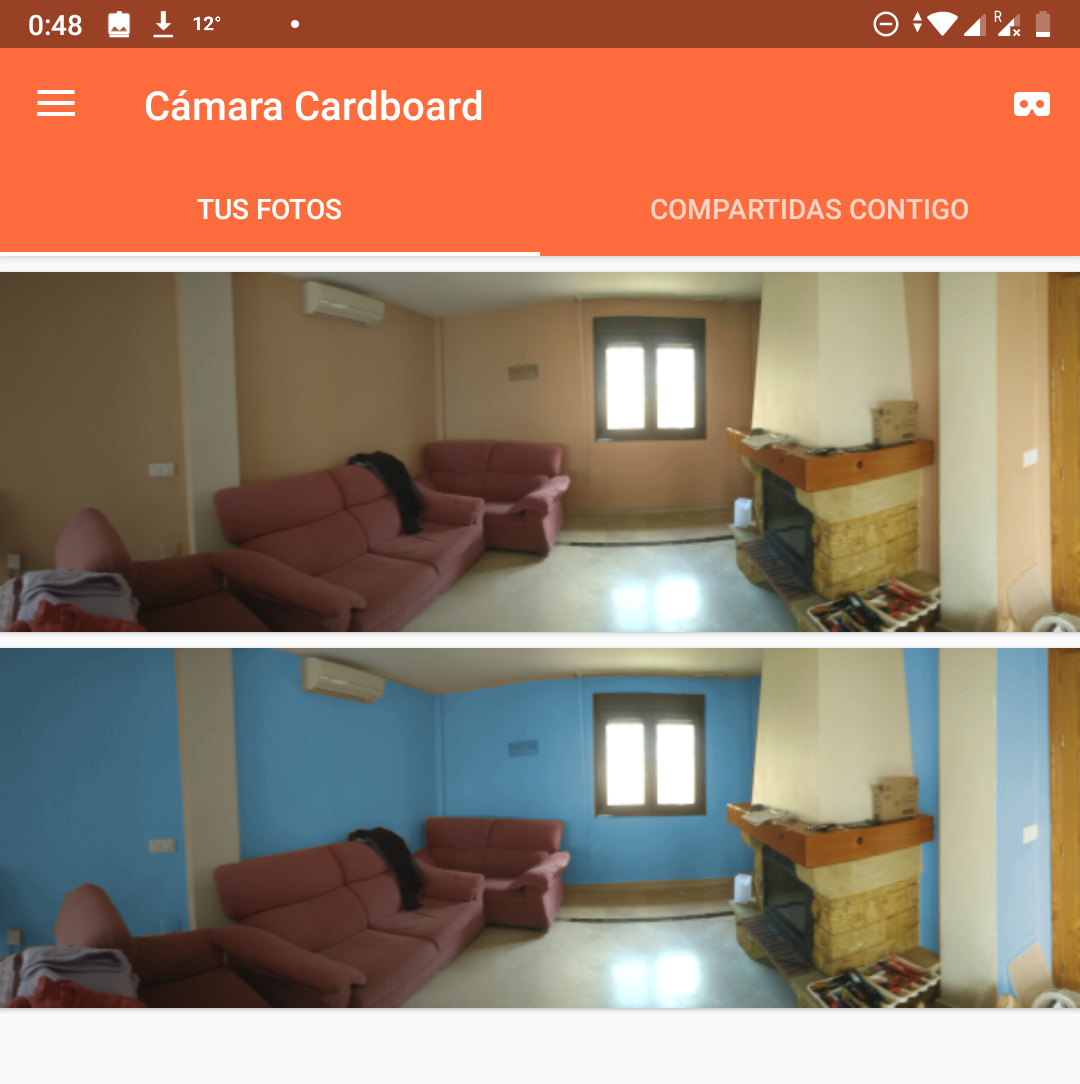
Generate new VR image
Go back to the same website as before https://cctoolkit.vectorcult.com/# and join both images this time, remember to keep the _left and _right names before uploading.
This will generate a new .vr.jpg page. Copy the image back on DCIM/CardboardCamera. If you did everything correctly, you will see both pictures (the new one and the old one) on the cardboard. If you upload a non-vr image, it won’t show on the app.
Click on the image and you will see it on VR. That’s it, enjoy.
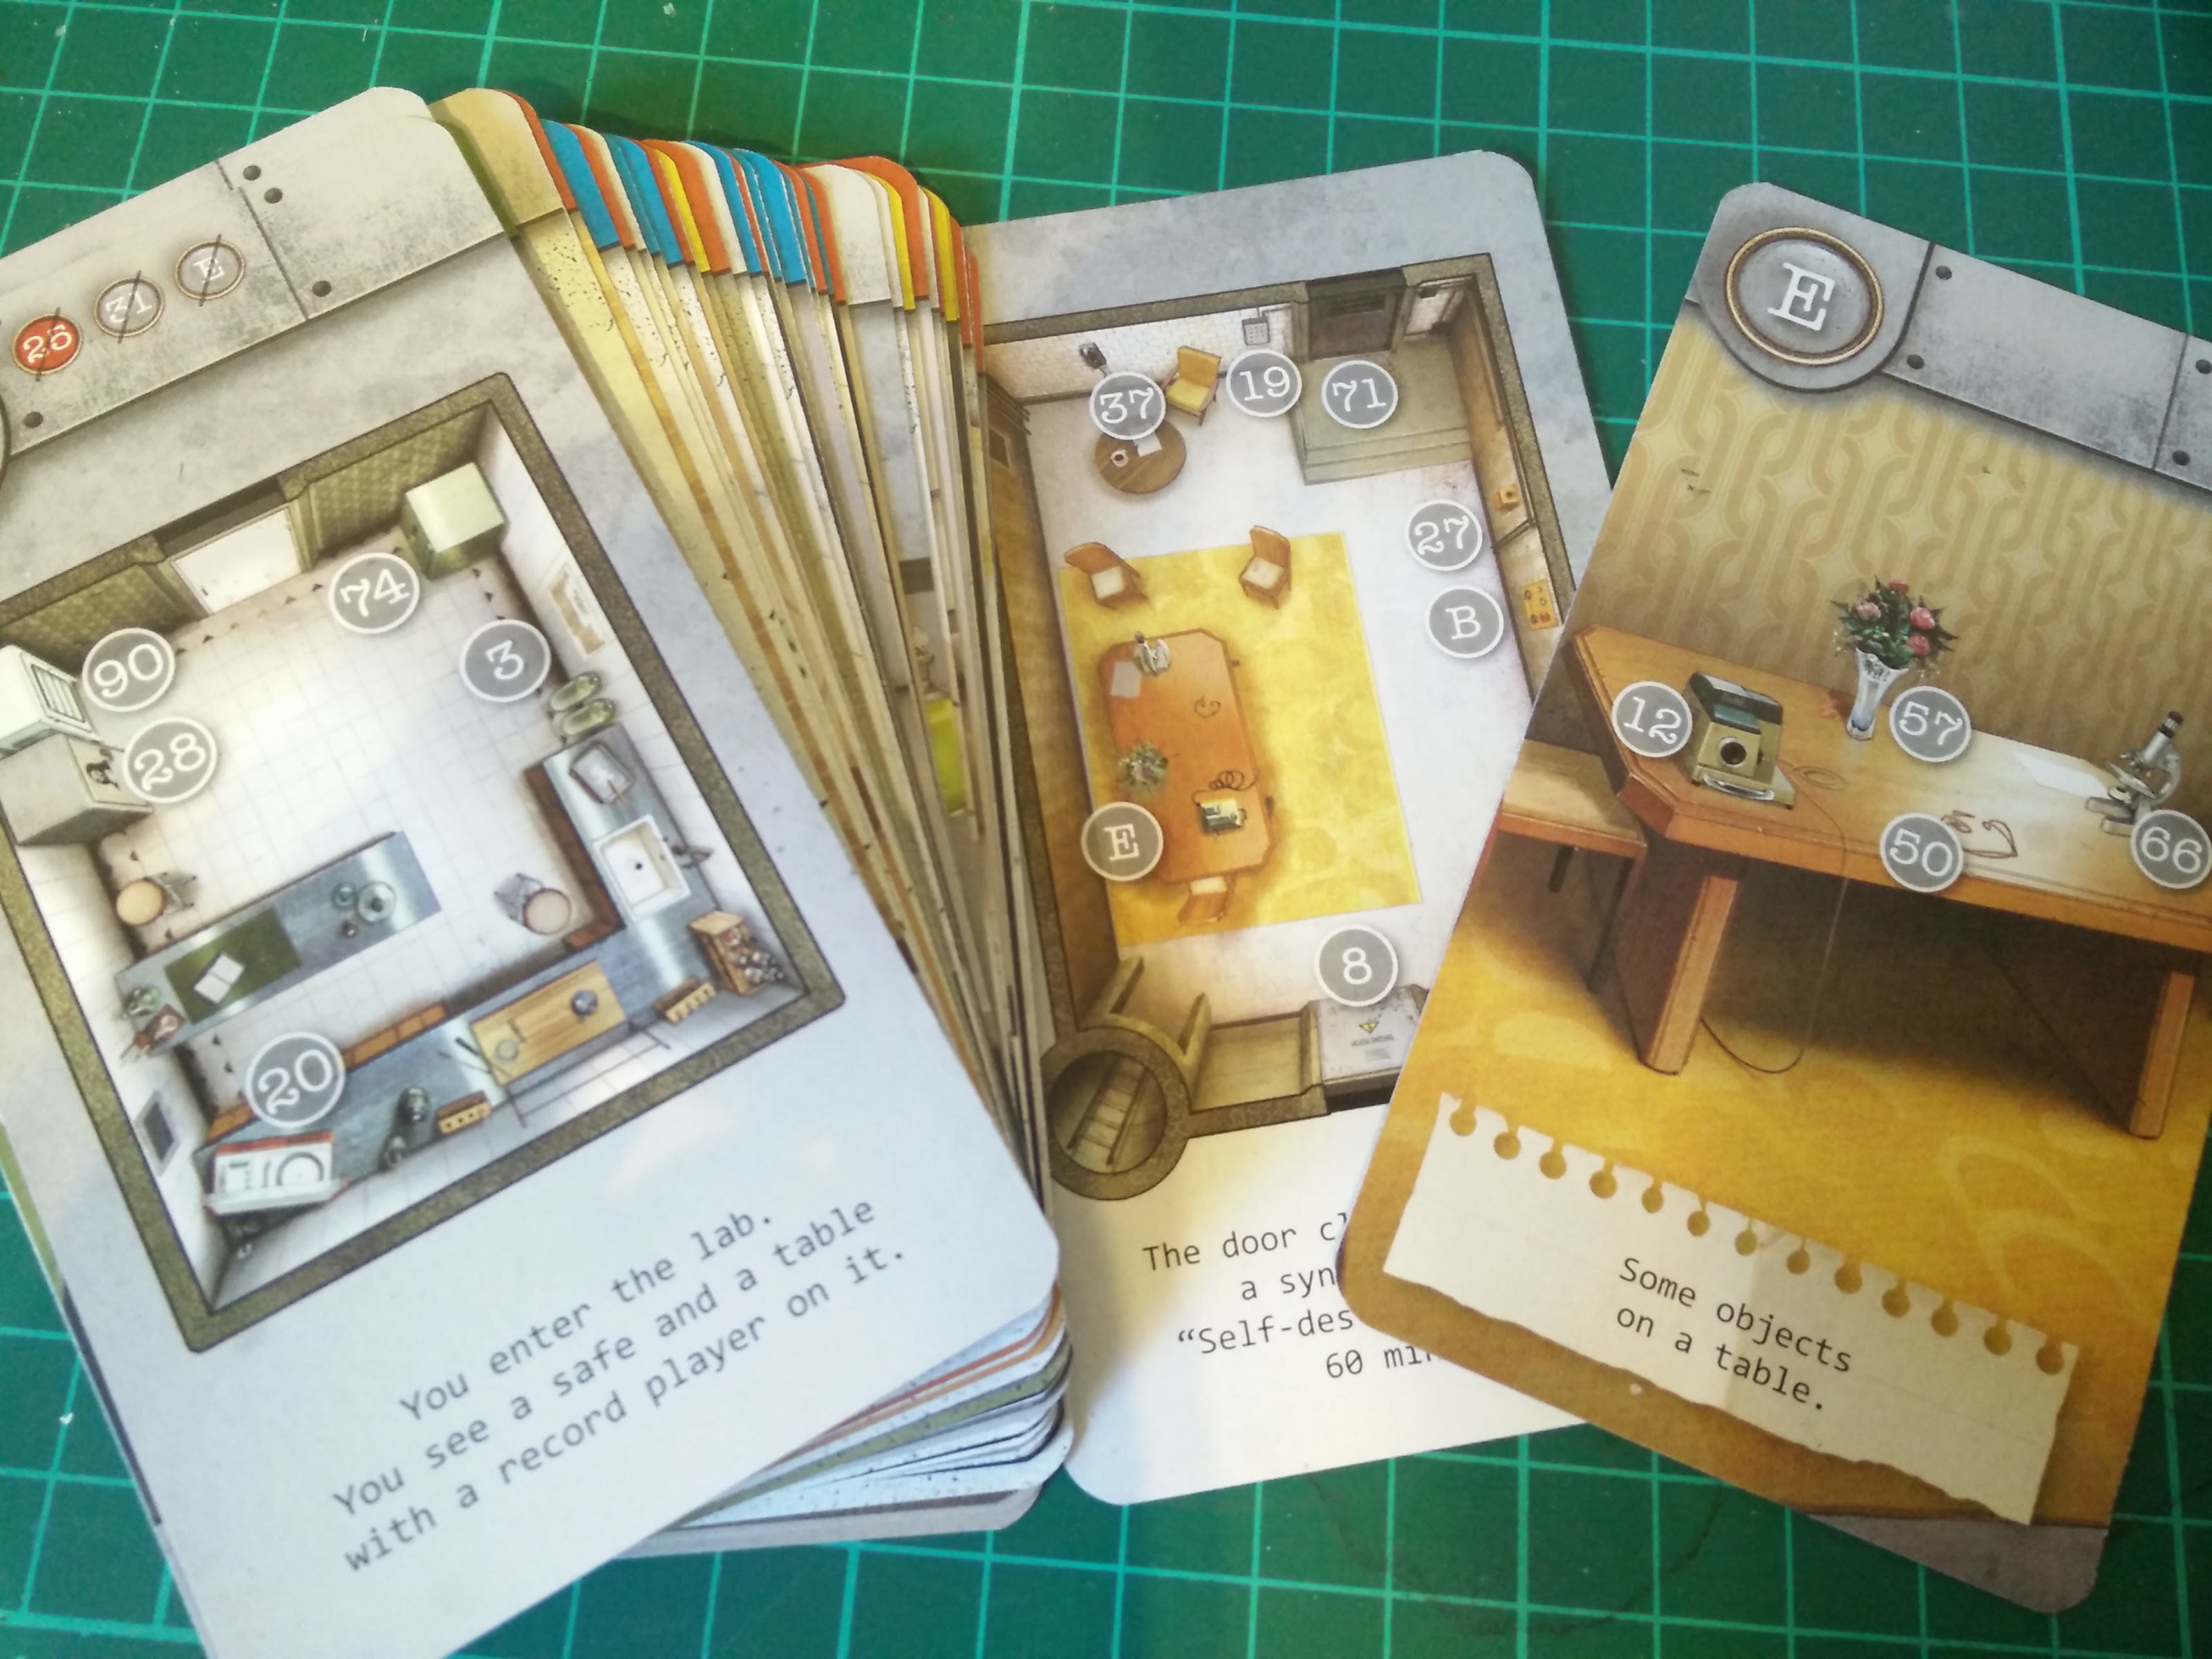
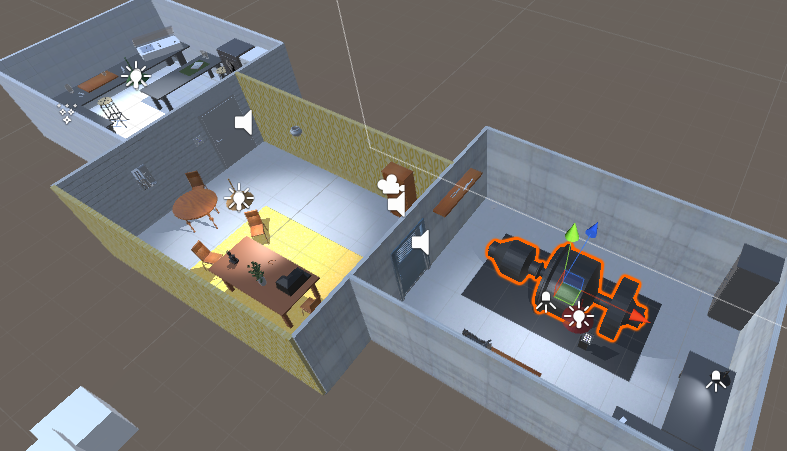
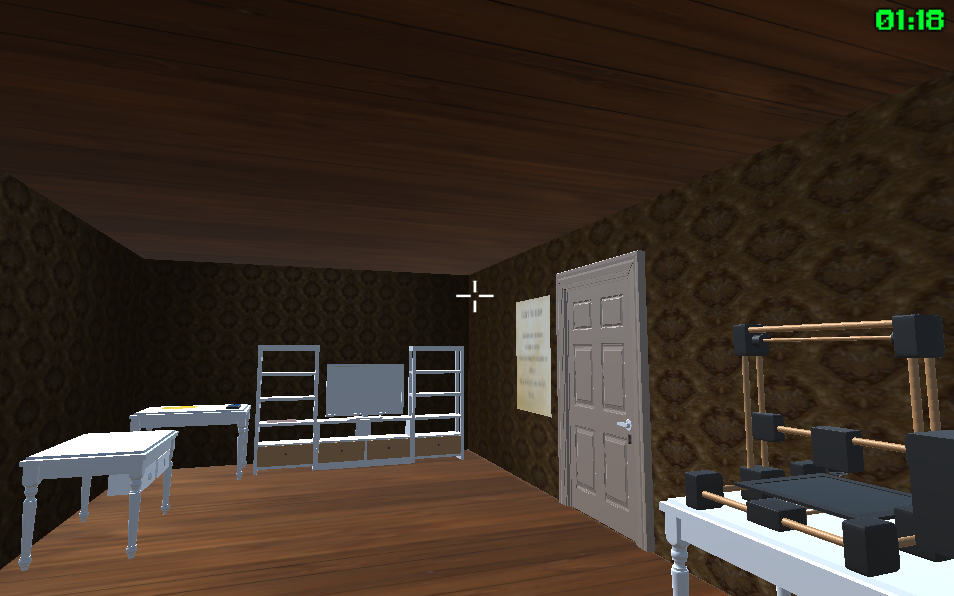
]]><![CDATA[Escaperoom X Unlock]]>2018-09-07T14:00:14+00:00https://coconauts.net/blog/2018/09/07/escape-room-demoA year ago we showed you a generative escaperoom game on Unity3D. Based on that formula, we decided to create some manually-crafted levels to make the game even better. So we decided to copy the first level design of a card based escaperoom game called Unlock. And the result was as good as we expected.
The game is not yet finished, but because we are going to move to a different project, we thought about showing you a demo of what we’ve built so far.
We copied the gameplay of the first level of the unlock game, with the same clues, same objects, similar text entries and even the similar wall textures.
The inventory system
We added to this game a new inventory wheel system, where you pick items and you use them on any other object in the scene using the right click, showing all the items you have on a wheel.
But of course, different items will have a different effect on the item you’re trying to use it on.
Conclussions
It takes a lot to generate the 3d models, implement the logic and replace the card-only mechanics into a 3D videogame; but the result is worth it.
I think, (now that we have proved the concept with a working level design) we could start building our own levels, adding more interactive puzzles (like the laptop one in our previous game).
However, we will pause this project for a while to start working on different stuff, but let us know if you have any interest on playing a game like this at some point in the future.
What do you think about the game?
Your feedback is really valuable to us! so please let us know on the comments or on twitter.
]]><![CDATA[Coconauts 2017 Retrospective]]>2018-01-18T19:14:46+00:00https://coconauts.net/blog/2018/01/18/coconauts-2017-retrospectiveIt’s the fourth year we’re doing this, my, time flies!
2017 was an incredibly packed year for us at a personal level, and the fun is still to continue in 2018. We still managed to scratch a bit of time for Coconauts, with highlights being:
The start of a podcast.
We only recorded three episodes, but each of them managed a listener count of over 100 on
ivoox alone.
Gamedev didn’t stop this year either. We did a bit of fiddling with
Phaser and
Cocos2D,
but in the end we keep coming back to Unity3D for anything serious.
Aside from the already mentioned Escape Room,
we’ve done a Skyroads remake.
And last but not least: we’ve broken a record of blogposts this year!
with 21 of them, almost two per month.
Hoping all of our readers enjoyed following us during 2017. It’s still not
too late to whish everyone a happy 2018, and stay tuned for more exciting
stuff to happen over at Coconauts!
]]><![CDATA[Live Picture Frame]]>2017-11-27T14:14:46+00:00https://coconauts.net/blog/2017/11/27/live-pictureI recently moved from UK back to Spain to work remotely, and since then, I’ve been curious about how the weather is there, specially when talking with people on the other country. Is it raining today ? Is the sun gone already ?
To address that problem, I found a few live videos/webcams about london like earthtv or London Tower Bridge so I kept those videos on one of the tabs of my browser.
But, wouldn’t be cool to have it on a separate picture frame, always there, just like a normal picture, but live.
That’s why I built a slim picture frame from old recycled components. To see the Tower Bridge at day and at night.
Materials
These are the materials I used to create the live picture. All these items were already on my inventory:
Old ultra-thin LCD screen from a broken laptop (10 years old)
The Ikea picture frame was made for A4 pictures, however, my 15’‘ LCD screen is slightly bigger than that, therefore we need to make some adjustments, first, increasing the hole in the white inner frame to 15’‘.
Then, cutting the back of the frame to the same size
Everything should fit together, so you should be able to see all the screen inside the inner frame
LCD screen
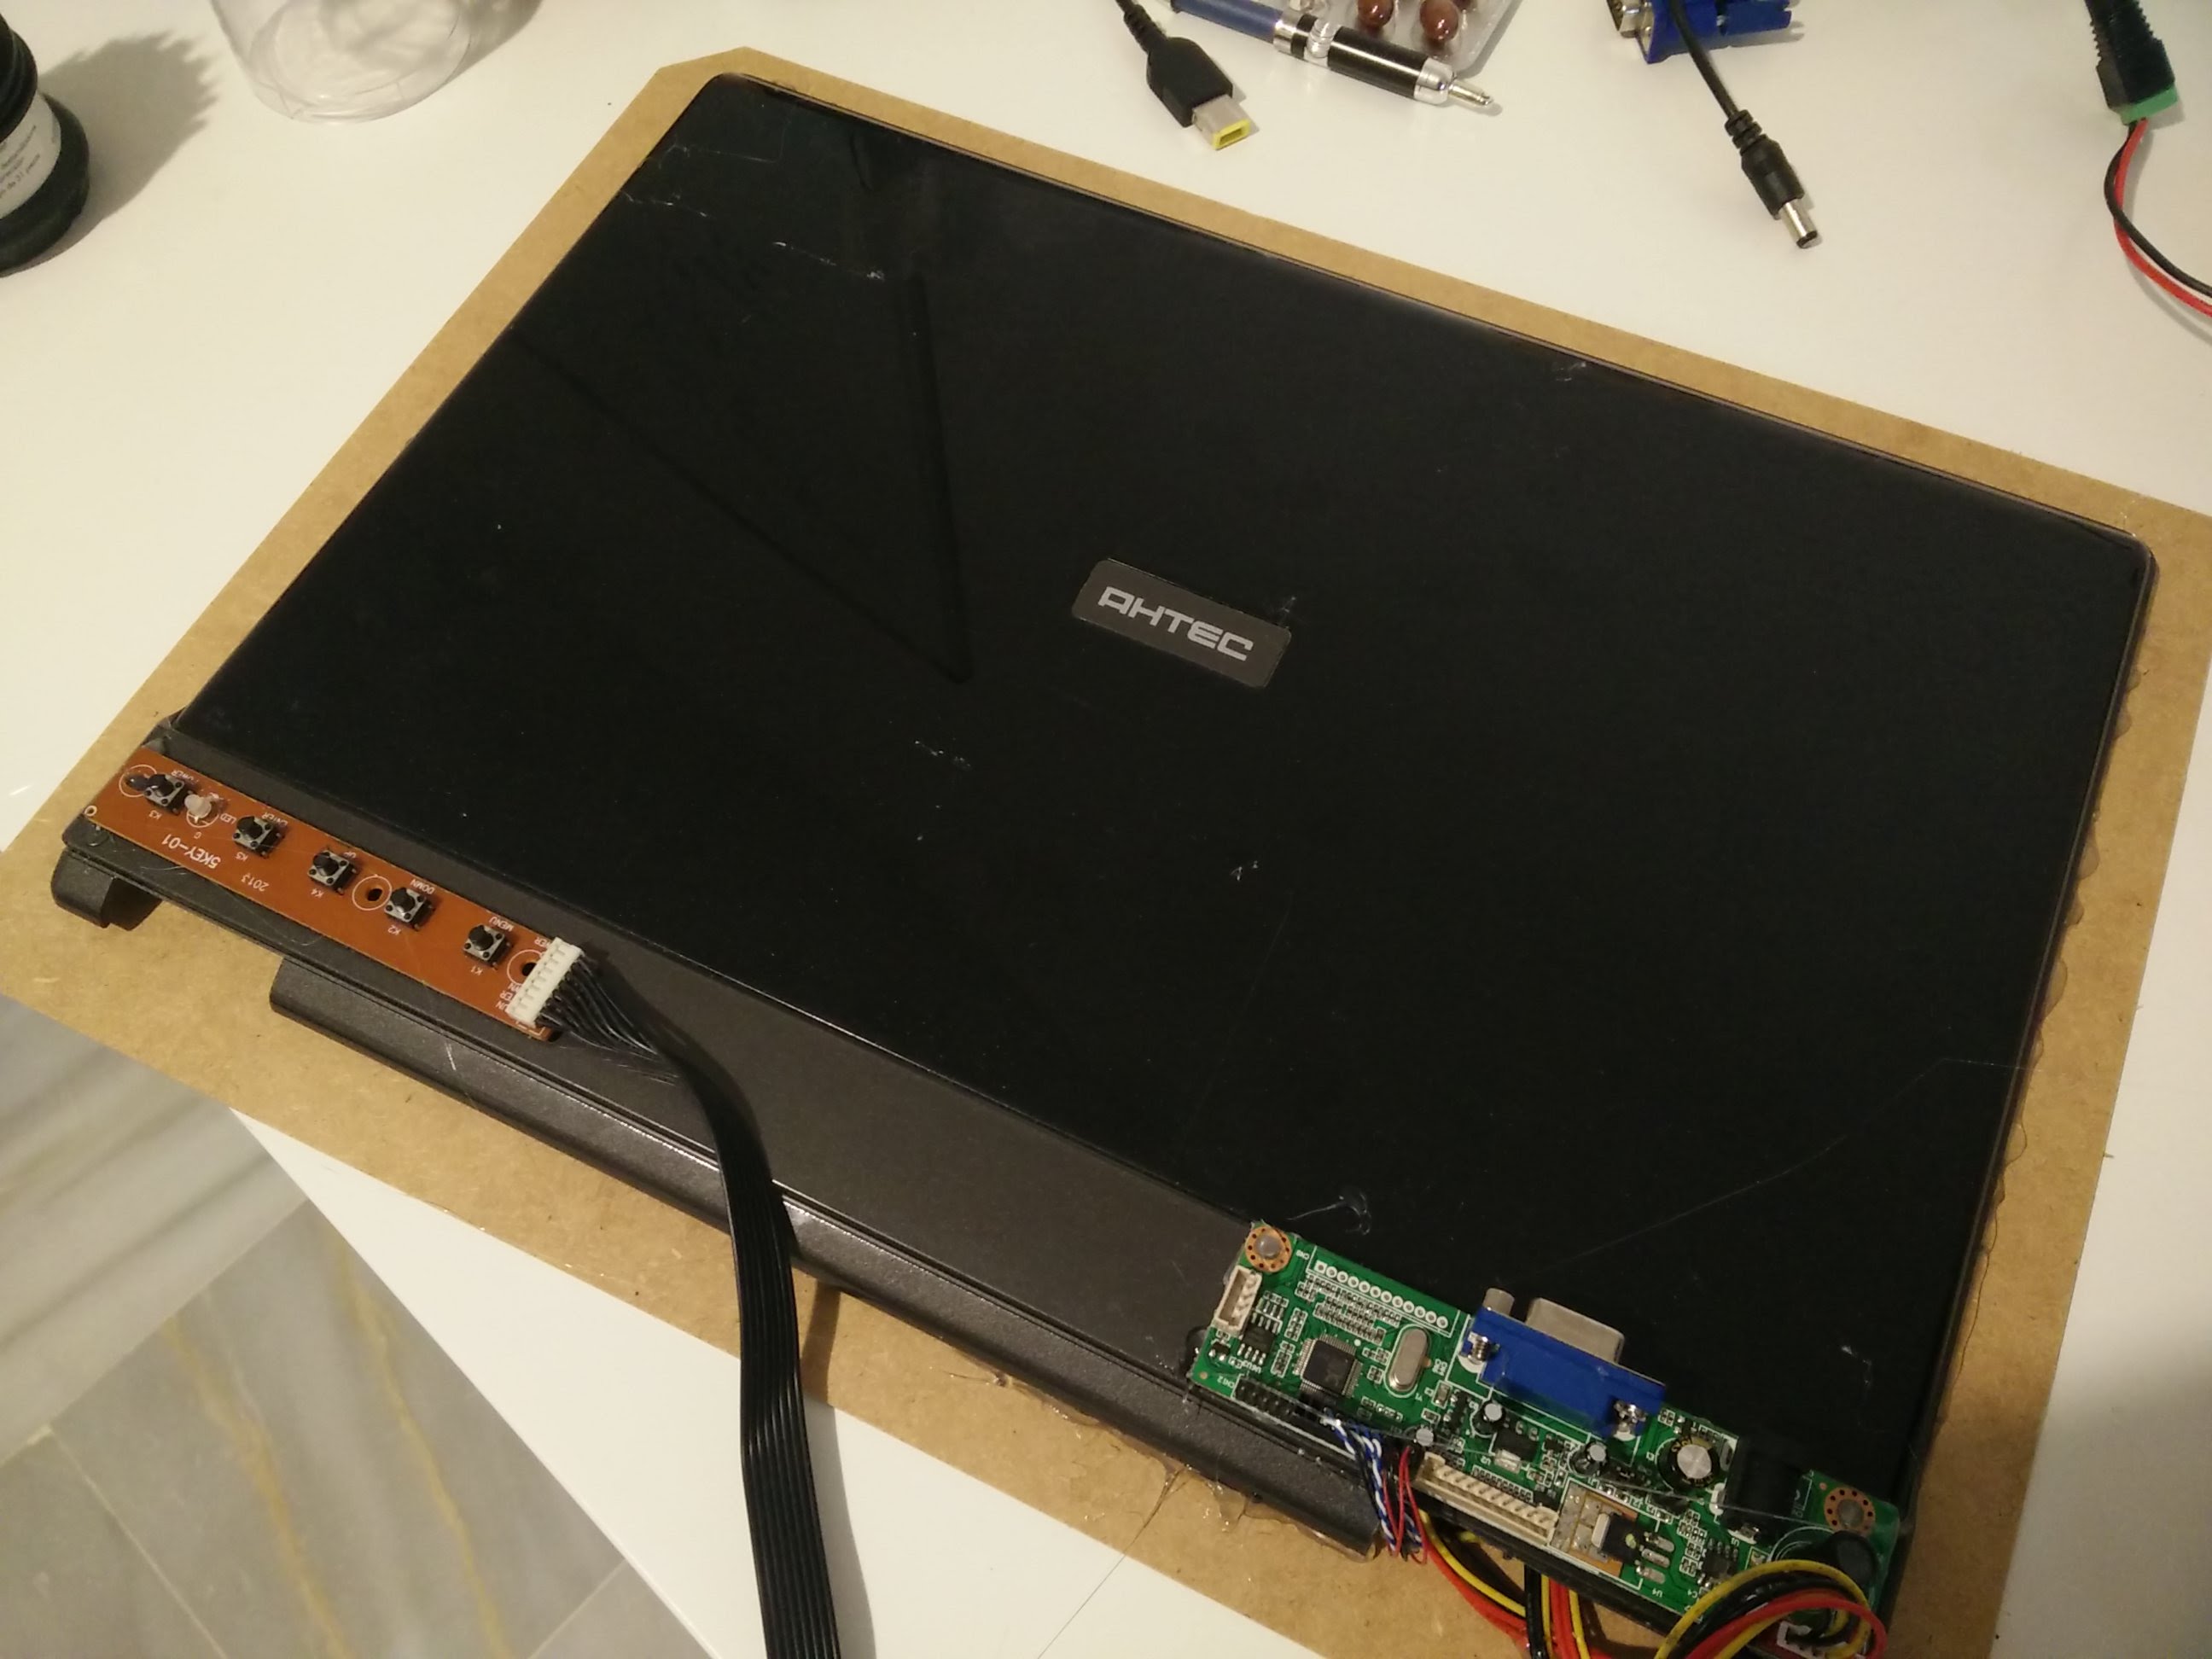
Since a few years ago, I had an ultra thin LCD screen from an old broken laptop. After finding and using a controller board, I’ve been able to use it as extra screen for my desktop computer sugin a VGA connection.
Controller boards are specific to the LCD screen, you need to use an specific model for the serial number of your screen, you can find it on the back. Then it’s a matter of searching ebay/aliexpress for a controller board listing compatibility with your screen model.
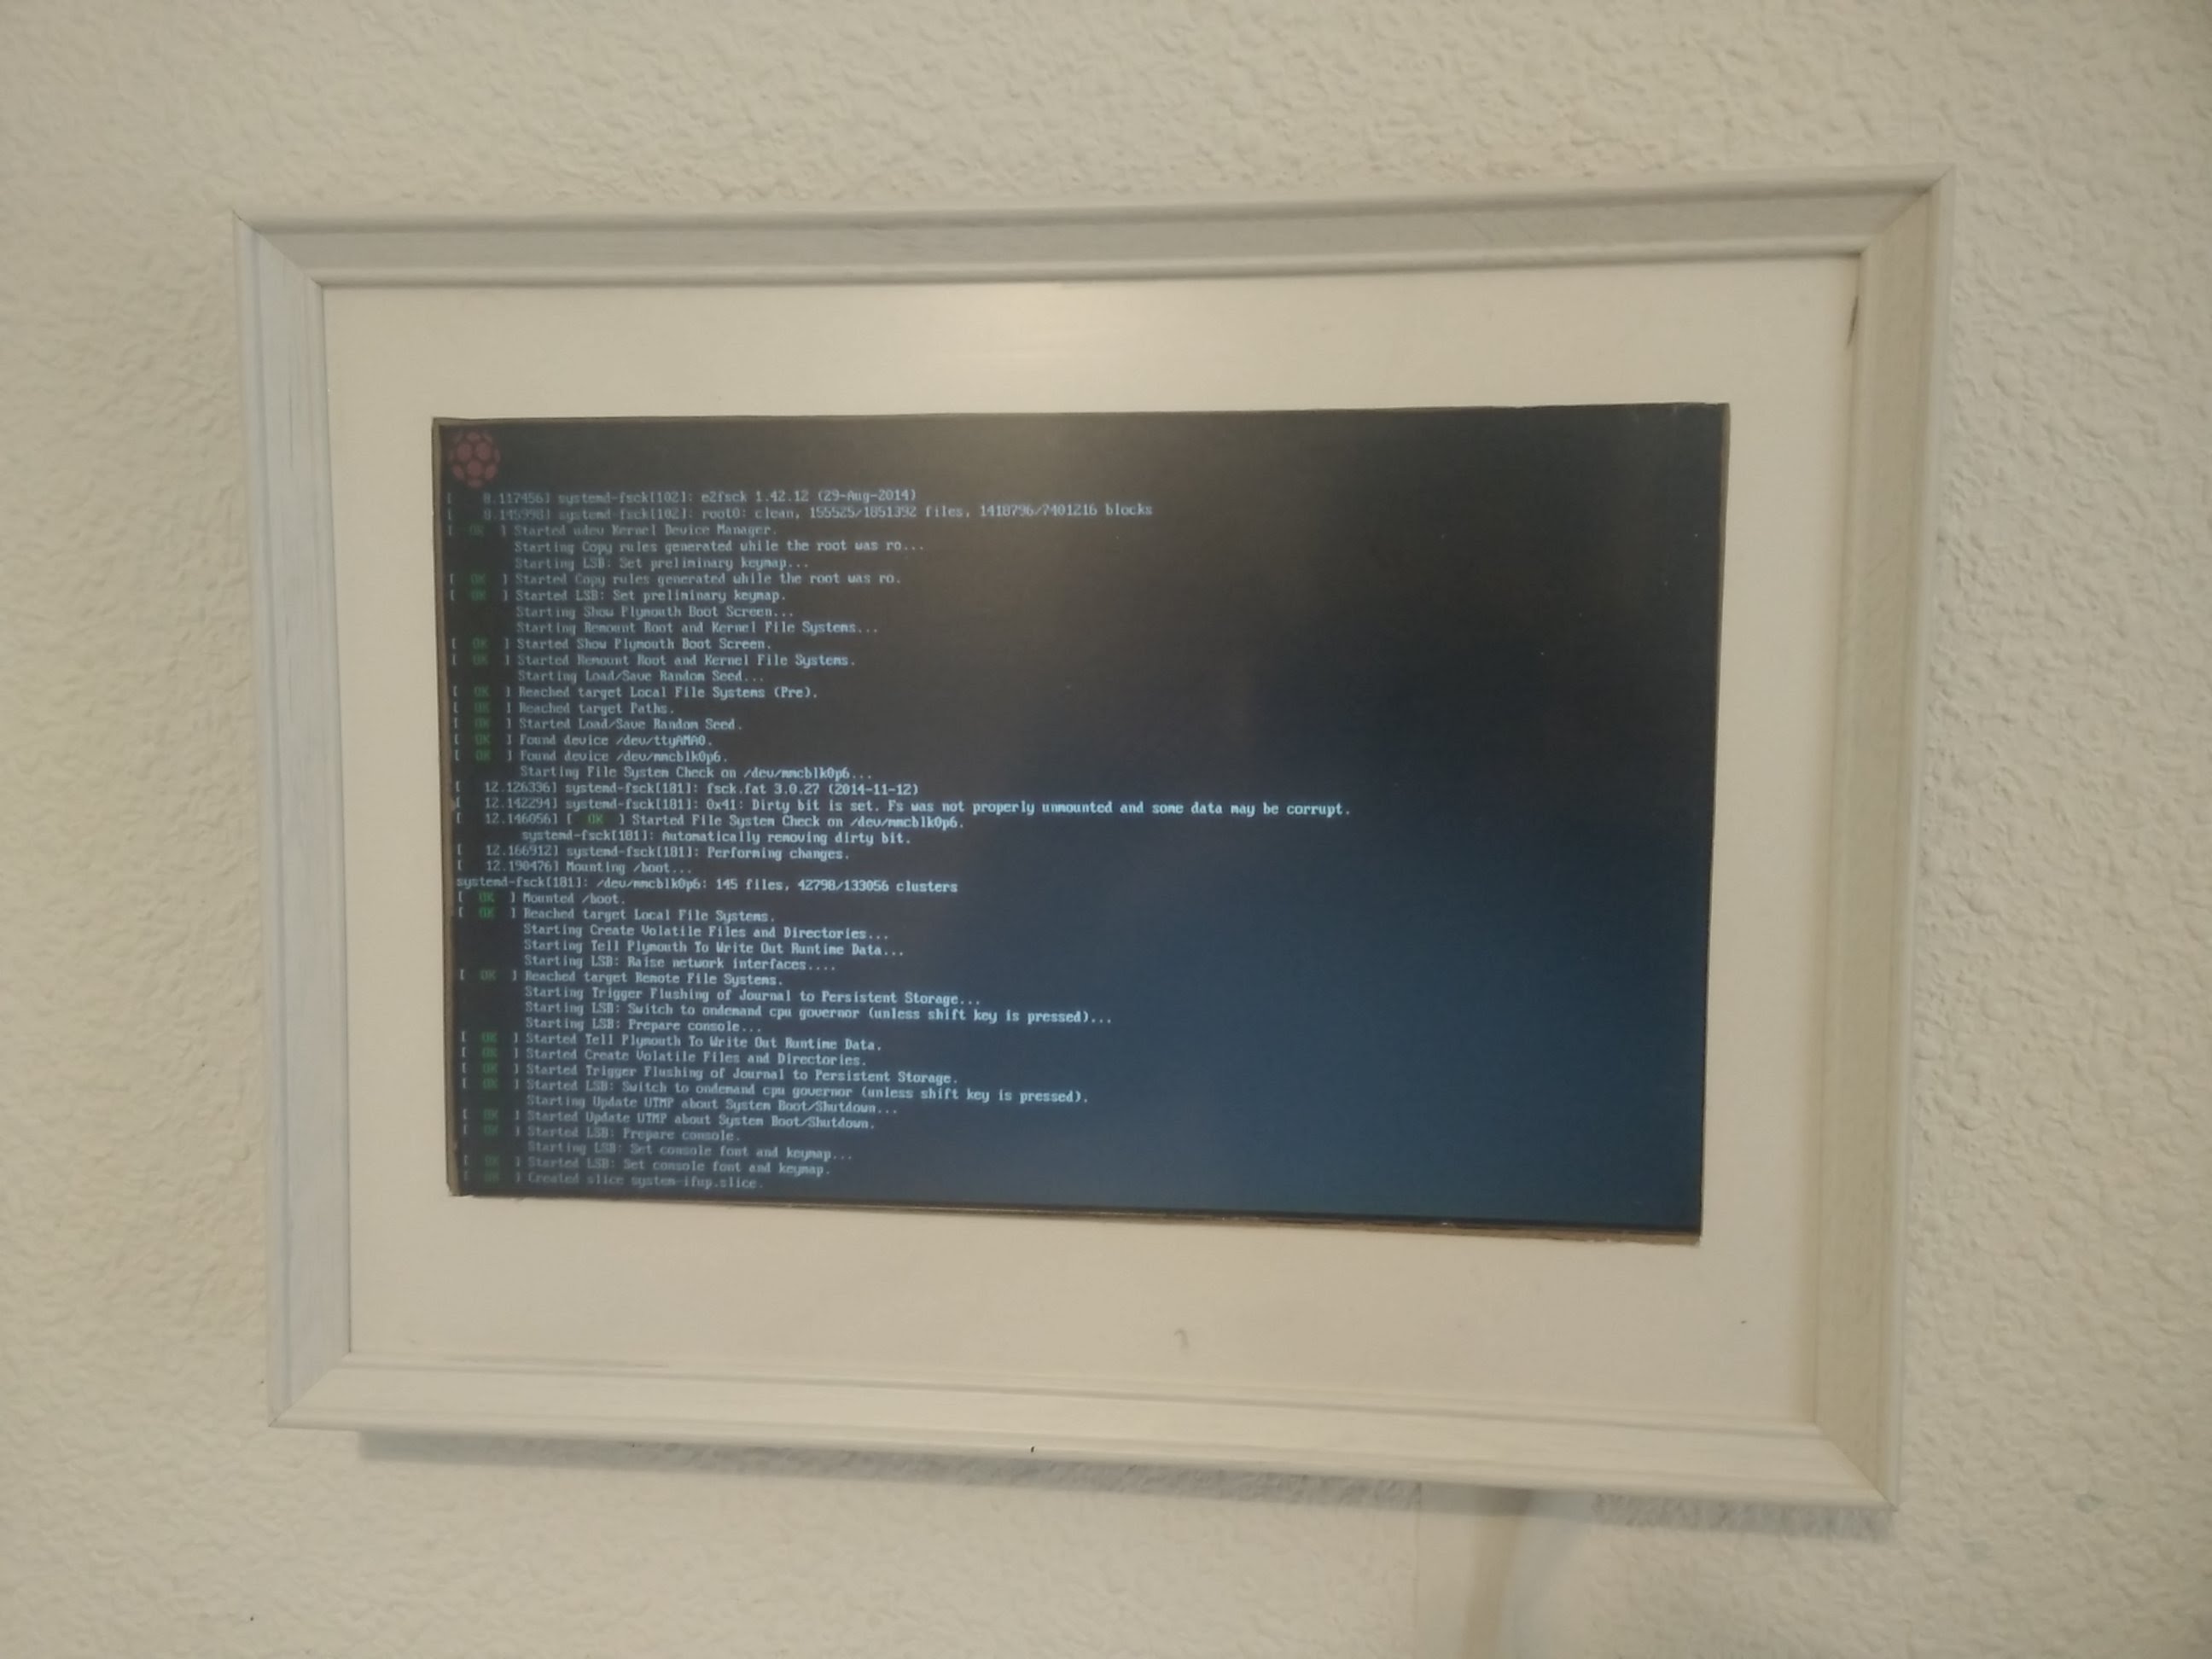
So I decided to recycle this screen now to create the canvas, because it’s thin and lightweight.
I removed the front case, but left the back side to protect the screen, isolate the components and glue the cables and raspberry pi to it.
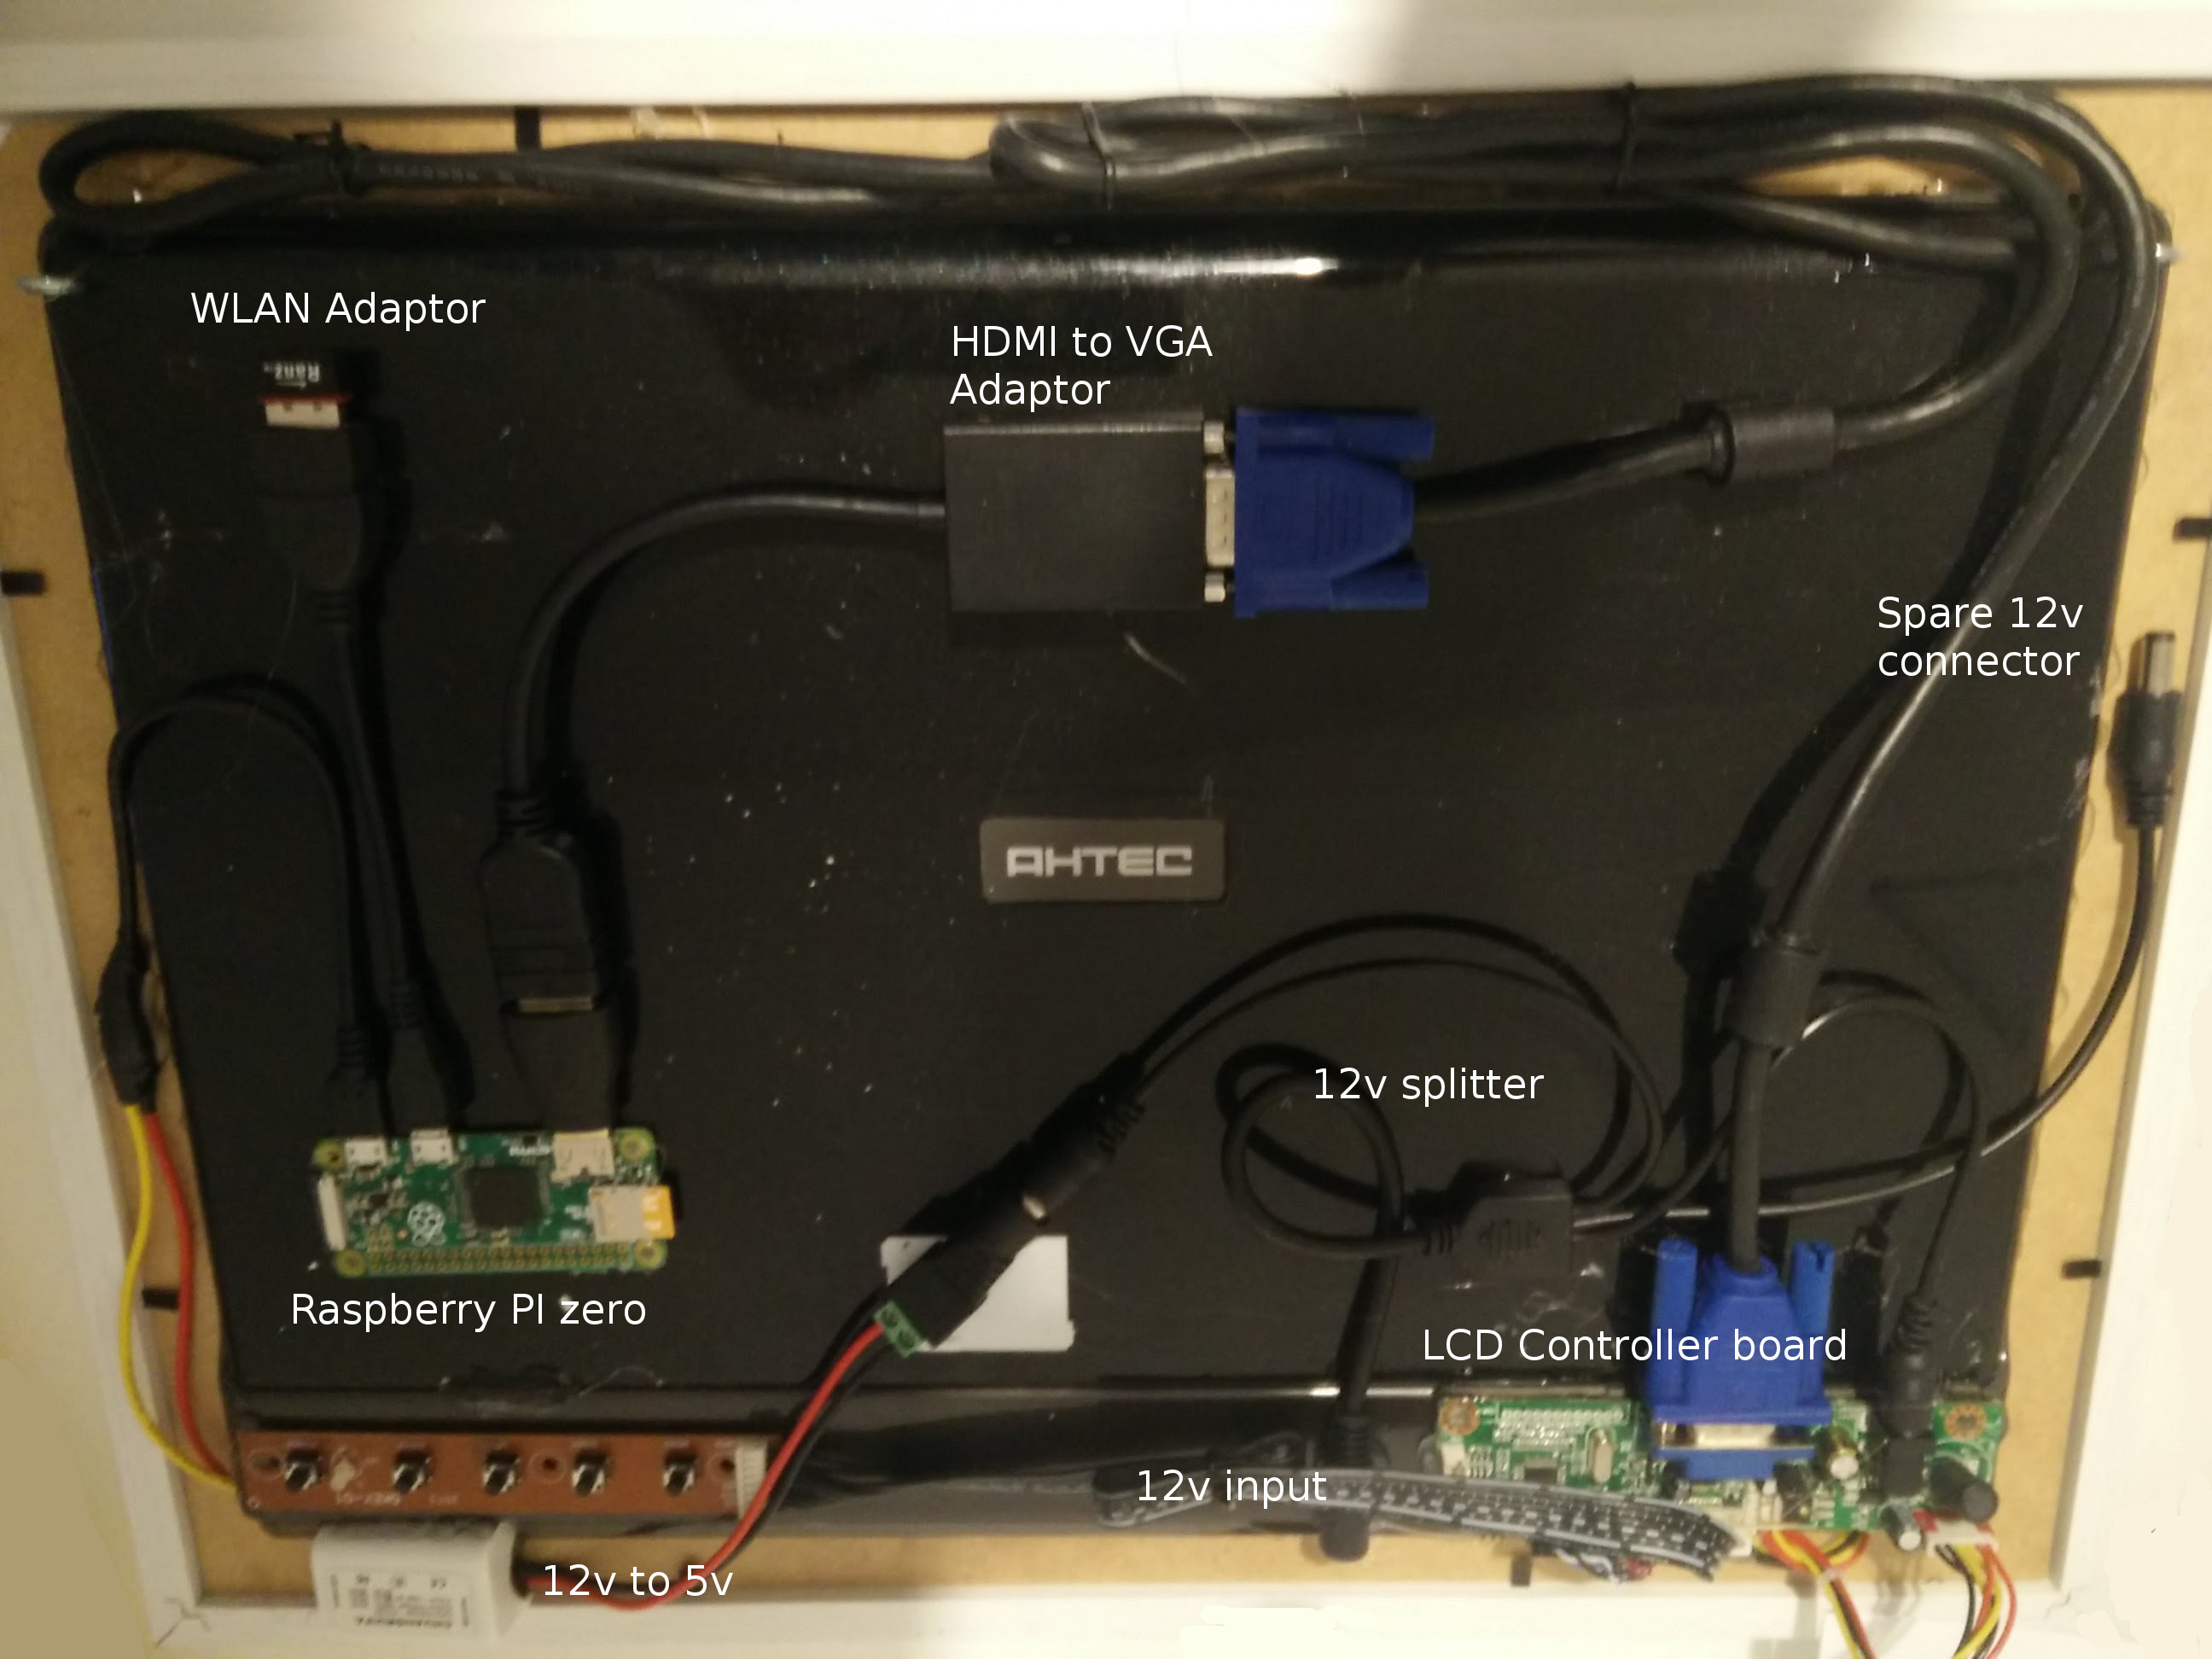
The Raspberry PI zero, glued to the back of the screen, is powered by the same power adaptor that powers the LCD screen, using a 12v to 5v conversor. So we don’t need another extra cable connected into the screen. This is how it looks from the back.
Wall mounting
After everything has been assembled together, and tested, we’re ready to hang it into the wall. For this I’ve just added two L shape hooks into the wall, and another two round hooks screwed into the plastic back of the screen.
After hanging it to the wall, I connected the 12v cable, and try to hide it using white tape.
Automatically schedule screen
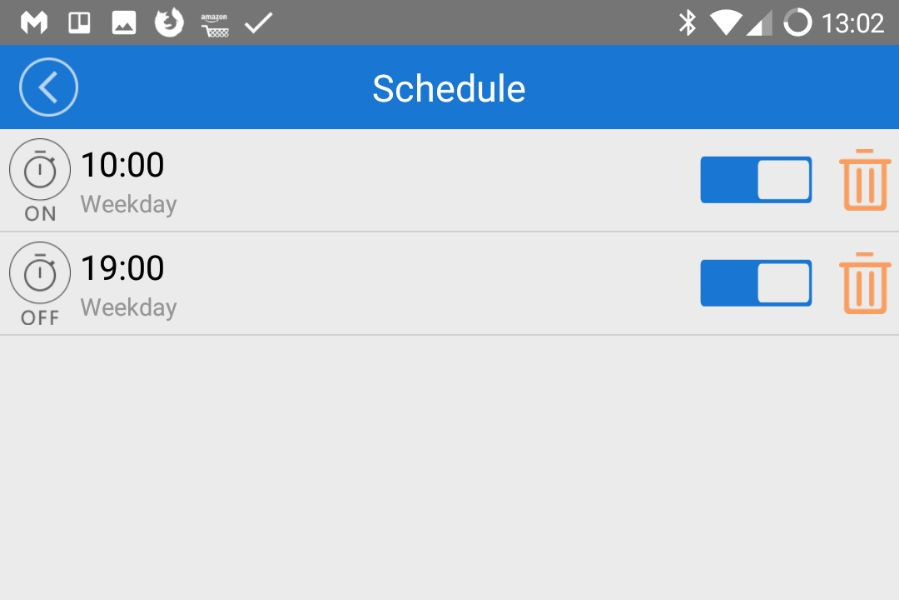
I’d like to schedule the frame, so it runs from 10AM to 7PM on weekdays, my working hours, so I can see London while I work remotely.
My first approach was to add some scripts on the Raspberry PI (cronjobs) to automatically switch ON/OFF the video output using tvservice --off or xset dpms force off however it didn’t work pretty well in my case, because my LCD controller was not going into standby after turning off the HDMI signal.
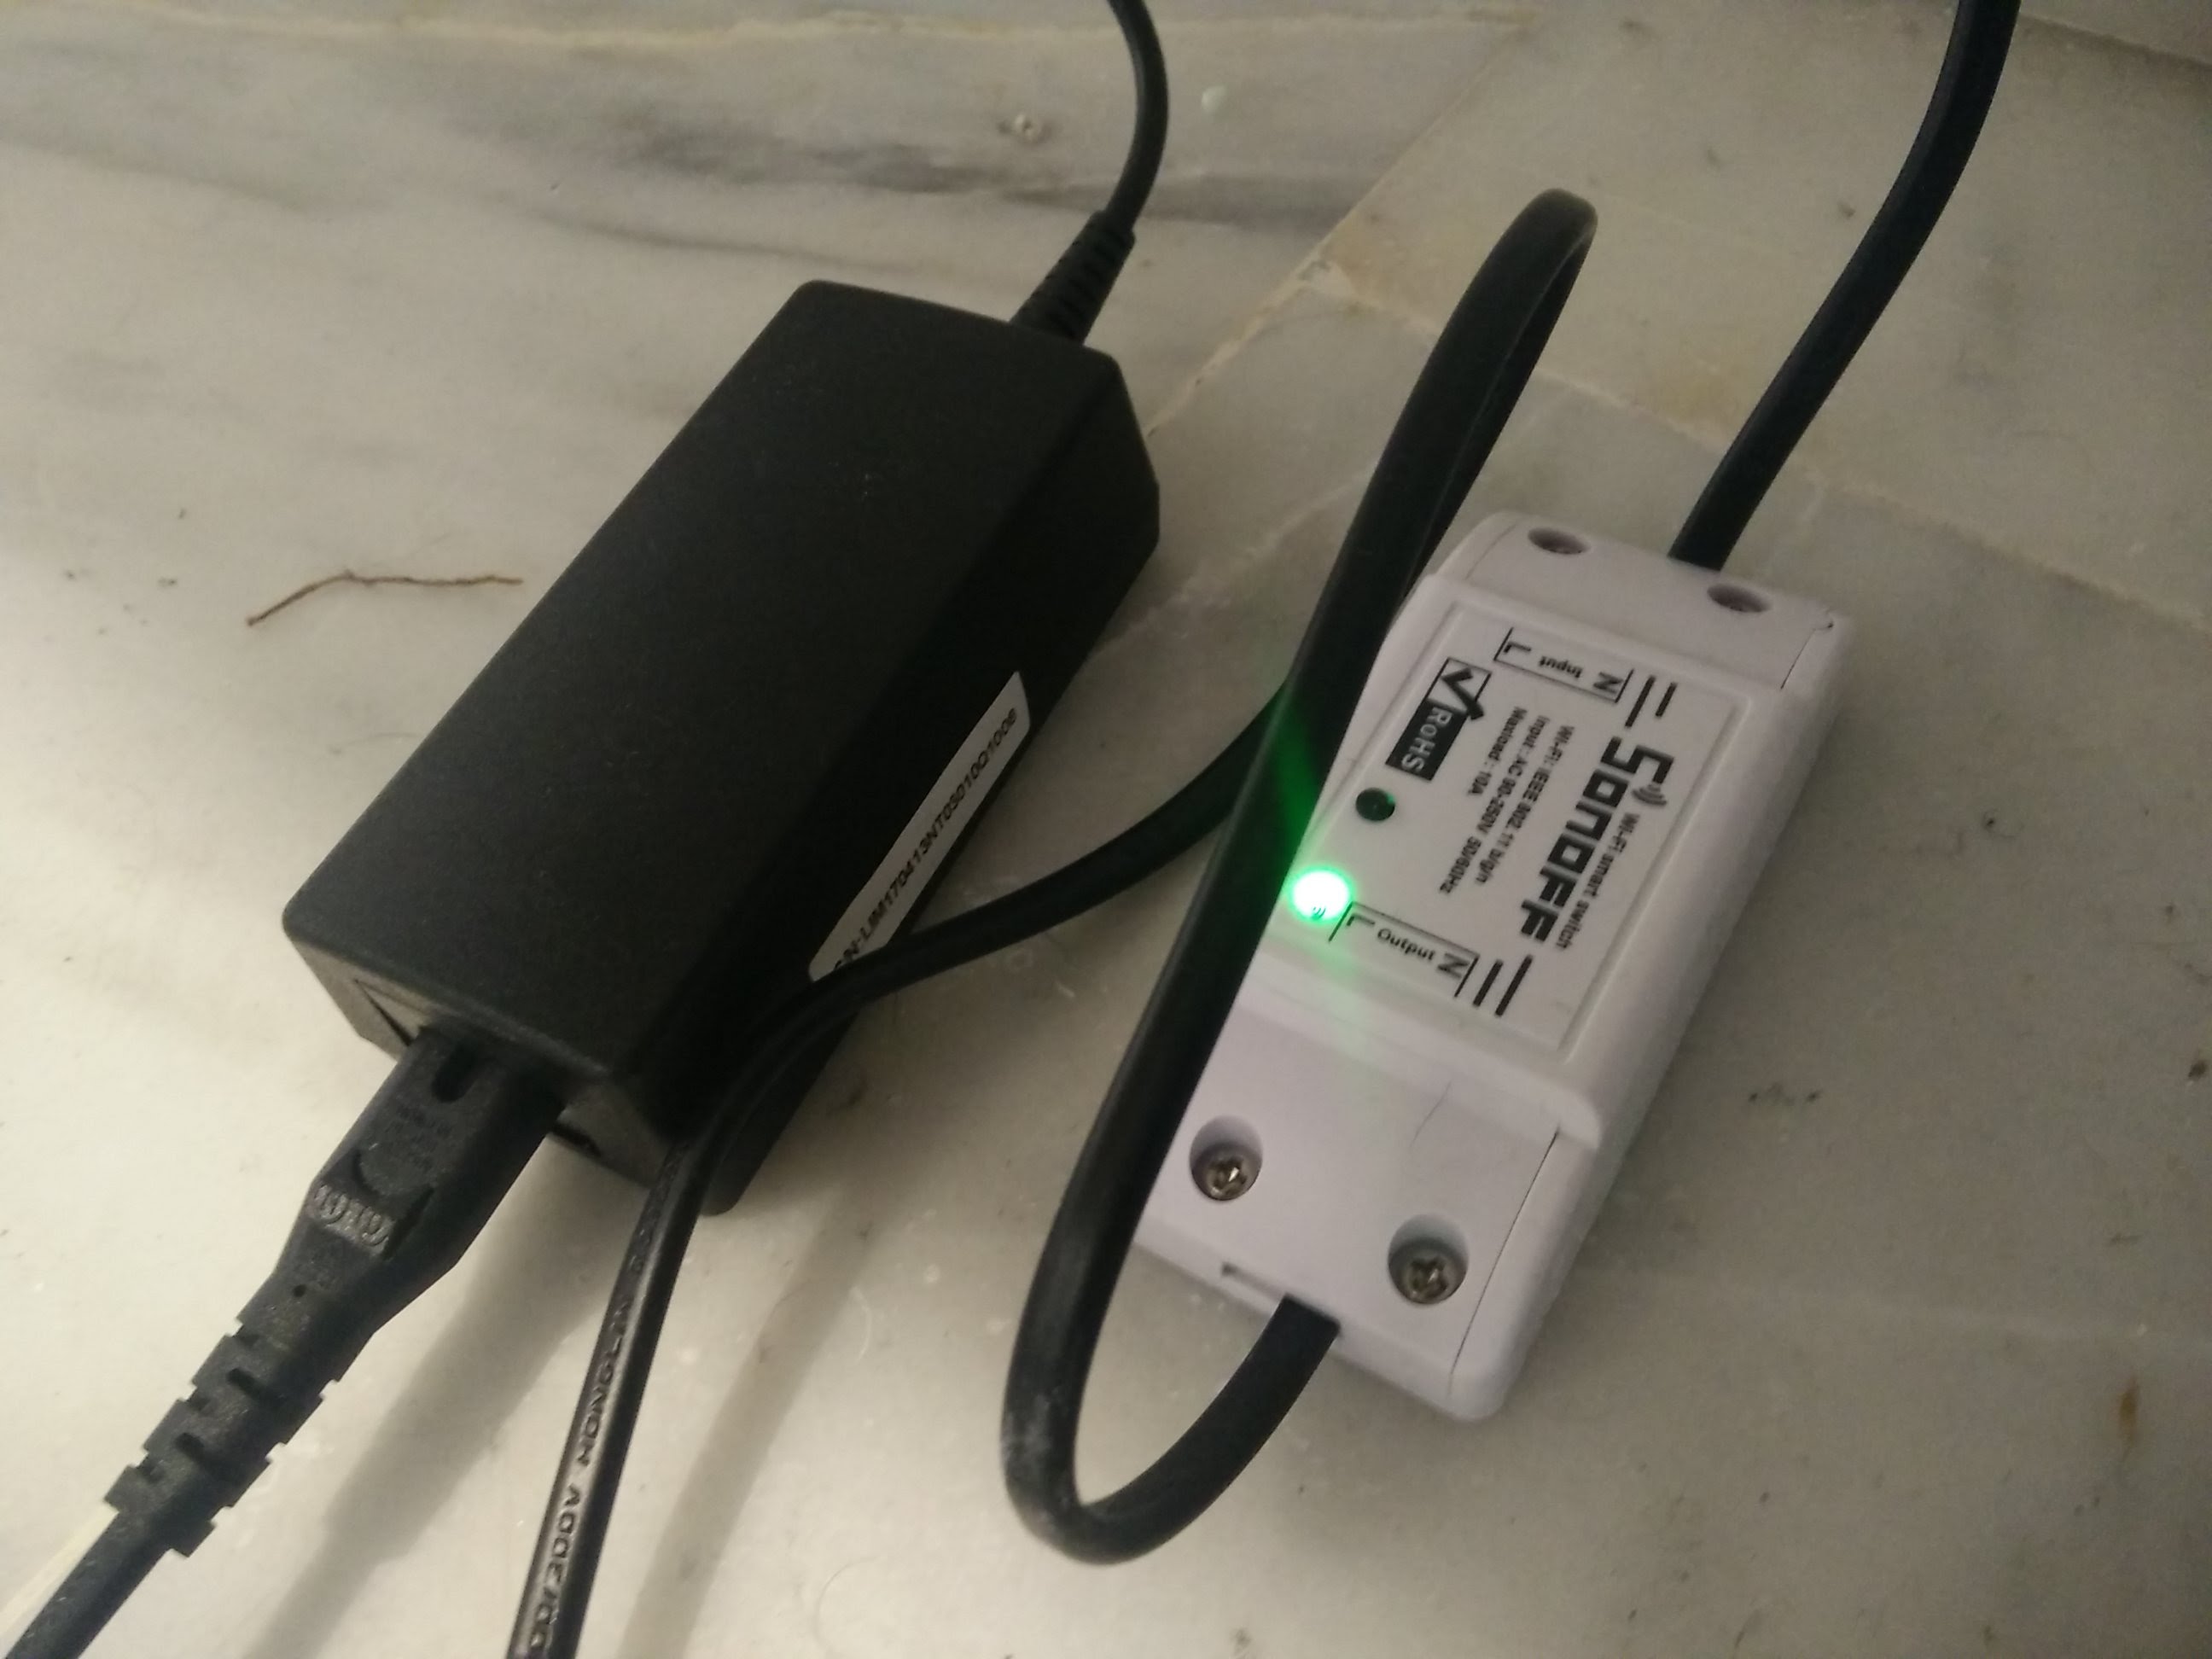
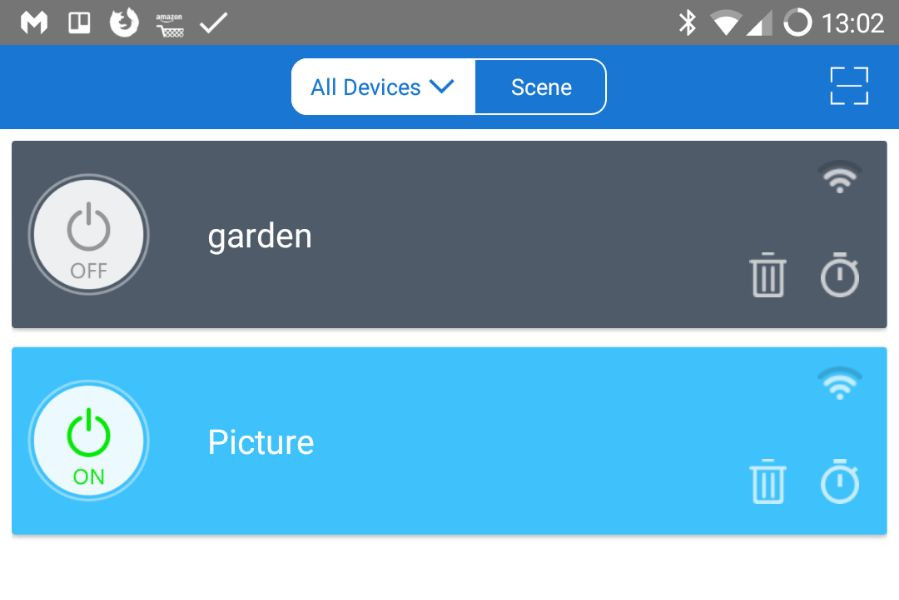
So I decided to use a cheap wireless smart switch I’ve been using for a while, which can be scheduled and controlled by the phone, called Sonoff. You could be using an Energenie, Xiaomi or something similar if you like.
This device needs to be connected in between your power cable, then you can configure it via the phone app.
Then you can add the schedule so the Sonoff, and the Raspberry PI and the screen will be turned ON and OFF automatically.
Software
Because I have now a Raspberry PI powered LCD screen hanging in the wall, I can pretty much display whatever I want. Like for example:
Web page using chrome chromium-browser --kiosk $url
Video using omxplayer omxplayer video.mp4
Use Kodi to display videos or other plugins.
Youtube, twitch live video using the Livestreamer
etc.
Display live video using livestreamer
For this project, I chose to display the London Tower Bridge from a live stream in youtube.
This can be easily achieved using livestreamer open source app, which allow us to display any live content from Youtube, twitch, livestream, dailymotion, etc… into a local video player, without using a web browser.
This is the command I’m using to display a Youtube link using omxplayer on fullscreen.
$youtube_url is a variable with the url of the livestream on youtube
720 is to select the resolution of the video, you can also use best or worst.
-n or --fifo Make the player read the stream through a named pipe instead of the stdin pipe
-p player to use
--no-osd hide the UI from omxplayer
--win display video on full screen (my screen resolution) on omxplayer
Omxplayer is the best open source video player on Raspberry PI, you could try using VLC, but it will not work or display anything because of the lack of native hardware acceleration on Raspberry PI.
Script to display on startup
I wanted to automatically run the video on startup, without any manual interaction.
There are a few ways to do it, but the best I found is using the autostart script located in /home/pi/.config/lxsession/LXDE-pi/autostart. On this script, you need to add @ before every command.
If you want to keep the display ON, you’ll need to add these lines to prevent the screen going OFF after a few minutes.
123
@xset s off
@xset -dpms
@xset s noblank
Then you can add the command from before to start the livestream on startup. This is all you need to add into the /home/pi/.config/lxsession/LXDE-pi/autostart script:
1234
@xset s off
@xset -dpms
@xset s noblank
@livestreamer https://youtu.be/SMOb9d9s_mI 720p -n -p "omxplayer --no-osd --win '0 0 1280 800' "
Conclussions and improvements
This was an easy and cheap project to build, if you have an old screen, or you get a cheap one. The picture frame looks very nice hanging on the wall, and thanks to youtube and livestreamer, we can display any video very easily.
It took me some time to find the best streaming combination on Raspberry PI Zero. I tried using chromium-browser --kiosk but after sometime the browser was crashing; I tried using VLC to display M3U8 streaming video, but VLC was not efficient enough. Some links did not play on omxplayer, so at the end, I decided to use livestreamer, which works pretty well, and you can use it with other sources too.
I’d like to have a better LCD screen, maybe LED, with a direct HDMI connection and better viewing angle.
You could use the spare 12v connector to add a LED strip on the back of the frame, if you want to have some extra light effect.
Let me know what you think about this project, and if you’ve built your own.
]]><![CDATA[Websocket vs REST]]>2017-11-20T14:14:46+00:00https://coconauts.net/blog/2017/11/20/websocket-vs-restWe, as web backend software developers, have enoguh experience with RESTful APIs for web services, because they are clear, easy to implement, and scalable.
However, websockets are since some time ago becoming a viable alternative
for communicating between a web browser and a server. But what are good
usecases for them? Can the replace REST completely?
In this post we’ll take a look at both architectures from their definitions to their implementations, and we will see which one is the best for building the future of web apps.
What is a REST API ?
A REST API (Representational state transfer, application programming interface) is a simple set of rules for making communication on web applications over the Internet, and probably the most popular at the moment; in contrast with other approaches, like the older WSDL or SOAP or the more recent Protocol Buffers.
REST leans on the HTTP protocol a uses many of it’s inherent features as part of the API structure.
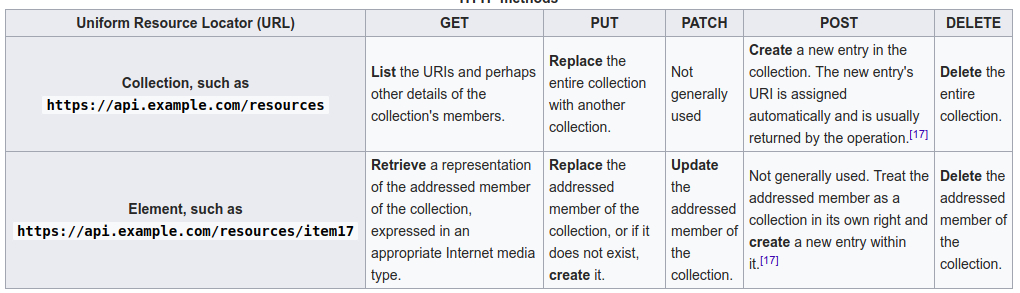
URL structure
It defines the URL structure based on “resources” like /resource/ or /resource/id. For example, if we provide users on our web interface, we might get a list of users if we hit /user endpoint, or retrieve an specific user by asking for his id /user/1234. This is in contrast to other approaches like SOAP which use a single endpoint for everything.
HTTP methods
The method defines the action to do on the URL previously mentioned, such as GET, POST, PUT or DELETE. For example, to get the information for the users, do you GET /user, this method doesn’t have any other side effect. However, if you want to introduce a new user for your app, you will do POST /user, etc.
Request and response
For every request in HTTP, we always get back a response, even if the connection is unsuccessful, so you know which response is associated with the request you make. Another important part of the response is their response codes like 200 for OK or 404 error for Not found.
Although you can use XML or HTML on REST, the most common format is JSON for both the request and the response. Following our example from earlier, to add a user with some specific data, you might want to do POST /user { "name": 'Javier" } and you will get back a response in the same format {id: 1234, "name": "Javier"} after it gets insterted into database with it’s own unique ID.
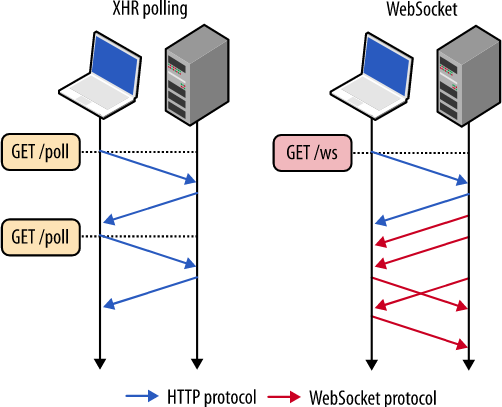
The communication is always initialized from the client to the server, which will respond based on the request made. If you want to constantly fetch information (eg: get tweets on your timeline) you can use a technique called polling which consist in constantly make requests (like every 5 seconds or 1 minute) to get the updated data.
Some solutions exist to overcome this, for example webhooks, in which you try to prevent polling by storing a callback url to call after an operation is complete (for example: github webhooks pinging your CI system).
What is a Websocket ?
WebSocket is a computer communications protocol, providing full-duplex communication channels over a single TCP connection. […] The WebSocket protocol enables interaction between a browser and a web server with lower overheads, facilitating real-time data transfer from and to the server. Wikipedia
If you’re familiar with classic unix sockets, it’s basically the same concept, translated to the web world.
Unlike REST, the communication is bidirectional, which means the server can send information to the client directly, as soon as the client creates the connection (called handshake). For example, a client could query for a feed on tweets, and leave an open channel with the server. The server would then feed the client with new data as soon as it’s available.
This offers some functionality that REST is unable to provide in an easy way.
Because of this, the communication needs to be asynchronous, which needs to be taken into consideration when handling the responses.
Differences between Websockets and REST
The first difference, is that they can’t be compared directly: Websocket is a protocol, while REST is an architectural style. So in terms of comparing them, it would be fairer to compare WS to HTTP in general rather than REST (which which it shares many points regardless)
For the communication, you have resource based URLs and HTTP methods in REST, and for each request, you get a response. On websockets you just send plain string messages with the data you want to the server, and it will translate and process the data, and optionally one or many replies back.
Websocket communication is a lot more efficient in terms of message size and speed than HTTP protocol, specially for large, repetitive messages. On HTTP you have to send the headers on every request (minimum of 2 bytes per message after initial request on websockets vs 8KB per request on HTTP) Full benchmark
Let’s see an example of an HTTP request vs a websocket request. When using client libraries, they become quite similar for a simple use case.
Authenticating an user on REST
Fetch your user using a POST message with user and password (using Request )
12345678
var myRequest = new Request('/user', {
    method: 'POST',
    body: '{"name": "myname", "password": "mypassword"}'
});
fetch(myRequest).then(function(response) {
    if(response.status == 200) myUser = response.json();
    else throw new Error('Something went wrong on api server!');
})
The method .emit sends a JSON from the client to the server. The werver will then reply to that message that will be processed in the client on the .on method.
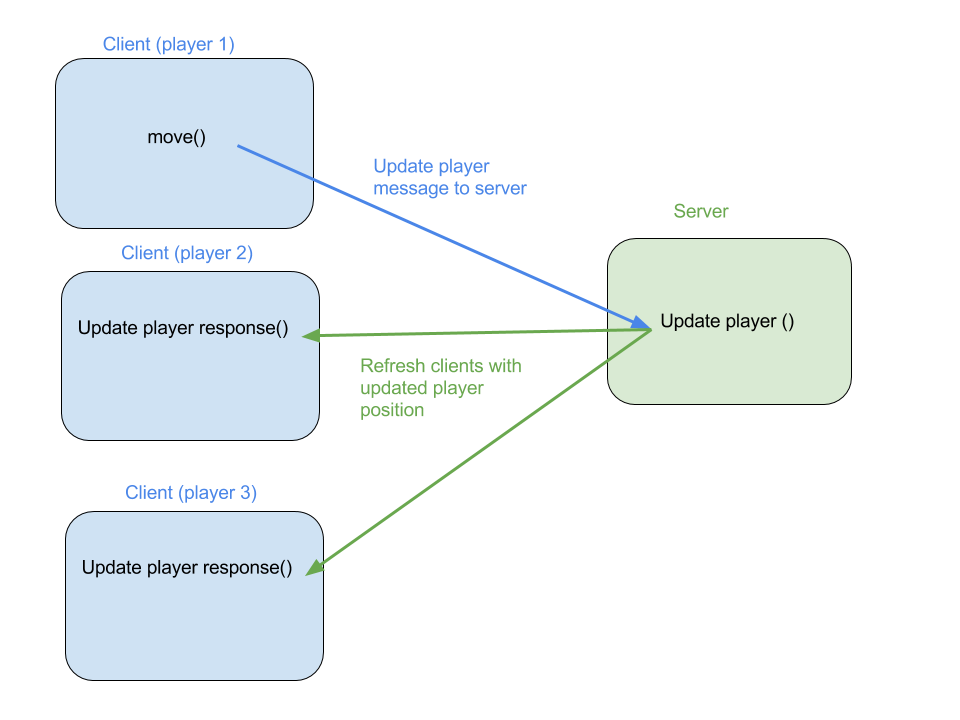
A real world example: Updating game player data
If we are building a multiplayer real time game, we will want to update the position of every player on everyone’s game, which means one player (client) will have to send the new position to the server, and every client will have to update this player’s position on their own game instance.
This request won’t be optimal using REST, specially on a fast paced real time game. The only option is to use the polling technique previously mentioned to fetch the status / position of all the players (or maybe filter by those recently updated) and make changes on them in the game.
But websockets are particularly good on this kind of requests, as the server gets A notification from a client when it changes, the server can then send that status change back to the rest of the clients really fast.
123456789101112131415
// Client side player 1, on move send new position to the server
function move(position){
    socket.emit("update player", { "position": position }
}
// Client side other players, update other players
socket.on("update player response", function(player) {
    otherPlayer.position = player.position;
})

//Server side, update player and broadcast
socket.on('update player', function (data) {
    //console.log("update player ", data);
    players[socket.id].position = data;
    socket.broadcast.emit('update player', players[socket.id]);
});
Also, the .on methods only get triggered when a message is sent from the server, so with no changes, no communication will be performed between client and server.
A full Websocket API can replace a REST api, however it can’t happen the other way around, as websockets offer realtime data stream that can’t be implemented on REST (efficiently).
The asynchronous and undeterministic character of websockets, can lead to race conditions, when you make multiple requests. On the other hand, for every request in REST, you always get a single response.
The Internet at the moment is built on top of HTTP, like for example DNS, load balancing, security or even SEO analytics are not fully compatible with Websockets (yet).
Another big difference is that while Websockets are stateful protocols, which means they create a connection that needs to live in the server until the socket is closed. HTTP connections are stateless, so they could be hitting different servers everytime and still work, which make them easier to scale horizontally.
Implementing a full Websocket API means reinventing similar standards already implemented on REST but with a different protocol, which might not be ideal.
So I’d still recommend to use REST for non real time data, because REST is the most popular architecture at the moment with loads of frameworks and tools, and it doesn’t look like is going to change. But at least, it’s fun to play with alternatives and most importantly, always pick the best tool for the job.
What do you think ? Have you ever tried to make a Websocket API instead of using REST ? let us know in the comments.
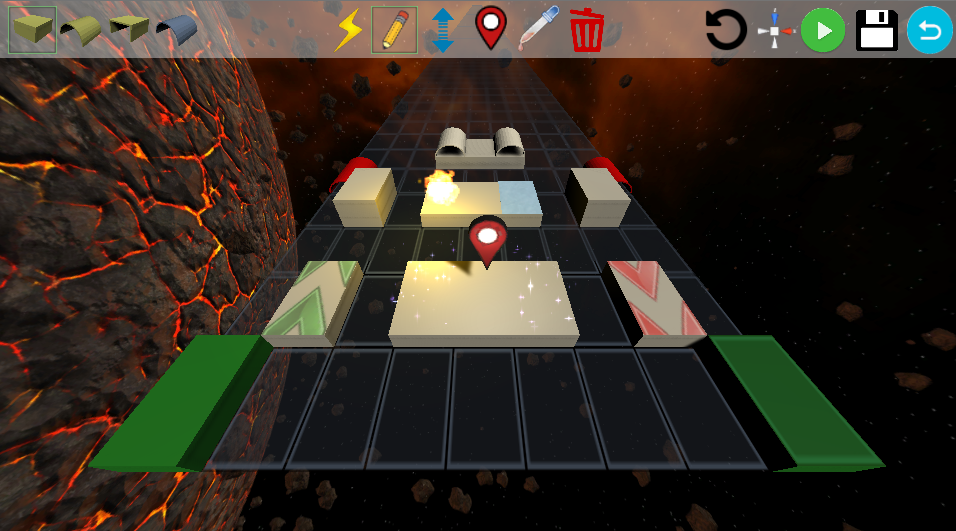
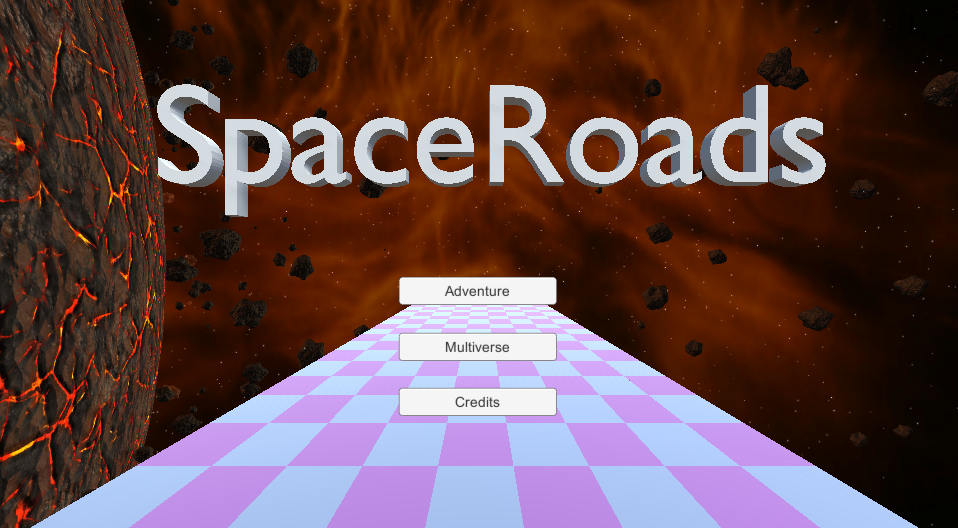
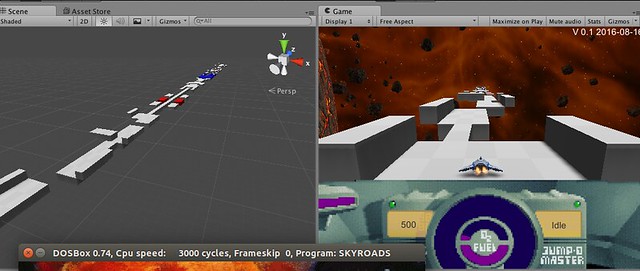
]]><![CDATA[Spaceroads Demo]]>2017-11-06T14:14:46+00:00https://coconauts.net/blog/2017/11/06/spaceroads-demoWe announced a few months ago we were working on a remake of Skyroads, a 1993 arcade game, on Unity3D. We called it Spaceroads.
Today we announce we have released a demo version you can play directly on your browser
Features
Three adventure levels
We built the first 3 level of the original Skyroads in our editor, with the same layout, blocks and feels (the color might be different).
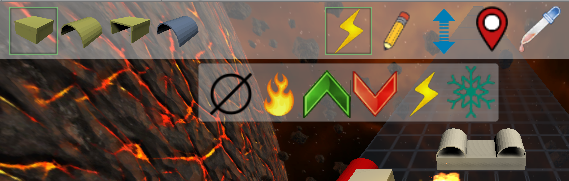
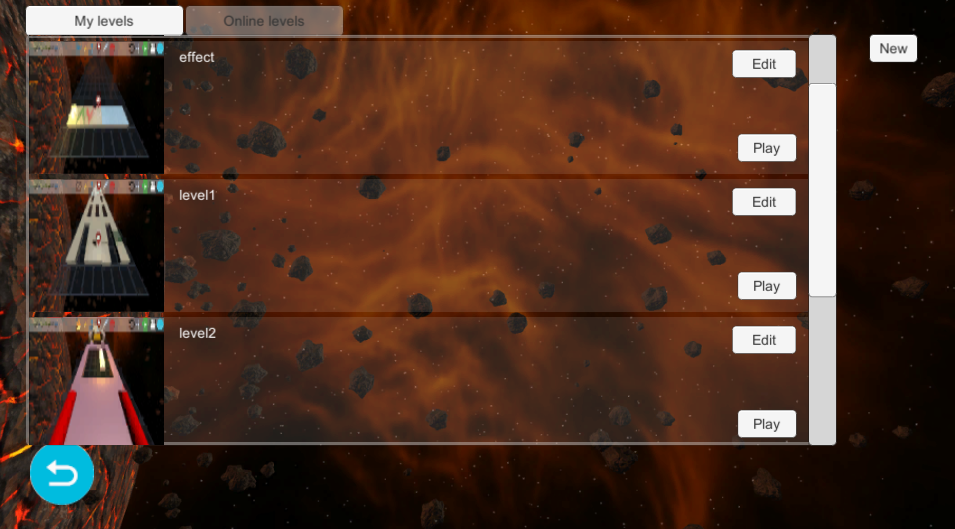
Level editor
We built a fully featured 3D editor for the game. You can add different block types, change start point, undo, preview levels or publish them online.
It has everything you need to build levels like in the original skyroads.
You can even add effects (burning floor, recharge, speed up/down, etc)
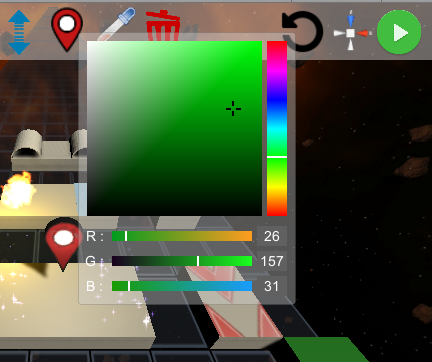
Or color to the blocks
Note: Saving levels or publishing online is built
but not supported on the demo version
Multiverse
Multiverse is not available on the demo, but this feature will allow players to list their built levels, and levels available online.
This version
is not complete and it can be a bit buggy, but we want you to test it and give us feedback before we continue with its development. So let us know what you think in the comments.
]]><![CDATA[Procedurally Generated Engine With Websockets]]>2017-10-30T12:23:46+00:00https://coconauts.net/blog/2017/10/30/proc-websocketsWe have been working for some time on an engine for cocos2d for
persistent procedurally generated 2D worlds, for building a few ideas based on this concept, like a Zelda-like RPG multiplayer game.
The engine is built in NodeJS, and the server-client communication is fully implemented with websockets (using Socket.io), cocos2d in the frontend and built together with docker.
Engine features
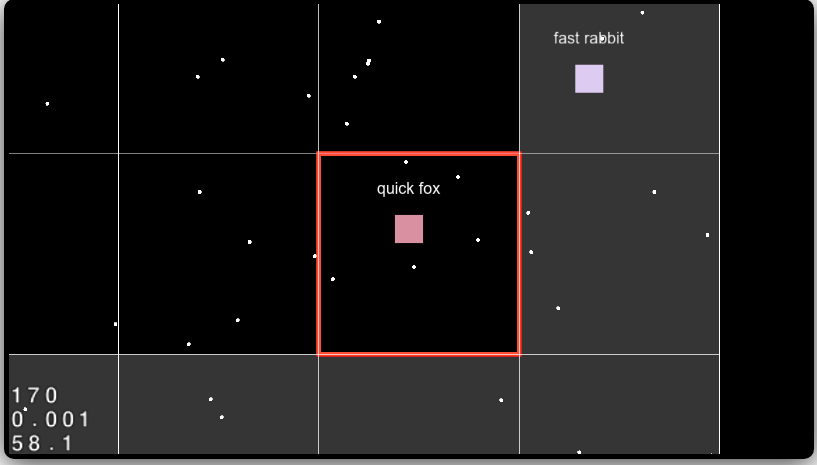
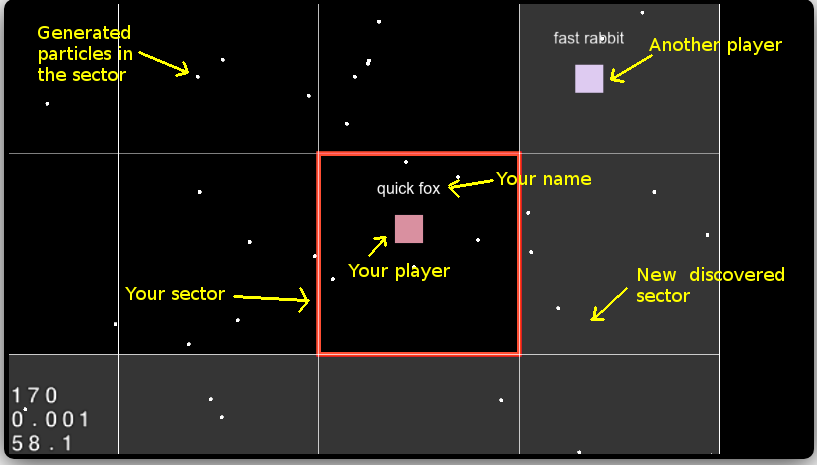
The client will only render the sectors around you, not the whole world.
When the player discovers a new sector, the server will populate that sector (new discovered sectors apperars brighter to the user)
The currenct sector will appear as red
Supports multiplayer (you can see other players next to you)
Random name generator for players
Move the player using the keyboard, the camera will follow.
Try it out (docker)
If you want to use it for your own game, You can find the code on the repo https://github.com/rephus/proc-cocos and share your creation in the comments.
so all you need to run it is to install docker and then docker-compose up.
We may use this engine eventually to build our own game, stay tuned for more details.
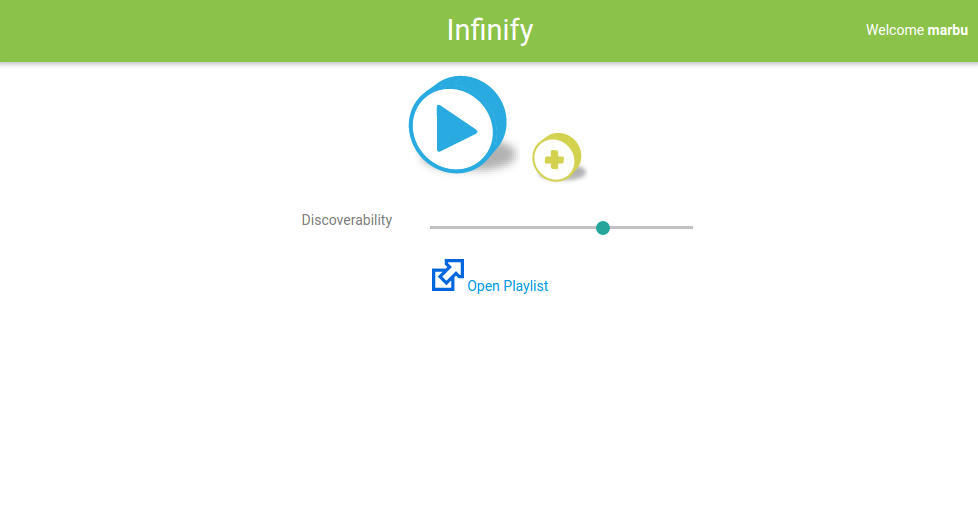
]]><![CDATA[Infinify Service]]>2017-10-16T14:57:46+00:00https://coconauts.net/blog/2017/10/16/infinify-serviceA few months ago, we implemented, during one of our hackdays, an infinite recommender for Spotify for private usage.
Today, we announce we’ve just published this service to the public for FREE, allowing multi-user accounts using OAUTH, so you can use Infinify without installing or configuring the service by yourself.
This service is available on infinify.coconauts.net and you just need to identify in the app using your Spotify account.
]]><![CDATA[Bank Holiday Hackday: Algorithmic Trading]]>2017-08-29T19:57:46+00:00https://coconauts.net/blog/2017/08/29/bank-holiday-hackday-algorithmic-tradingAs it is becoming tradition, we dedicated the last UK bank holiday to hacking activities.
In this occassion we wanted to something bitcoint-related, as it is lately all the rage.
We developed on the idea of an automated investing algorithm that would use an API to
buy/sell bitcoin automatically, trying to maximize earnings and minize losses.
Read on to find out our results!
The idea
Algorithmic trading is not a novel idea. In fact it seems to be quite a researched topic,
and it’s not difficult to find resources about it online. From strategies, to code
libraries, to people sharing algorithms on github.
In or case, we wanted to use it to invest on bitcoin or other cryptocurrencies.
To invest you need an exchange: a place that you let you buy and sell bitcoin
in exchange for “real money” (eg, dollars or euros). In the last years several of them
have surged and become established, most notably perhaps Coinbase
and Kraken.
And the best news – these exchanges offer a public API, that you can use in your
algorithms for automatic trading. Sweet!
Simulate first
Playing with the exchanges themselves however would require investing real money.
Also, they charge a rate for every transaction, so before recklessly toying around
we should first find a decent algorithm while testing on a simulated environment.
And so, we set ourselves to the task. We made a little python script that would
simulate the interface with the stock exchange to buy or sell. You can feed a CSV file
to the script with the historical exchange rate, so that it can replay it.
You just need to search google to quickly find some historical data for stocks.
For bitcoin data a good source is the Bitcoincharts API.
The algorithms
On top of that toy environment we set to build a couple algorithms, and set them to compete
against each other:
simple algorithm: keeps a constant amount invested in stock at all time.
If the price goes up, it extracts the profit difference with the original amount.
If the price goes down, it buys up new stock until it reaches the investment amount.
pirate algorithm: based on this algorithm that we found on github. It keeps track of
the value at which you bought or sold a bit of stock. If the price goes further down that you bought it for, it will sell it to avoid loss. If it goes up it will rebuy it.
static algorithm: buys full amount of funds and simply waits. No fuss investment!
It will basically produce profit or loss depending on the longterm evolution of the market.
random algorithm: it will randomly buy or sell a fixed amount.
These are not very sophisticated strategies, but they are a starting point. Now the next
step would be to simulate them running against the historical exchange rate data for
bitcoin, and see if they would have made us any money had we set the algorithm to run
some time ago in the past.
Results
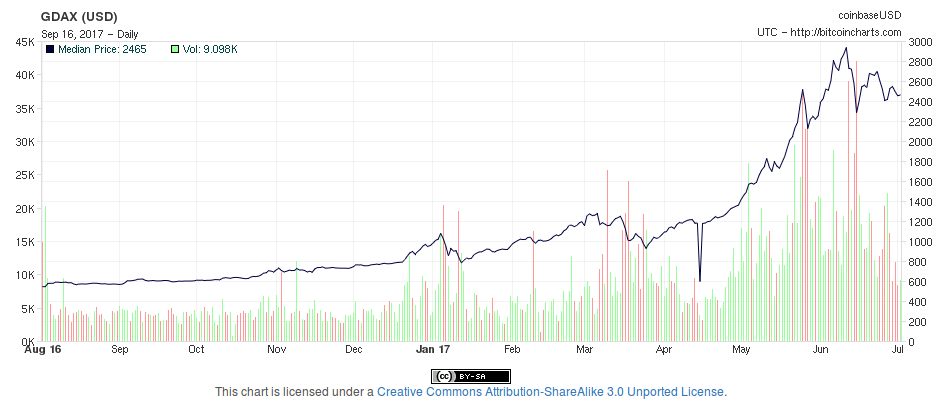
We simulated the run of these algorithms over the last year of bitcoin
historical data, over an investment amount of $1000. The resulting benefit
in USD was a follows:
static
simple
pirate
random (3-run average)
252.244923
486.14863
-999.957644
1204670.35464
Interestingly, it seems that the best strategy is by a huge margin the random
one! Our simple algorithm turned to be a slight improvement over the
static “invest and forget” strategy, yielding double the amount of benefits.
The pirate algorithm turned out a huge disappointment and made us loss
practically all of our investment amount. The surprising results come
from the random algorithm, which yielded a x1000 ROI.
Is our conclussion then that the best investment strategy for the stock
market is to buy and sell randomly? Well, let’s not go that fast. Consider
that the shape of the exchange rate curve might have much to explain.
Notice how bitcoin has had an exponential growth during the last year.
Under this sort of conditions, no matter what you do, the market is going
to be on your favor. Under this kind of curve, constant mindless selling
and buying is of course what is going to make you right, rather than being
more conservative with your money.
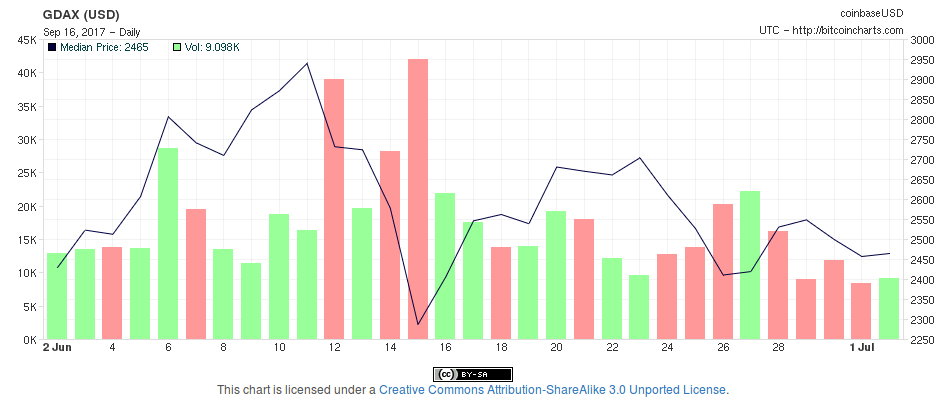
Lets see what’s the difference when running the same set of algorithms
over just the last month of June, in which there was a strong volatility
but not a noticeable diff in the exchange rate.
static
simple
pirate
random (3-run average)
-41.3003
-31.1976
-81.3840
-18.3573
There was indeed a small loss in the value of bitcoin, which is reflected by
the static strategy. Our simple algorithm was not a huge improvement here, it
managed to mitigate the loss a little bit but not in a significant way.
The pirate algorithm proves to be just as terrible, while the random
one now shows its limitations.
Conclusions
Algorithmic trading is easy to implement, but difficult to come up with
a strategy that will make you rich. If there existed a way, be sure that
the best data scientists in the world would have already found it, and
everyone would be using it. Predicting when is the best time to sell and buy
is difficult even for expert human stock traders after all!
Even with one strategy, there’s lots of fine tunning to do in terms of
amounts, timings and optimizations that we didn’t try in our experiments.
Also not all stock shapes look the same, and different algorithms might
perfom differently depending on the characteristics of the stock type.
For example, some stocks might exhibit more volatility, others are more stable,
some have a higher price than others and might perform better if you algorithm
is willing to invest bigger rather than smaller amount.
Even having this into account, what is for sure going to make you money is
picking a market that goes up rather than down! It is unlikely that an
algorithm can create a profit when prices are going down. At most, it can
try to mitigate the losses, but picking a winning stock is the only way
to generating benefits.
And last but not least: in our setup we didn’t consider the particularities
of the exchange services, namely, the fees. An exchange service will
charge fees normally per transaction, so having this into account is
fundamental when designing your algorithm, or you might loose any earnings
simply paying for fees. The fees are different with every exchange service,
but normally they are expensive for small quantities and after a level they
even out. Exchanges that are friendlier and more accessible for beginners
(for instance coinbase)
are also more expensive than others.
You can find our algorithms and the sandbox code in our github.
]]><![CDATA[Escaperoom Early Access]]>2017-08-07T20:00:14+00:00https://coconauts.net/blog/2017/08/07/escaperoom-v3A couple of months ago, we showed you Escaperoom,
a puzzle game we developed during a hackday. We’ve continued improving the game after that,
and today we want to show you a first polished prototype.
This is not the finished game yet, but it’s a version we consider polished enough
for playtesting. Give it a go here! http://unity3d.coconauts.net/escaperoom-v3/.
And read on for the geeky details…
The procedural puzzles puzzle
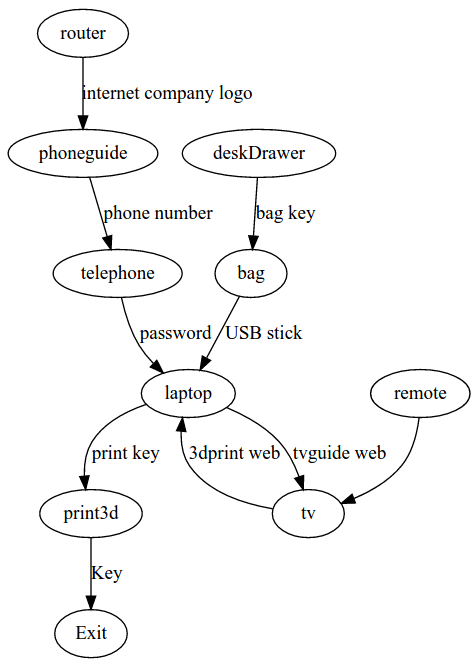
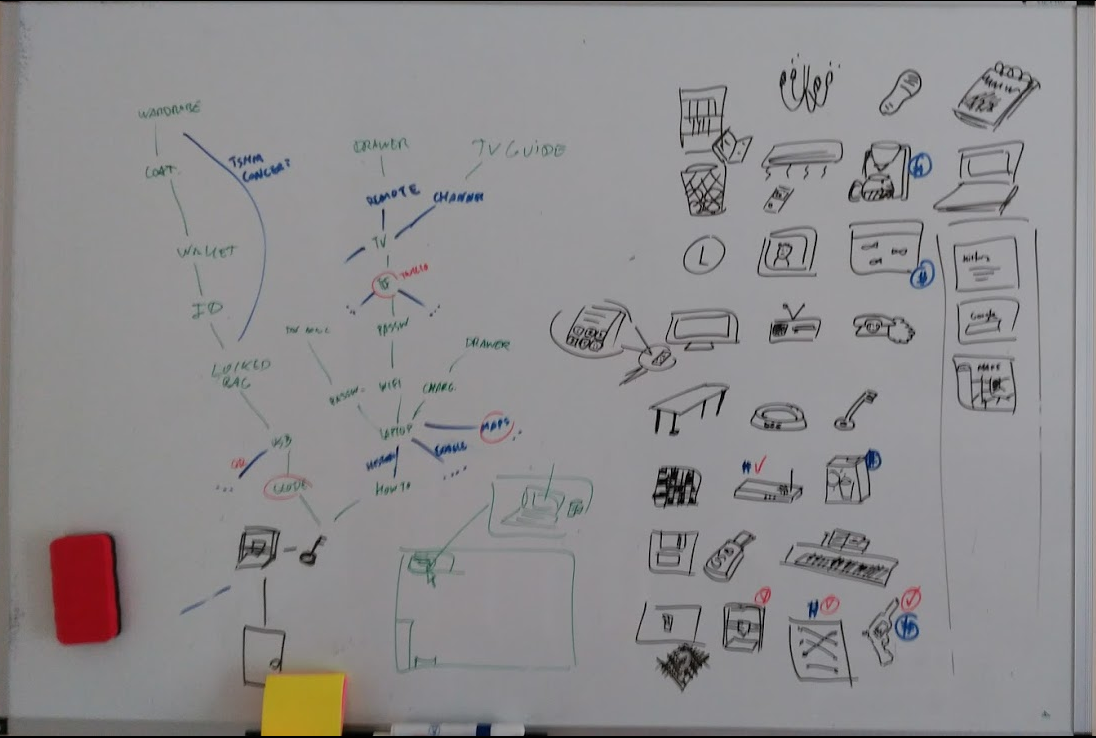
After developing the hack, we tried to focus on the final goal of having dinamically generated rooms filled with parametric puzzles and multiple inputs/outputs; a sort of “roghelike puzzler”. We successfully wrote a first pass at an algoritm to
generate puzzle dependency charts, which was kind of convincing. However, we soon realized that it was difficult to
integrate the puzzles in a contextually coherent way.
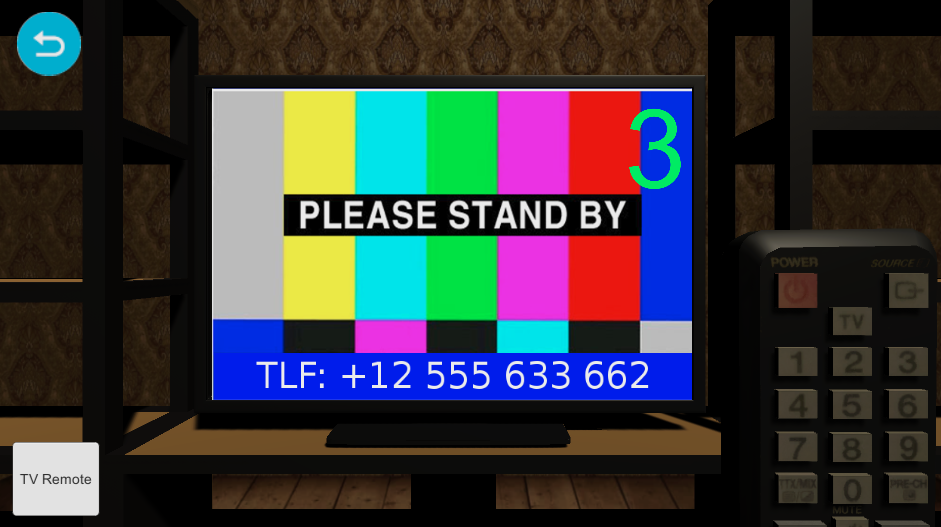
Allow me to expand on this. Imagine you have a locked laptop, and to get the password you need to call a certain
telephone number, and the phone number shows up on a phone guide. If order for the player to make the connection, we
need to provide some context in the phone guide, such as the logo of your laptop. This is easy to do if you are
designing a static puzzle. However, in our case we have a generative algorithm that picks and matches clues and keys
with containers to hold them. In that way, the phone guide might be used to display any phone number, be it one to give out
the laptop password or another one to give you the color of a cable to cut.
However, it’s not a simple as it sounds. If you simply see a phone number with no context, you won’t be able to know
where to use it, and the puzzle won’t be fun. That’s why we need to provide context alongside the phone number, that
will change depending on the generating puzzle (eg, the tech support service or the electrician), which might several
levels above in the puzzle dependency graph.
Our algorithm is not that smart yet. So we can get numbers and keys distributed, but without context, it is not fun.
To bring back the fun, we decided to step back and design a static puzzle to begin with, and we’ll see into randomizing it later (or not!).
Improvements
So eventually, we decided reuse the puzzle design we crafted for the hackday, with mainly UI improvements.
These are all the new features of this new version:
Text dialogs: usually by clicking in objects you will see some text , describing the object, and sometimes clues.
Is funny how we spent a single day to develop the hackday version, but nearly two monthts (not full time) just on improving the current status and getting rid of the bugs.
Many of our trials and ideas didn’t cut it into this version in the end, but might make it into future ones. We also
want to extend the puzzle to make it approximately one hour long, as escape room games usually are.
What do you think about the game? Were you able to escape the room? What did you like and what would you improve or change?
Your feedback is really valuable to us! so please let us know on the comments or on twitter.
]]><![CDATA[Spaceroads]]>2017-07-25T17:56:08+00:00https://coconauts.net/blog/2017/07/25/spaceroadsWe are working on a remake of the classic
Skyroads PC game.
The project is still in early stages of development but
as promised
we want to give more continuous updates over the course of the development.
Skyroads
We are big fans of the Skyroads game
by Bluemoon Interactive. Released on 1993, if you were a kid with a computer
during the 90s very likely you have come accross it in many of the popular
shareware compilations that roamed the world at the time.
In case you have never seen it, here’s a sample:
The game not only looks and sounds gorgeous, it also has a very neat level
design and a great difficulty curve that makes it incredibly addictive.
The levels not only play with the geometry of blocks, but also with parameters
such as the gravity (different on every planet!) and the oxigen and fuel gauges,
which add a lot of variety. For instance, in some levels you will start
with little oxygen, which will force you to run faster or you’ll run out!
Whereas some longer levels will require you to ratio your resources better.
On top of all, this little gem was developed in just three months! Although
it benefited from being an iteration over a previous game the company had made,
Kosmonaut.
We know. Our purpose with this project though is not so much to fill a gap
but to use it as a game development learning tool. The technical difficulties
of this game are not very big, yet still not trivial either. We expect it
shouldn’t be too difficult to get a working engine, so we could then focus
on polishing the look and feel details and content, which is something we
rarely do, and will also be good practice.
We will initially target Spaceroads to be a desktop game, but if we reach to
a point we we are satisfied with the product we will see how we could adapt
the controls for mobile (this was our initial aim actually!) or even VR!
Fun fact: the developers of the original Skyroads game did in fact start
working on a VR version
as far back as in 1994! Amazing.
The (space)roadmap
Here are just some ideas of where this project could go. Some will happen,
some will not, or not in order:
A game engine that looks and feels (and plays) like the original game
A level editor
Add polish and fluff (will not look like the original anymore)
Server side, user generated content
Campaign mode with a level progression and … a story even?
Port to mobile
Port to VR
Updates will follow during our jorney, including code and playable versions.
For now we are still midway though step one, working on that game engine
with Unity3D. In case you are wondering, it’s already looking like this!
]]><![CDATA[What Is 4K and HDR ?]]>2017-06-13T20:00:14+00:00https://coconauts.net/blog/2017/06/13/what-is-4kIt is now the E3 2017, and with the presentation of the Xbox One X (code name Scorpio)
and the Playstation Pro already in the market, we hear a lot of buzzwords like 4K, HDR,
Teraflops, etc. So in this post we’re going to try to put this simple, so you know what they mean.
4K
The most popular term these days on TVs is 4K or Ultra HDs (Some have even introduced
5K ).
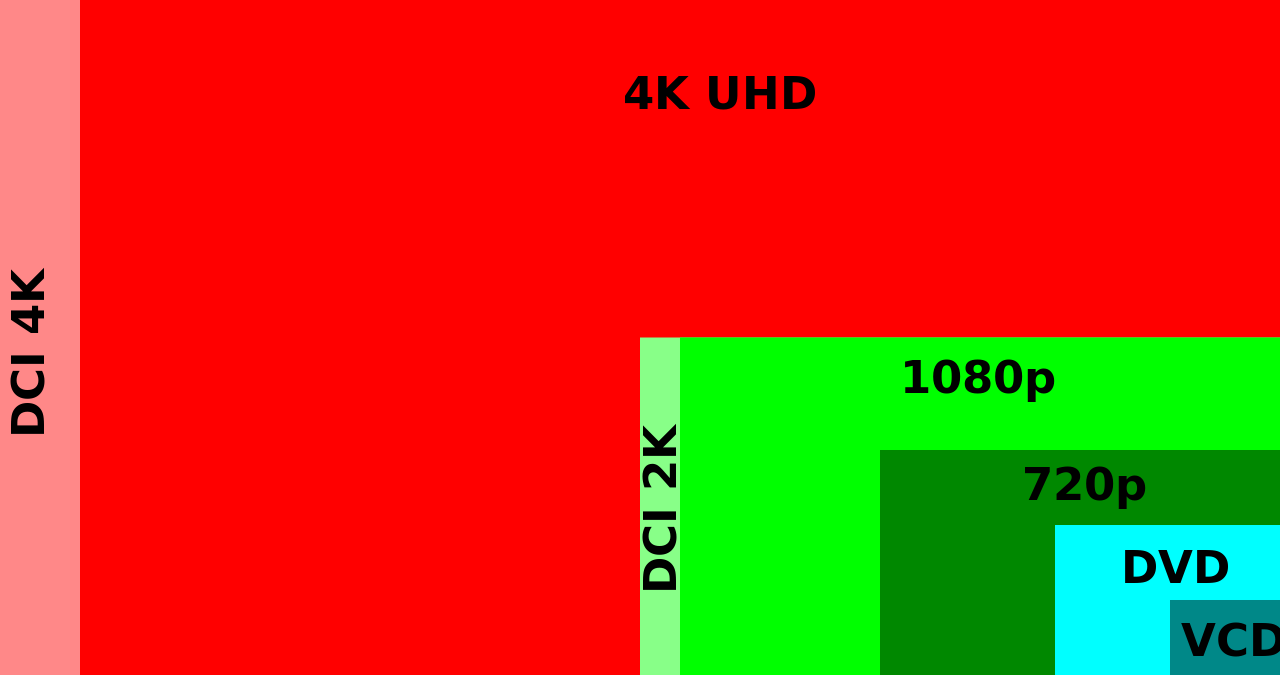
What 4K really means is 4 thousand pixels, or to be more precise,
actually in the order of 3840 (or 4096) pixels.
Compared to the previous and most common resolution of 1080p or Full HD,
4K basically means 4 times bigger.
This also means that for a TV the same size (eg: 49’‘) a 4K screen has 4 times
as many pixels than a 1080p. Therefore the image should be clearer and sharper.
Can you tell the difference between 1080p and 4K ?
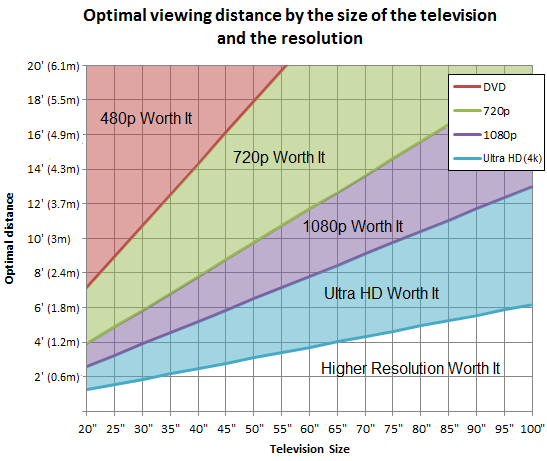
If your TV is small however, or you are sitting far enough from it, you might still
not be able to tell the difference between 4K and 108’, as you can see in this graph.
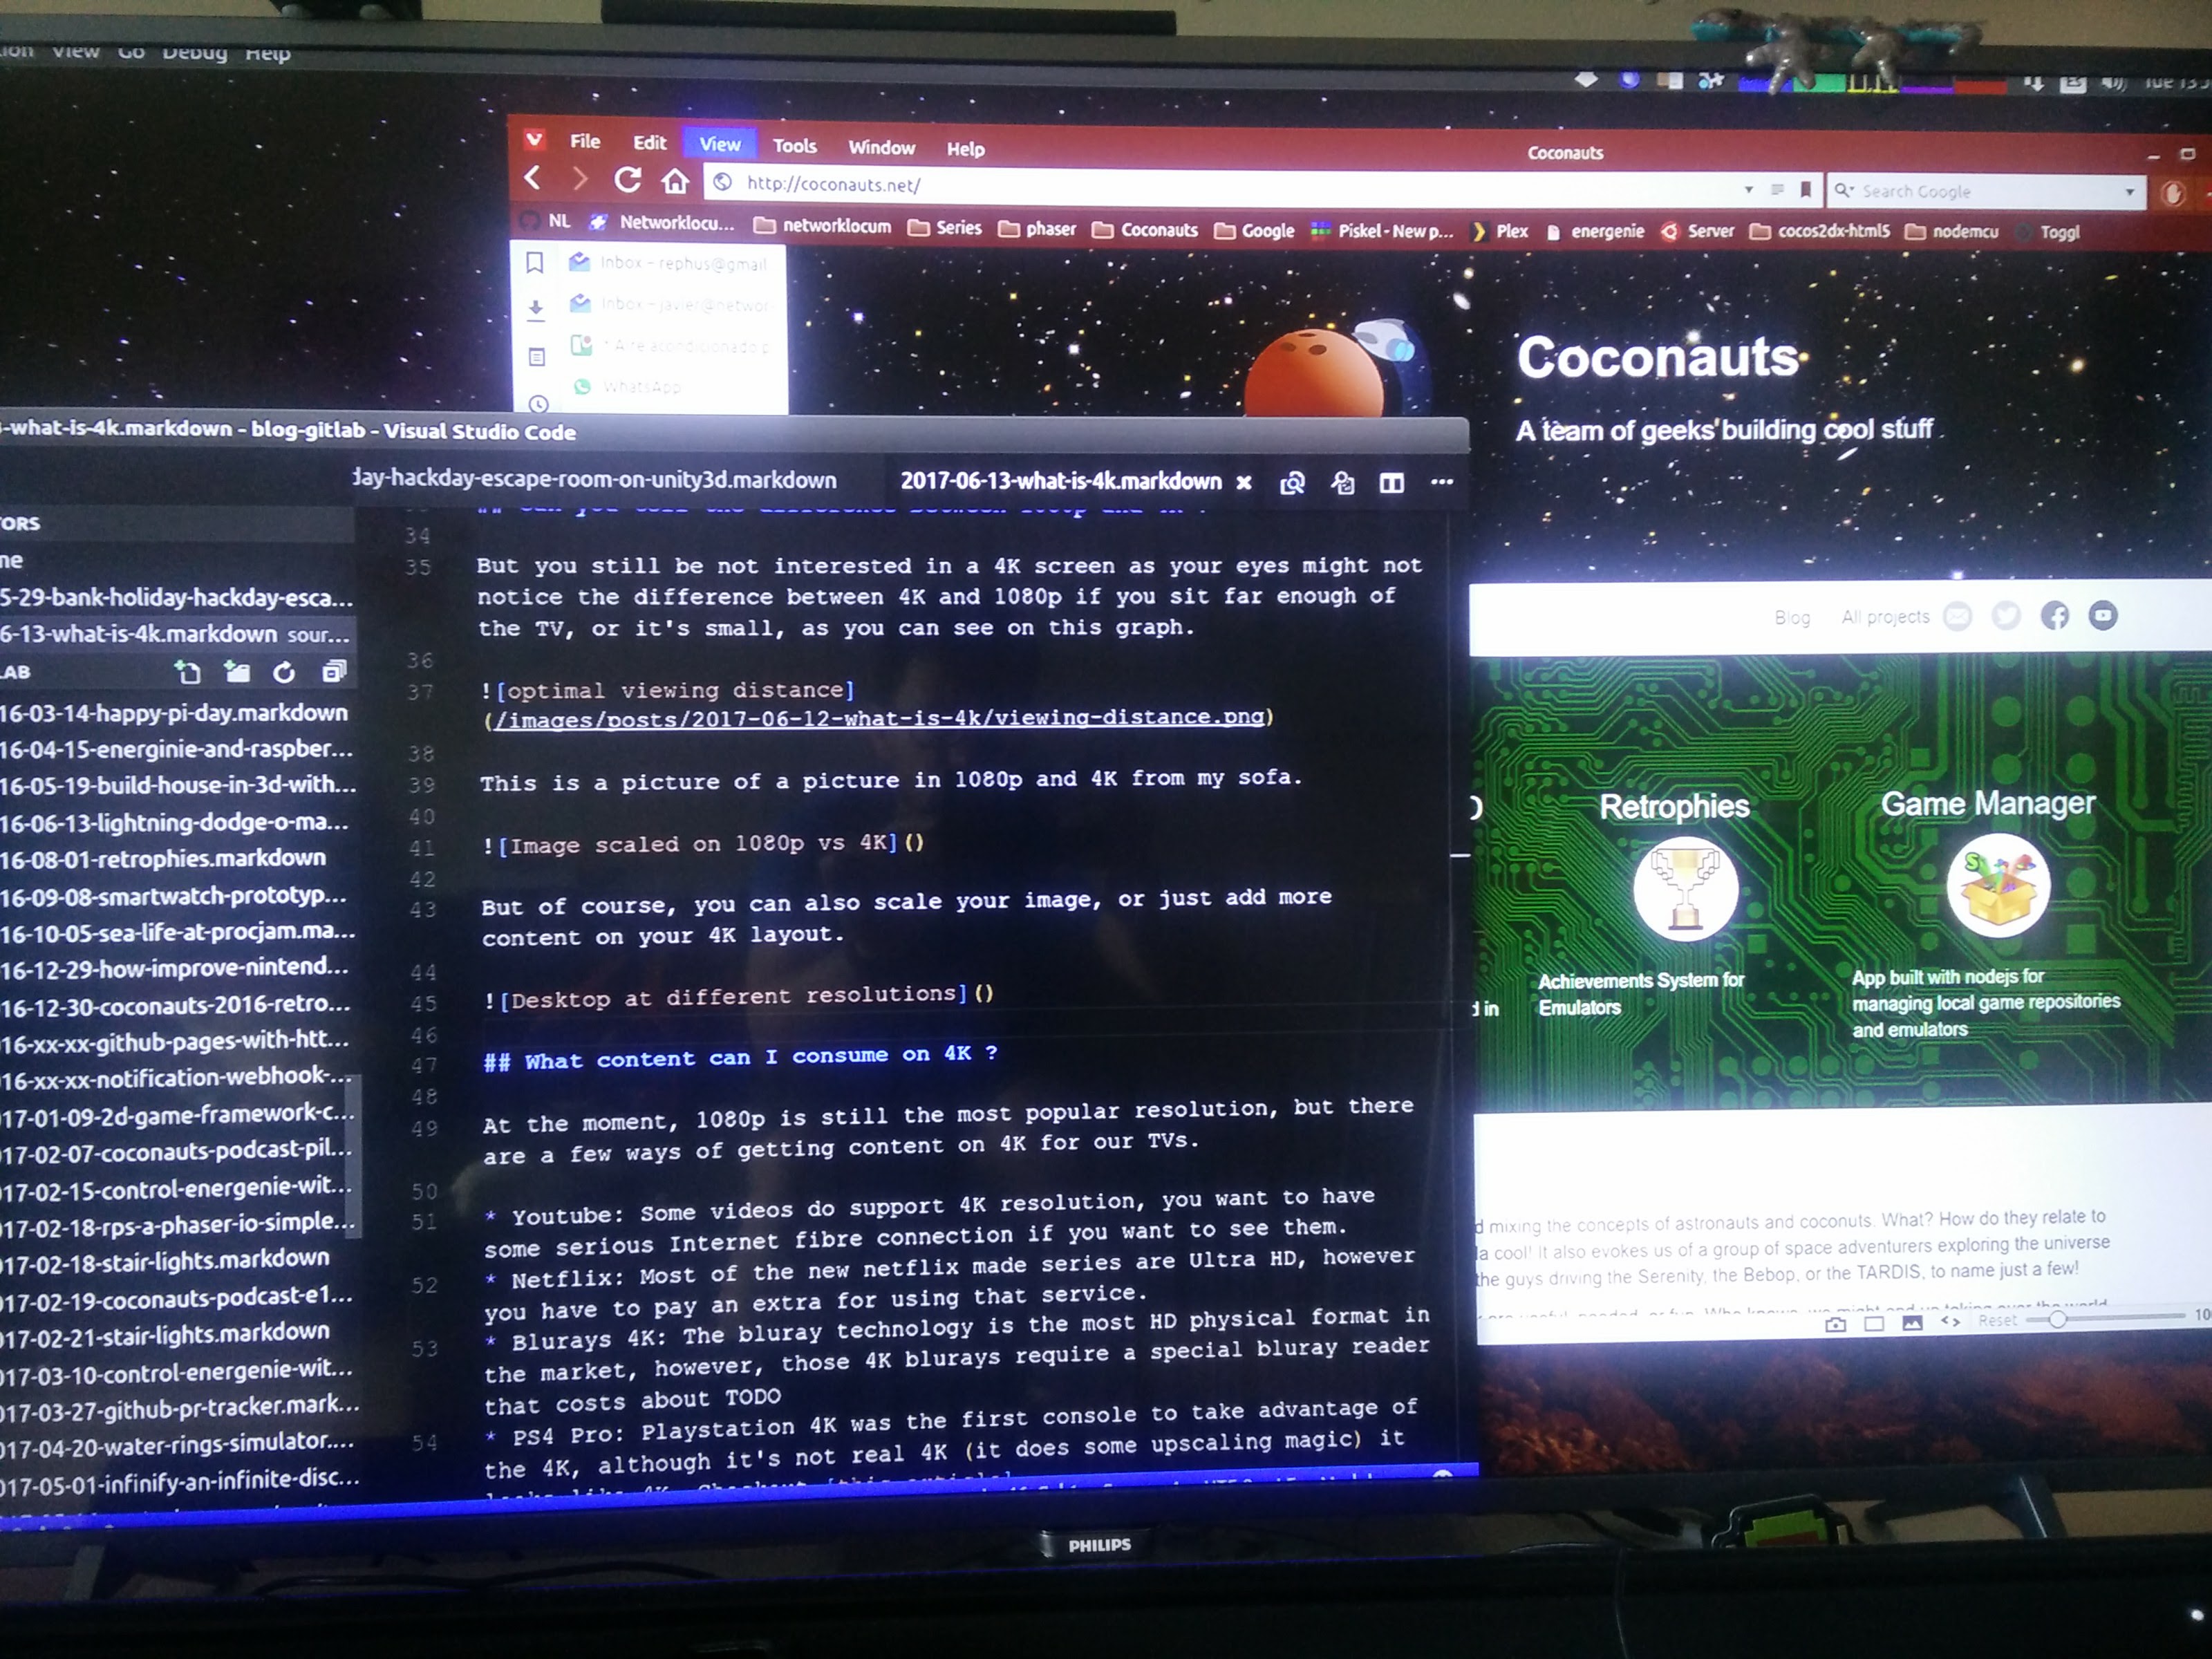
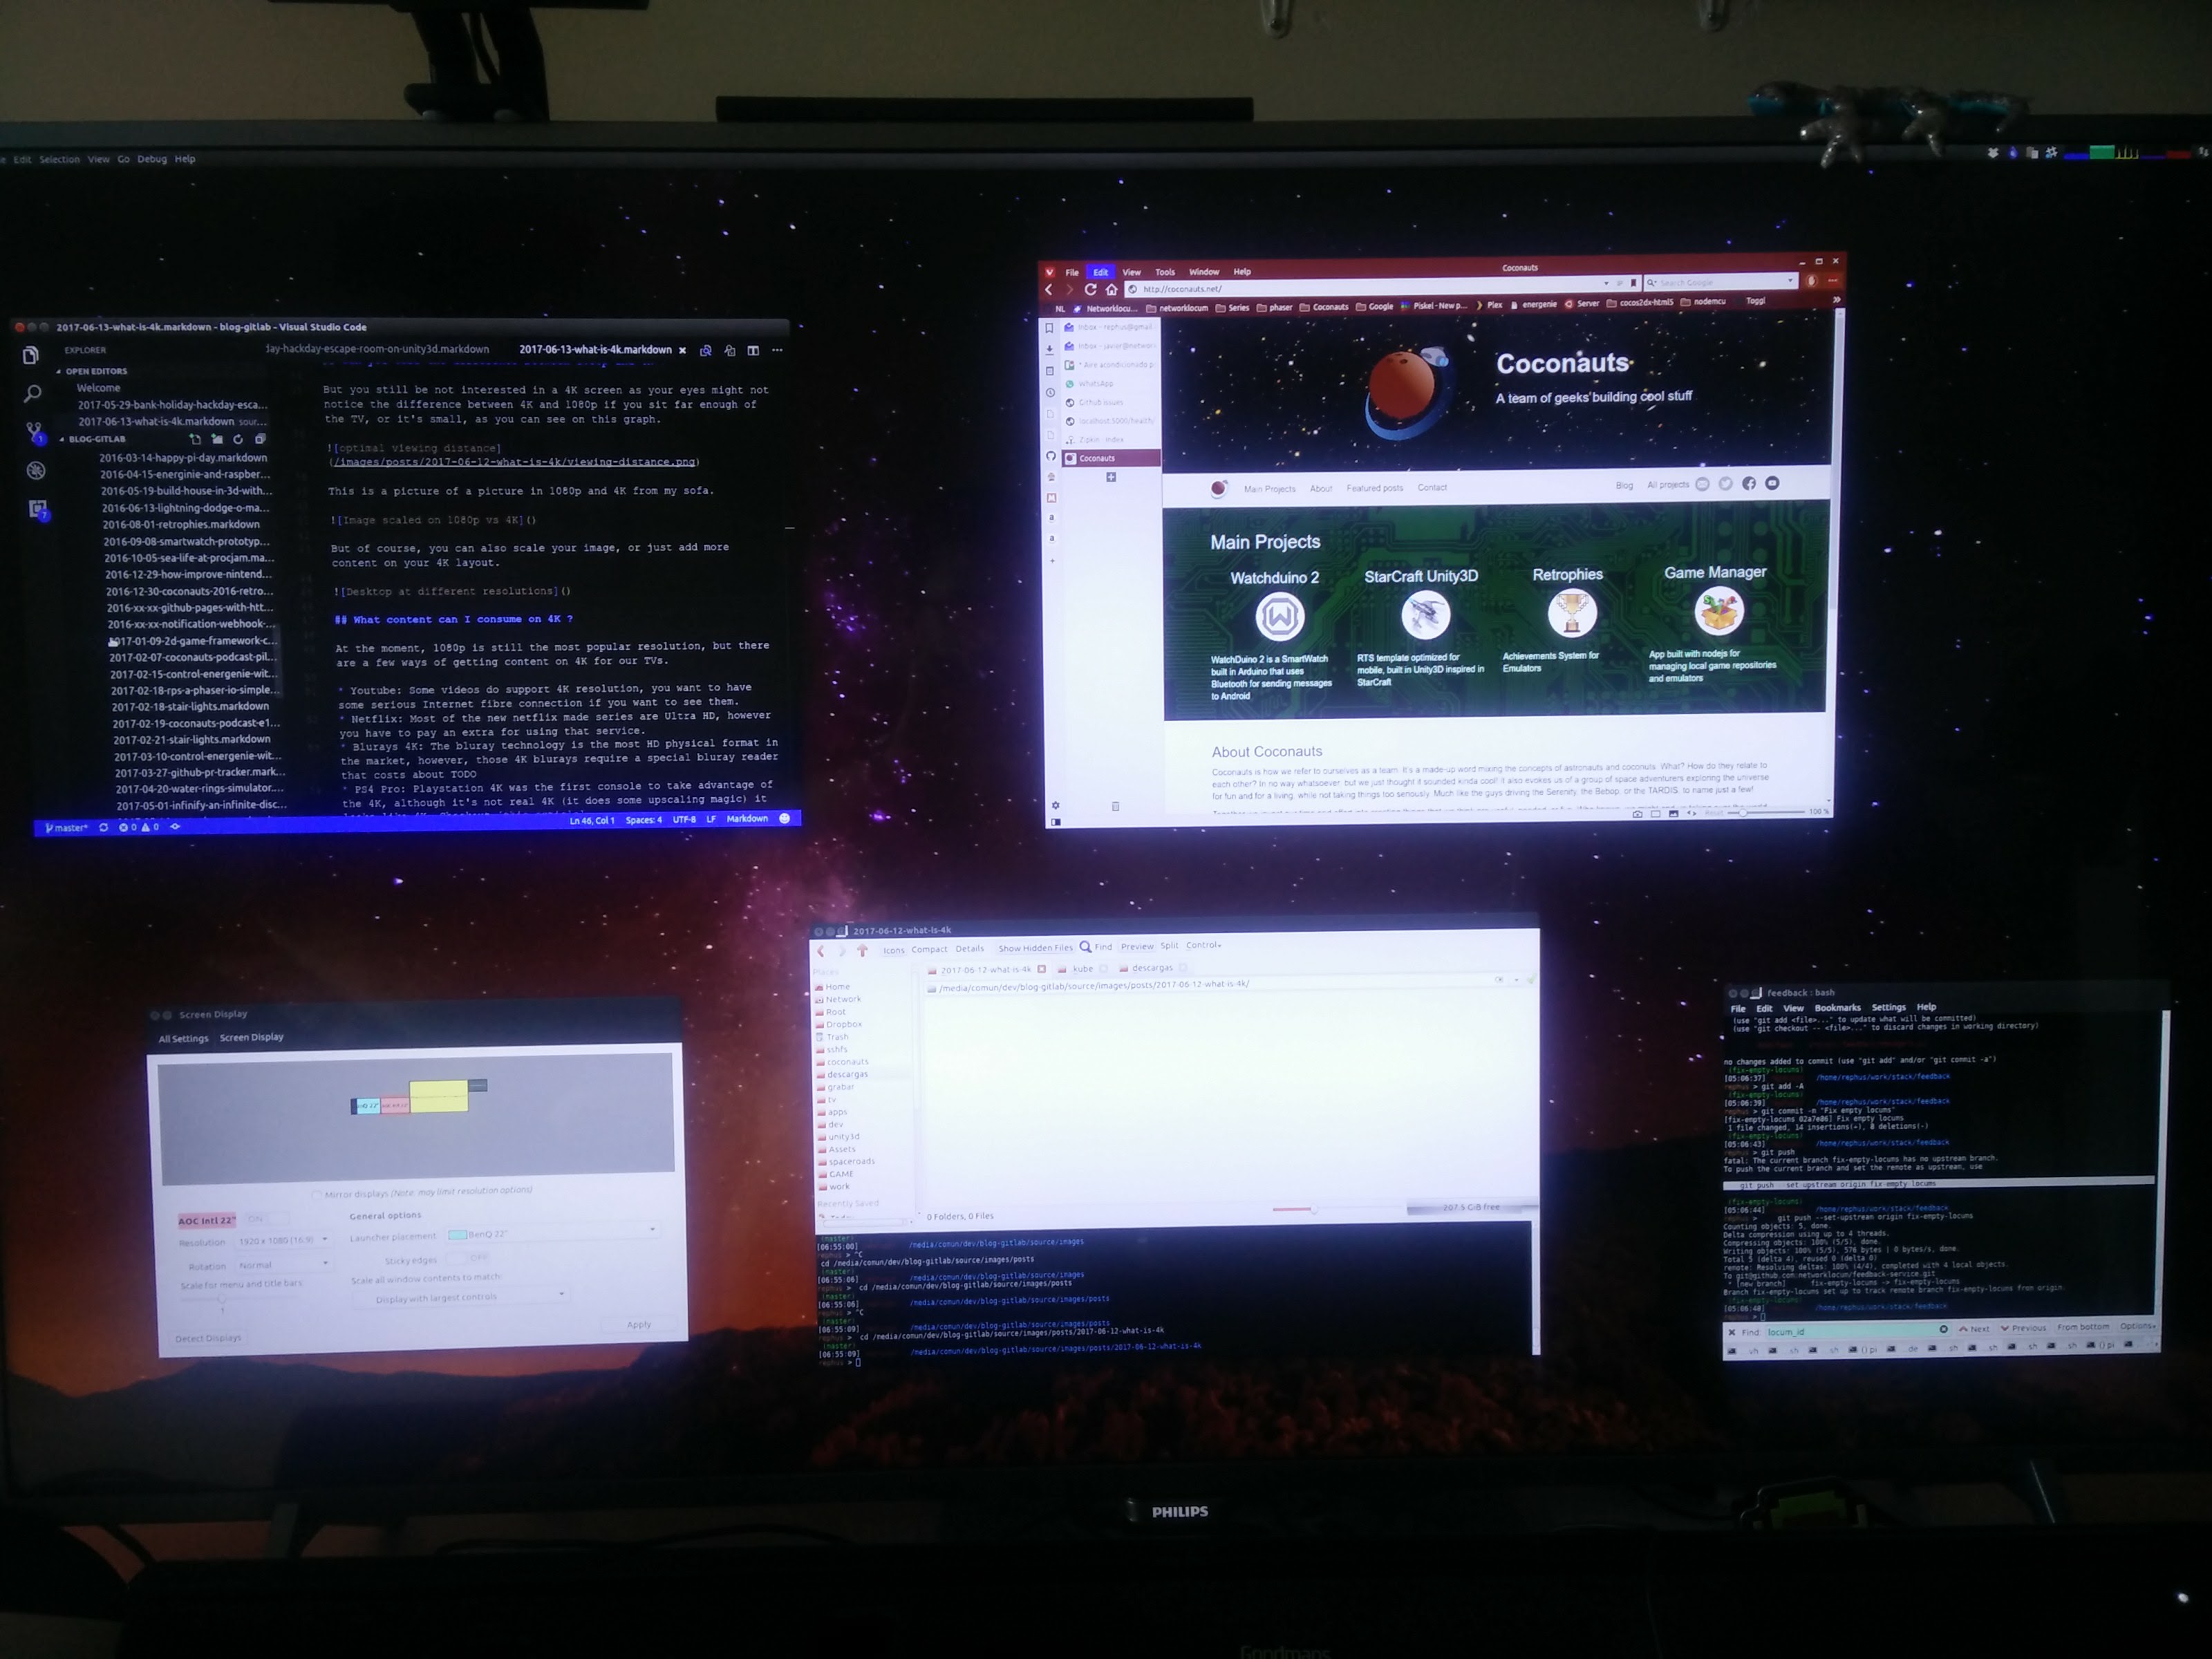
A 4K resolution comes with other advantages however.
Even if you can’t notice the sharpness, you can still fit more content into your screen.
What content can I consume on 4K ?
At the moment, 1080p is still the most popular resolution,
but there are a few ways of getting content on 4K for our TVs.
Youtube: Some videos do support 4K resolution (but make sure you have some
serious Internet fibre connection if you want to see them).
Netflix: Most of the new Netflix-original series are shoot in Ultra HD,
however you have to pay an extra for using that service.
Blurays 4K: the physical format with highest resolution in the market, however,
those 4K blurays require a special bluray reader that costs about ~200$.
PS4 Pro: Playstation 4K was the first console to take advantage of the 4K,
although it’s not real 4K (it does some upscaling magic) it looks like 4K.
Check out this article
to see how it works.
Xbox One X: The brand new console from Microsoft, promises to deliver a real
4K game experience directly to your TV. Some games already in the market will
be upgraded, and most of the new ones will be compatible with it.
PC with decent graphics card: If you download a digital movie on 4K or play
some games on 4K resolution (like Bayonetta). Just make sure your graphics
card is able to handle 4K without sacrificing any refresh rate.
1080p 60hz vs 4k 30hz
As stated before, you might not see the difference between those two resolutions,
and it’s more that likely that you’ll consume Full HD content most of the time.
However, you are going to see the difference between 60hz and 30hz, not on images, but on videos.
At 30h you might notice an annoying horizontal band in the middle of the screen sometimes.
This is because the refresh rate is not quick enough to update the image on the screen.
I tried to watch once an action movie on 4k 30hz on my computer, and it was not very pleasant.
This is another comparison with 60hz and 120hz on quarter speed (15hz and 30hz).
What is HDR ?
HDR (High-dynamic-range) to put it simple, is a specific type of signal that
identifies the contrast of the image.
On TVs, when a device and media is HDR compatible (like PS4 and a HDR videogame),
it sends the signal to the TV throught the HDMI cable including some metadata to
specify the Real contrast per pixel. This is particularly noticeable on
multiple contrast pictures, like light, explosions, sunsets, etc.
There are multiple versions of HDR, but one thing you need to keep in mind is
that in order to take advantage of the HDR on TVs, your video cables also need
to be compatible – like HDMI 2.0a which was released on April 8 2015,
and DisplayPort 1.4 which was released on March 1, 2016.
Happy watching
Did you do the switch to 4K yet? Are you thinking about it? Would you go back?
Let us know in the comments!
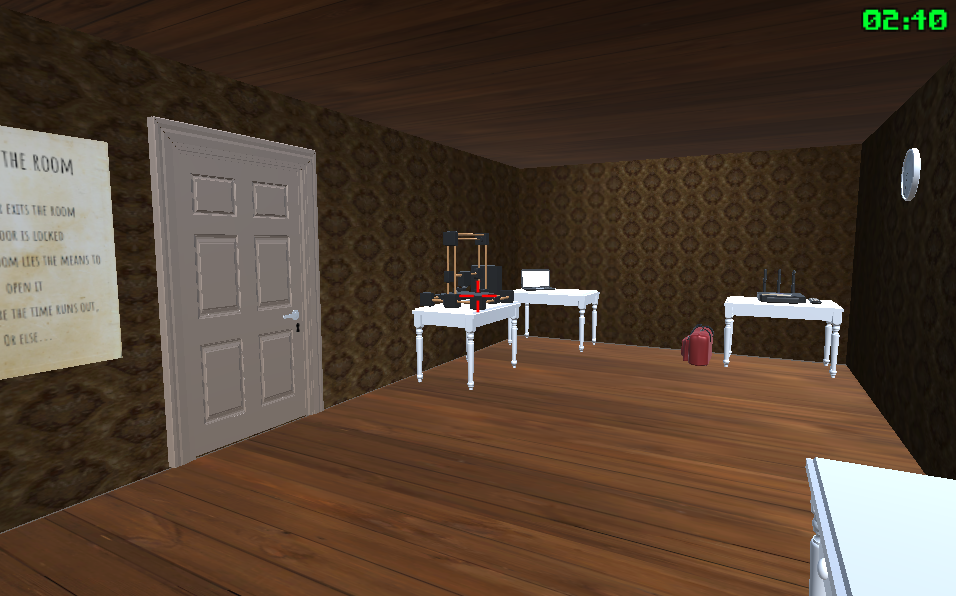
]]><![CDATA[Bank Holiday Hackday: Escape Room on Unity3D]]>2017-05-29T20:00:14+00:00https://coconauts.net/blog/2017/05/29/bank-holiday-hackday-escape-room-on-unity3dIt’s another bank holiday in England, and in Coconauts this means: hackday!
Our idea came after playing the Unlock! board game,
which quite successfully recreates the experience of a scape room using just cards.
The only downside of the game is that after you’ve solved each of the 3 rooms,
it looses the fun, as you already know the solution to the puzzles. So we though,
wouldn’t it be cool to use this idea on a videogame, and have autogenerated puzzles
so that the fun never ends?
Lets not get overexcited though: we set as our first goal to design and implement a
static escape room puzzle, just to get familiar with the concept and the mechanics.
So that was the goal of today’s hackday.
We started by brainstorming some ideas for items and fixtures in a possible
escape room. Then we started linking some of them together as dependencies,
following the puzzle dependency graph technique, that the good people at Lucasarts use to design their adventure games. It’s surprisingly easy to start
doodling puzzles with this method!
Then we got into implementing. We went for Unity3D, using fixed camera scenes for
the main room and each of the fixtures that we need to interact with. We
ended up having to dumb down a bit our original puzzle grahp design,
as otherwise we wouldn’t have had time to implement it all in a day.
The end result is a short, but we hope that also clever escape room.
You can play right here from your browser!
We are quite happy with the result. It’s the first time we make a puzzler game
and it turns out it is very rewarding: usually physics is the most frustrating
part of game development, and you have none of that in here. Your mind can focus
on designing and thinking puzzles rather than on tricky implementations. And
the game is fun without having to spend a lot of time polishing the mechanics.
As stated, our MVP is linear (except for a couple of passwords which are
generated randomly), but we plan to pick this project again to try to turn
it into something generative next time. Stay tuned!
]]><![CDATA[Control Energenie With NodeMCU]]>2017-05-16T08:53:19+00:00https://coconauts.net/blog/2017/05/16/control-energenie-with-nodemcuYou might have noticed, we like the concept of Smart Homes, and physical devices you can control remotely from an API using your local Wifi network. Specifically, we’re talking about Energenie sockets, a brand of electrical sockets controlled by radio. We’ve introduced previously these sockets in posts like Control Energenie with ESP8266, Control energenie with Pebble or Raspberry Pi and Energenie but this time, we’re going to show you how we built the same Energenie radio controller with a NodeMCU web server.
NodeMCU
NodeMCU is an open source IoT platform. It includes firmware which runs on the ESP8266 Wi-Fi SoC from Espressif Systems, and hardware which is based on the ESP-12 module. Source
The concept behind this is the same as our ESP8266 implementation. But, there are a few advantages of using NodeMCU instead.
Easier development
Lua scripting (easier than C++)
Standard 5V microusb power input
More stability (ESP8266 was constantly restarting (memory leak on C++?))
Easier wiring (No need for reset button or PIN0 hack)
More pins available than our previous ESP-01 module (this is ESP-12)
Fully dedicated SDK (ESPlorer)
Lua examples on NodeMCU
Lua scripting is very simple and easy to learn. Similar to python at first, but without the alignment restriction; you use end tags to mark the end of a statement. These are a few examples
LED blink
12345678910
LED_PIN = 4 -- Use pin 4
gpio.mode(LED_PIN, gpio.OUTPUT)

while true do
   gpio.write(LED_PIN, gpio.HIGH)
   tmr.delay(500 * 1000)

   gpio.write(LED_PIN, gpio.LOW)
   tmr.delay(500 * 1000)
end
wifi.setmode(wifi.STATION)
wifi.sta.config("Marphus","fafafafafa")

function check_wifi()
 local ip = wifi.sta.getip()

 if(ip==nil) then
   print("Connecting...")
 else
  tmr.stop(0)
  print("Connected to AP!")
  print(ip)
 end
end
tmr.alarm(0,1000,1,check_wifi)

srv=net.createServer(net.TCP)
srv:listen(80,function(conn)
    conn:on("receive", function(client,request)
        local buf = "";
        local _, _, method, path, vars = string.find(request, "([A-Z]+) (.+)?(.+) HTTP");
        if(method == nil)then
            _, _, method, path = string.find(request, "([A-Z]+) (.+) HTTP");
        end
        -- Store all the GET parameters in a table
        local _GET = {}
        if (vars ~= nil)then
            for k, v in string.gmatch(vars, "(%w+)=(%w+)&*") do
                _GET[k] = v
            end
        end

        buf = buf.."<h1> ESP8266 Web Server</h1>";

        client:send(buf);
        client:close();
        collectgarbage();
    end)
end)
wifi.setmode(wifi.STATION)
wifi.sta.config("SSID","password")

function check_wifi()
 local ip = wifi.sta.getip()

 if(ip==nil) then
   print("Connecting...")
 else
  tmr.stop(0)
  print("Connected to AP!")
  print(ip)
 end
end

tmr.alarm(0,1000,1,check_wifi)

RADIO_PIN = 4
gpio.mode(RADIO_PIN, gpio.OUTPUT)

function sendCode(code)
    print("Sending radio code " .. code)
  rc.send(RADIO_PIN,code,24,185,1,2) --Sends the data via GPIO pin 4 to the rc switch.
end

srv=net.createServer(net.TCP)
srv:listen(80,function(conn)
    conn:on("receive", function(client,request)
        local buf = "";
        local _, _, method, path, vars = string.find(request, "([A-Z]+) (.+)?(.+) HTTP");
        if(method == nil)then
            _, _, method, path = string.find(request, "([A-Z]+) (.+) HTTP");
        end
        local _GET = {}
        if (vars ~= nil)then
            for k, v in string.gmatch(vars, "(%w+)=(%w+)&*") do
                _GET[k] = v
                print("Got parameter " .. k .. ": " .. v)
            end
        end
        buf = buf.."<h1> ESP8266 Radio Web Server</h1>";
        local radiofreq = {
             ["Socket 1"] = {on= 6916877, off= 6916878},
             ["Socket 2"] = {on= 6916871, off= 6916870},
             ["Socket 3"] = {on= 6916875, off= 6916874},
             ["Socket 4"] = {on= 6916867, off= 6916866}
        }
        for k, v in pairs(radiofreq) do
            buf = buf.."<p>" .. k .. "<a href=\"?f=" ..v["on"] .."\"><button>ON</button></a> <a href=\"?f="..v["off"].."\"><button>OFF</button></a></p>";
        end

        local _on,_off = "",""

        if( _GET.f ~= nil)then
              sendCode(_GET.f)
        end
        client:send(buf);
        client:close();
        collectgarbage();
    end)
end)
Again, as always, our code and all the details about this project are available on Github
]]><![CDATA[Infinify: An Infinite Discovery Mode for Spotify]]>2017-05-01T18:13:37+00:00https://coconauts.net/blog/2017/05/01/infinify-an-infinite-discovery-mode-for-spotifyI’m a Spotify user. I’m not the greatest fan of the user experience they offer, but it’s definitely the “lesser evil” when it comes to music streaming.
You see, I’m the kind of person that just cant be bothered to choose, I loathe
choosing. Deciding albums to hear? What are we, in the 90s? with phisical CDs that
need popping into a player? It’s the digital age! I just want to open Spotify
and be presented with a continuous stream of non-stop music,
wihout having the choose an album, or a genre, or a playlist.
They even require my constant feedback when in radio mode!
(don’t even get me started on the Spotify radio, yuck).
I just want a big “play” button and let Spotify use a teeny bit of
machine intelligence to feed me stuff that it thinks I might like.
Considering the app is sitting on top of a pile of data from me
(listening history, saved collection)… is it really that hard?
Because Spotify is not giving that to me though, we at Coconauts decided to
build it ourselves, using their API and Javascript. The result: Infinify.
What is it?
Infinify is a website with a huge “play” button, that feeds on your
Spotify saved collection to produce a continuous mix of tracks from your
own music plus recommendations.
The /recommendations endpoint instantly gives you a list of recommended tracks,
given a seed of a list of songs, artists or genres. You can even tune a bunch of
crazy parameters, such as danceability, energy or popularity. It’s quite amazing.
The problem though is that the recommendations output is finite (capped at 100 results),
whereas we want a continuous flow of recommendations.
Another problem with it, which is also noticiable in their discovery modes,
is that it tries too hard to give you music that is similar to all of your seeds.
Wha this means is: if you seed it with some classical music, heavy metal and jazz,
it’s going to try to return tracks that are strange chimaeras mixing all of those
traits, rather than giving you a mixed bag of more conventional tracks in those genres.
In other words: it’s an and, not an or. Now, this might actually be what you want
in some occasions, but when it comes to recommending music to people it doesn’t work:
if I like John Williams and Queen I want to be recommended Danny Elfman and Van Halen,
not “Some Orchestra Plays Very Bland Rock Classics”.
So our solution involves working around the endpoint, using in a bit unorthodox way:
Fetch a random single song from the user’s saved music collection.
Use this song’s artist as a seed to the /recommendations endpoint. Get a small X number of songs back.
Pick a random song from the response, and add it to a playlist.
Repeat the above every 2 minutes.
In this fashion, the result is a Spotify playlist that is continuously growing
with fresh recommendations (for as long as the the website remains open).
We use the artist as a seed, rather than the song, so that you can still get
a chance of getting the songs you already have in your library and love.
The seed is started from a single song to try to get purer recommendations, rather
than strange blends. We then produce X recommendations and pick one. Why?
Well, we experienced that the first item in the results is always a song by the
same artist that your seed, and this doesn’t give you much variety. So by producing
several and then picking one of them, you get a delicious balance: you’ll get a
certain chance to get songs by the same artists in your library, but them a slightly
bigger chance to get related artists (that may or not be in your library).
This X number of tracks is what we call the discoverability parameter, and
you can toggle it between 1 (“I just want the artists I know and love”) and 10
(in which approximately 9 in every 10 songs will be new, and 1 will be familiar).
The ugly bits
Unfortunately there are some limitations that make the user experience a bit rough.
For starters, the fact that you need to have an external web application to start
the infinfy playlist. Spotify scrapped their in-app extensions some years ago,
so the only way to add integration nowdays is by keeping them completely external.
It would be possible to stream the audio directly to the webapp, but only 30-second
samples: not acceptable. So you need Spotify for playback, and the webapp for the
integration.
You can at least control the playback on a device via the API, you need to
have a premium account for that. So if you don’t, you need to hit the play button
twice: once on infinify, once on the app.
Another uglyness is that we found no way via the API to be able to track the
listening progress of the user on the playlist. This made it quite difficult to
determine when we should add and remove tracks from the playlist.
After trying some nasty kludges, we decided for a straigghtforward solution:
just add new songs every 2 minutes, and keep the old ones there. They don’t
bother you after all! (in fact, its kinda nice to have a record of your
listening session) and there’s no problem on Spotify even if the playlist
gets absurdly long.
The only edge case is if you run out of songs in the
playlist: for this eventuality we added a little (+) button to force a manual
generation. When you start a new session the playlist gets reset, as it would be
confusing to have the long list of tracks from last time.
Because the way we are abusing the /recommendations endpoint, ours is
not the most rate-friendly solution. However, it’s also not that bad: our load
is 4 or 5 requests every 2 minutes, which still falls within reasonable limits,
at least if we keep it to only one user.
Final remarks
For recommender engines, and in general many AI problems, there’s usually
a rule: a naive, straightforward solution can take you 60-80% there.
Then any increases on that number will require years of PhD research.
Infinify is a very simple solution, but surprisingly, also very effective! I was
very pleased with the quality of recommendations, and how you can still get
a mix of familiar and new. Of course, most of the
heavy lifting comes from the magic behind the /recommendations engine,
but I’m happy that we could bend it to overcome it’s limitations.
For now, I intend to use it heavily for a while and see if it still satisfy me,
or if recommendations start getting a bit repetitive. In such case, I might start
tunning the algorithim to try more variability (for instance, going for
multi-level recommendations from recommendations).
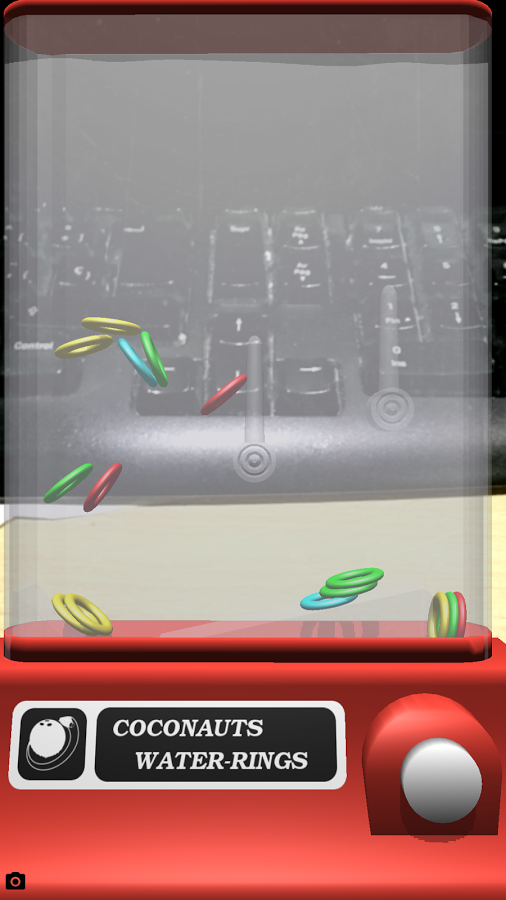
]]><![CDATA[Water Ring Simulator]]>2017-03-27T10:12:19+00:00https://coconauts.net/blog/2017/03/27/water-rings-simulatorWe have more projects that posts in the blog, that’s why a long ago we created a new new version of our first-game-ever: Water Rings.
Water Rings Simulator is the new version of the classic toy game on Unity3d exlusive for Android.
This game features:
Realisitc underwater physics
3D graphics
Mobile movement detection
Realistic visual effects
Transparent phone background (using camera to see behind it)
Do you want us to keep expanding the game? let us know in the comments
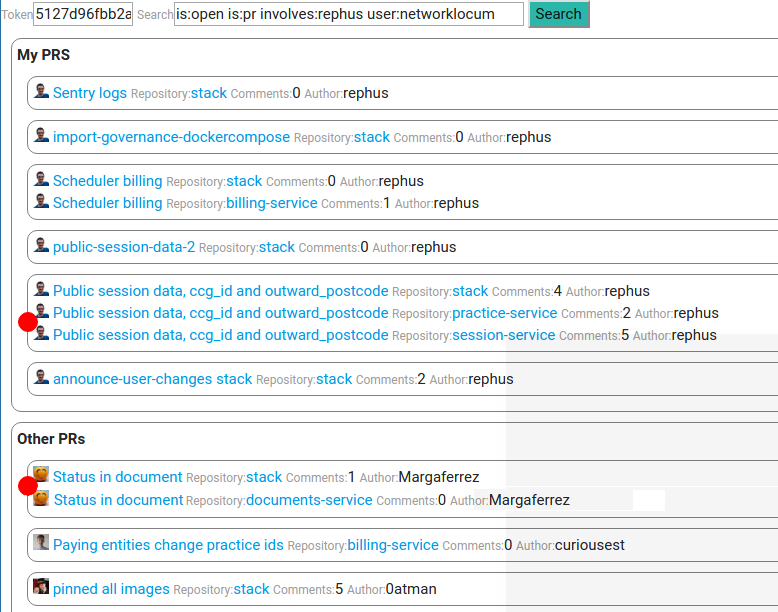
]]><![CDATA[Github PR Tracker]]>2017-03-27T10:12:19+00:00https://coconauts.net/blog/2017/03/27/github-pr-trackerSometimes I feel like following changes on PRs on Github is a bit confusing and/or verbose, even with the existing Github notifications
or Github pulls interfaces, sometimes the best way was to check your email inbox.
So I decided to create my own Github PR tracker
for my own Pull Requests, but also for those that I’m assigned to.
Features
Group pull requests by title, that will allow me to easily visualize changes related between microservices (in different github repos)
Visual “Red dot” on those Pull requests that have been updated since you refreshed the page:
comment added, commit made, opened pull request…
Get quick access to all your relevant PRs, only pin this page on your browser,
and forget about dozens of opened tabs or bookmarks.
Then you need to create a
Github personal access token
and use it on the input text on the search (or modify the index.html to add the default value)
Easy and simple.
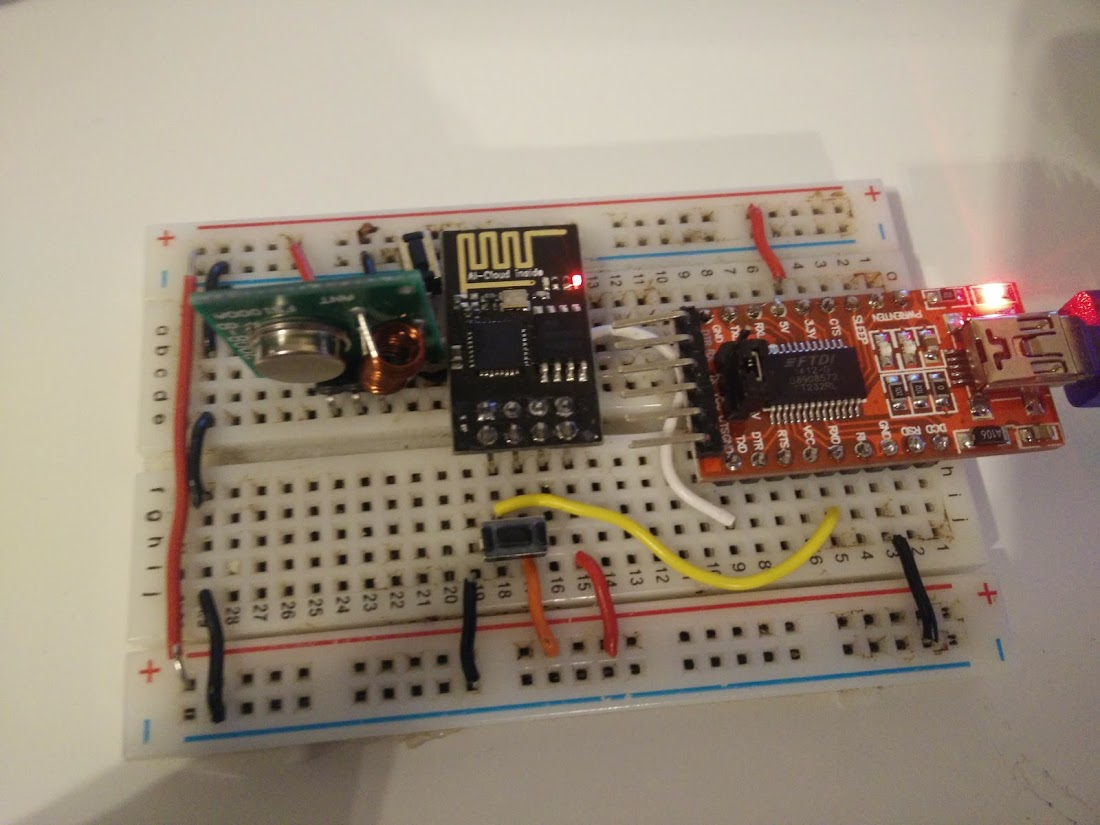
]]><![CDATA[Control Energenie With ESP8266]]>2017-03-10T21:30:19+00:00https://coconauts.net/blog/2017/03/10/control-energenie-with-esp8266We recently showed you how to control Energenie sockets using Pebble smartwatch app,
thanks to a Raspberry PI REST API.
But we recently found this Github repo
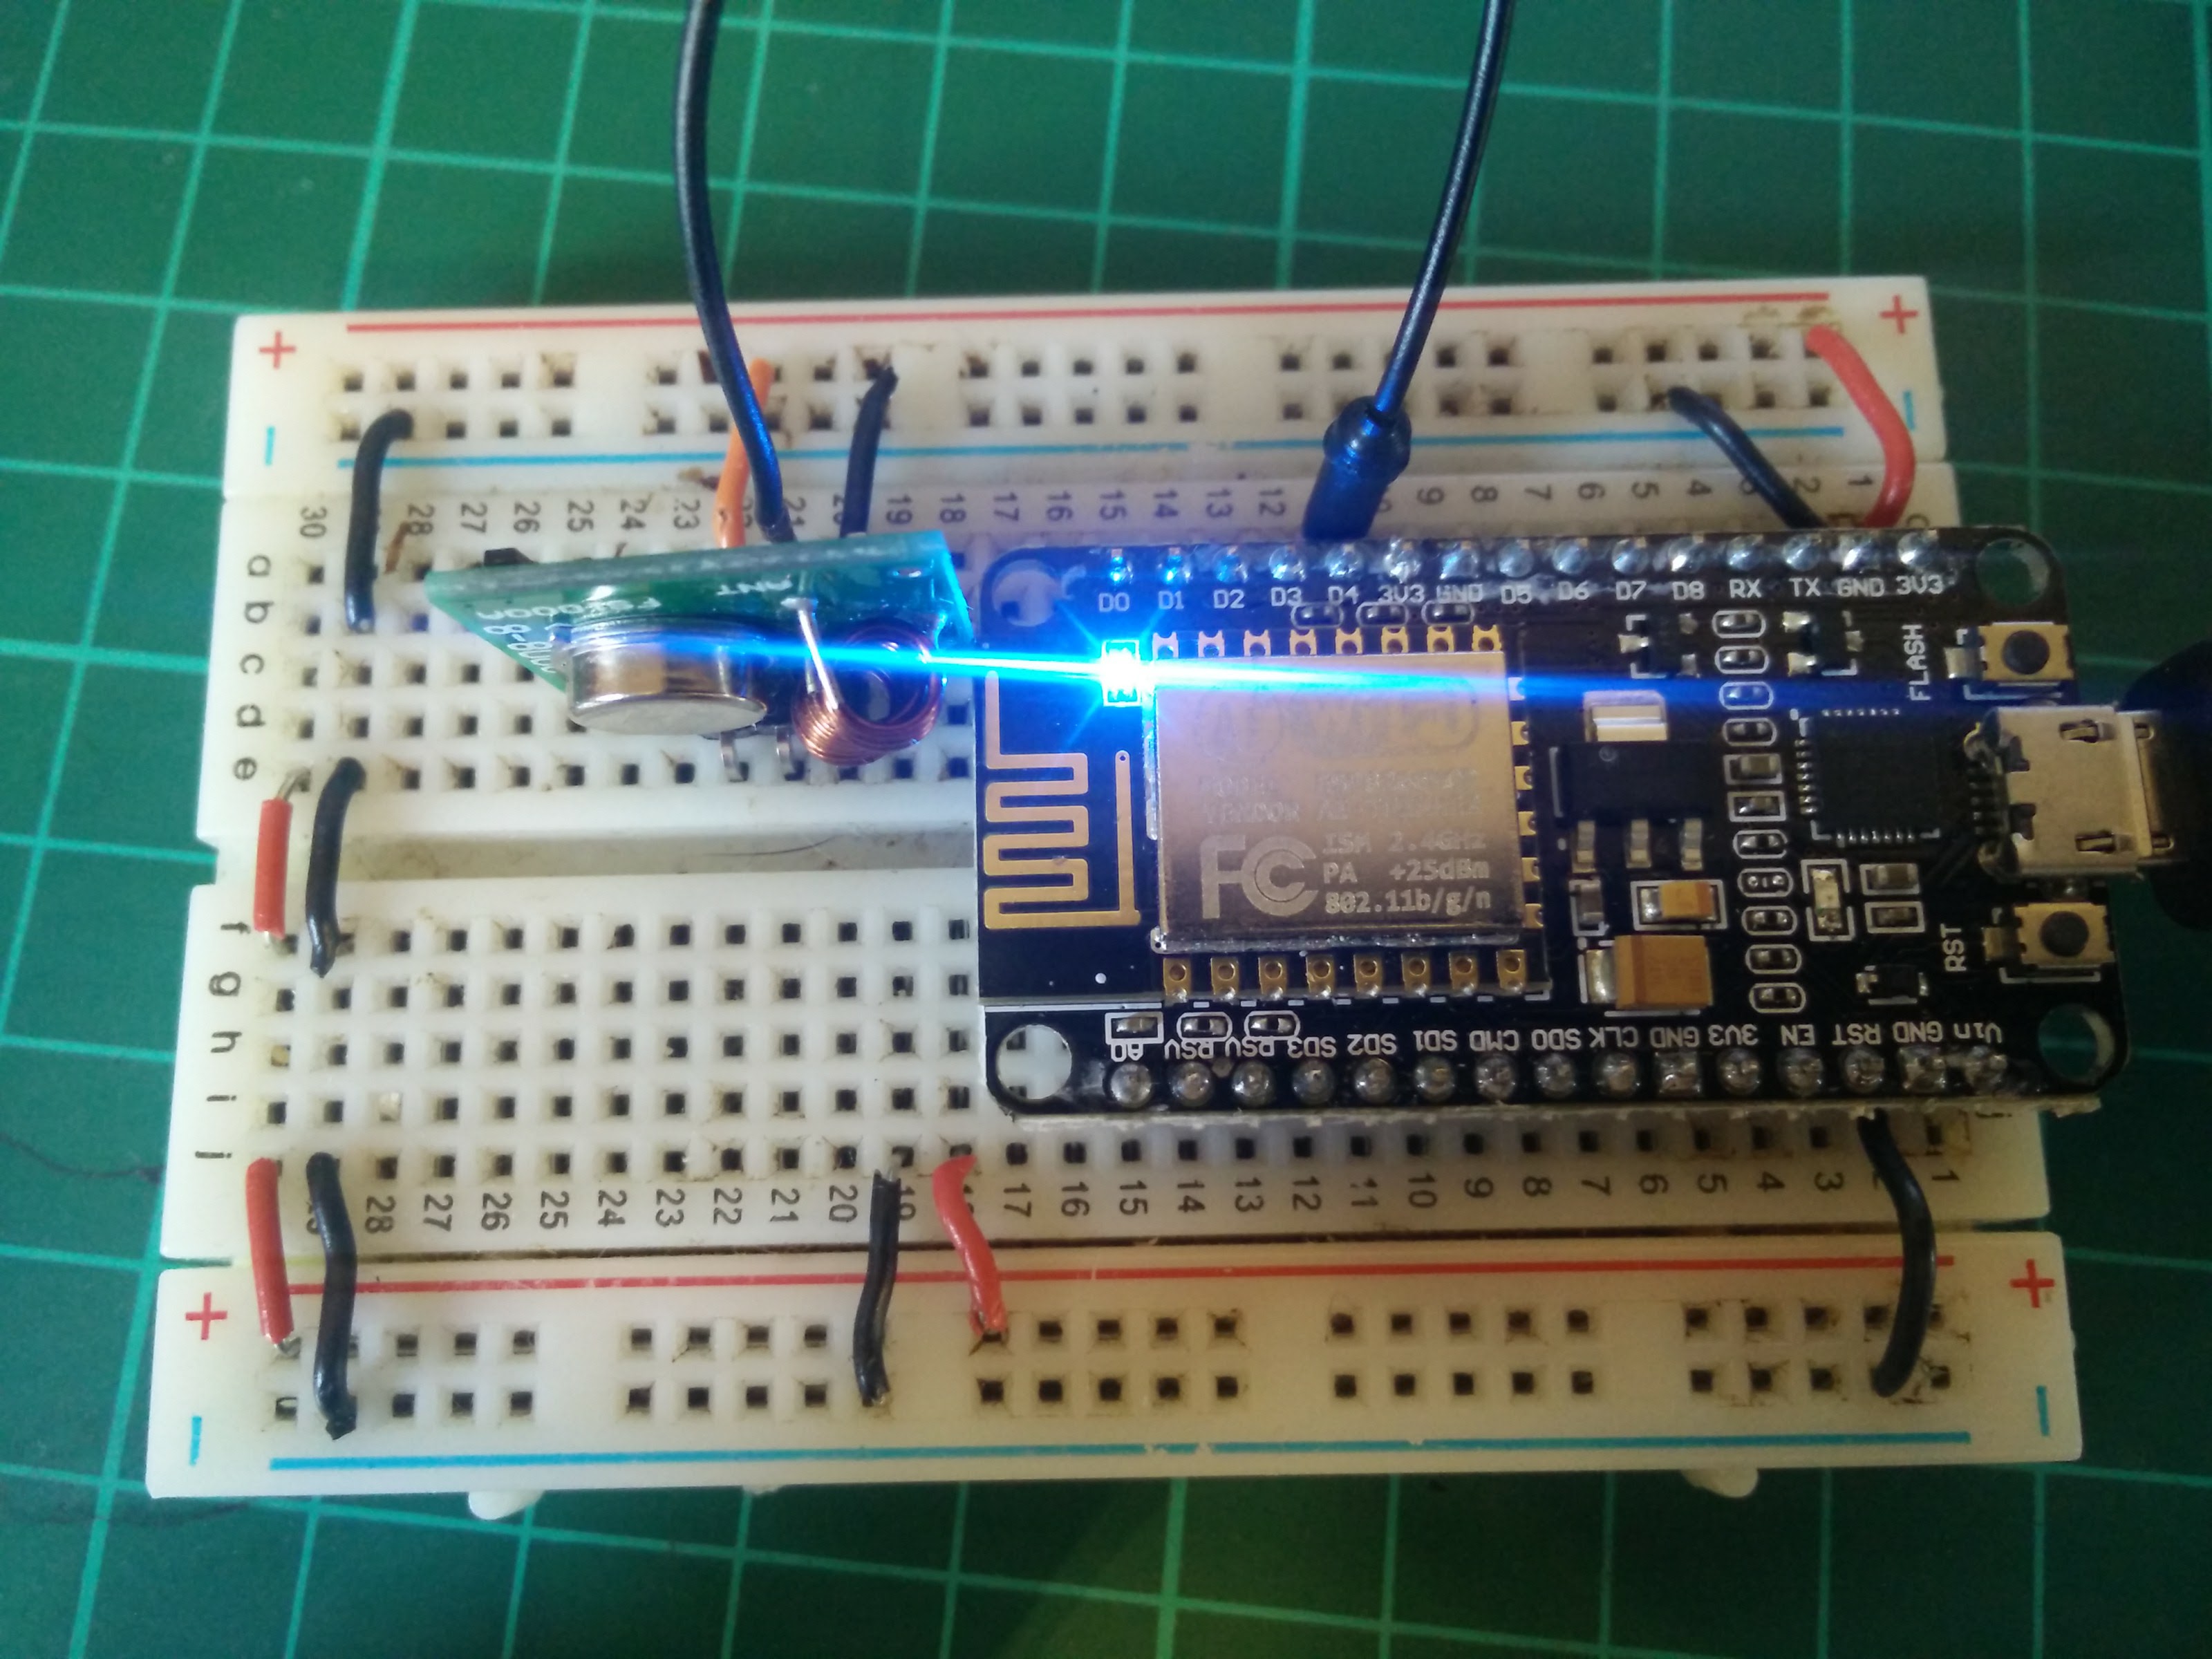
about how to use a generic 433Mhz radio module with an ESP8266 to control Energenie sockets.
So we decided to replace our Raspberry setup with this cheaper, smaller, portable and scalabe solution.
All you need is an ESP8266 and this tiny and cheap radio module
In order to build this
The detailed guide and schemas about how to do it is on our own Github repo