<?xml version="1.0" encoding="utf-8"?><feed xmlns="http://www.w3.org/2005/Atom" ><generator uri="https://jekyllrb.com/" version="3.10.0">Jekyll</generator><link href="https://coconauts.net/blog/feed.xml" rel="self" type="application/atom+xml" /><link href="https://coconauts.net/blog/" rel="alternate" type="text/html" /><updated>2026-05-08T13:14:20+00:00</updated><id>https://coconauts.net/blog/feed.xml</id><title type="html">The Coconauts Blog</title><subtitle>Hardware and software projects</subtitle><entry><title type="html">Making pebble apps in 2026</title><link href="https://coconauts.net/blog/blog/2026/05/08/pebble-apps/" rel="alternate" type="text/html" title="Making pebble apps in 2026" /><published>2026-05-08T00:00:00+00:00</published><updated>2026-05-08T00:00:00+00:00</updated><id>https://coconauts.net/blog/blog/2026/05/08/pebble-apps</id><content type="html" xml:base="https://coconauts.net/blog/blog/2026/05/08/pebble-apps/"><![CDATA[<p>‘Member <a href="https://www.kickstarter.com/projects/getpebble/pebble-e-paper-watch-for-iphone-and-android">Pebble</a>? It was one of the first smartwatches in the market, and in my personal opinion, the only one that got the concept right: it was minimal, efficient, and tinker-friendly. People could program apps for it, just like with a smartphone. Pebbles were so popular back in the day that the company died of success: took up too much investment, and ended up being bought by Fitbit, who <a href="https://web.archive.org/web/20180705003113/https://blog.getpebble.com/2016/12/07/fitbit/">officially discontinued the project in 1016</a>.</p>
<p>The community around Pebble was naturally disappointed, to the point that a group of enthusiasts (who called themselves <a href="https://rebble.io/">“the Rebble Alliance”</a>), found a way to keep their watches alive by building their own replacement of the online services and app store, and scraped all of the existing watch apps and faces before the official ones were shut down. But ultimately, our devices ended up dying of old age.</p>

<p>Then last year, Pebble’s original author announced <a href="https://ericmigi.com/blog/why-were-bringing-pebble-back/">that they were resurrecting the project</a>: and there was much rejoicing! Production took a while, but as of today you can <a href="https://repebble.com/">buy a brand new Pebble watch</a>. And whatsmore: they imported all of the old archive of apps and faces rescued by Rebble into <a href="https://apps.repebble.com">the new app store</a>, which are still compatible with the new watches. A success story in digital preservation!</p>

<p>Recently, there was a <a href="https://repebble.com/blog/spring-2026-pebble-app-contest">official app-making contest</a> which served as the perfect excuse to build <a href="https://apps.repebble.com/apps/dev/coconauts_1e79b46fb4a32ceee9259940">a couple of apps ourselves</a>.</p>

<div class="img-with-text" style="display: block; margin: 0 auto; text-align: center;">
    <img src="/images/posts/pebble/neko_IRL.gif" alt="Neko watchface on a pebble watch" style="max-width: 300px; width: 100%;" />
    <p>One of the apps we've build: a Neko wristmate</p>
</div>

<!--more-->

<h2 id="neko-wristmate">Neko wristmate</h2>

<p>Mar built a watchface (ie, an app whose purpose is to run as the main display of the device) featuring an animated <a href="https://en.wikipedia.org/wiki/Neko_(software)">Neko screenmate mascot</a>, alongside the time and date. The Neko will play around for a bit, and fall asleep after a while. It will wake up on a tap event (eg, when you tap the watch or do a wrist-turn movement).</p>

<p><img src="/images/posts/pebble/pebble_neko.gif" alt="Neko watchface screenshot" style="display: block; margin: 0 auto; text-align: center;" /></p>

<ul>
  <li><a href="https://apps.repebble.com/neko-wristmate_4c25df439af543d19c98630a">Pebble app store.</a></li>
  <li><a href="https://github.com/coconauts/pebble-neko-watchface">Source code.</a></li>
</ul>

<h2 id="80-battery-charged">80% battery charged</h2>

<p>Javi built an app that triggers on charging, and will notify the user when the charge level reaches 80%. This way you can choose to interrupt the charge before reaching 100%, which is useful for preventing long term  battery capacity degradation.</p>

<p><img src="/images/posts/pebble/pebble_battery.png" alt="80% battery app screenshot" style="display: block; margin: 0 auto; text-align: center;" /></p>

<ul>
  <li><a href="https://apps.repebble.com/80-battery-charged_e7540c9775d545af81ba7f3f">Pebble app store.</a></li>
  <li><a href="https://github.com/rephus/pebble-battery-charged">Source code.</a></li>
</ul>

<h2 id="implementation-details">Implementation details</h2>

<p>Pebble apps used to be non-trivial to build back in the day. They need to be coded in C, and although the SDK provides a lot of helpers, building something minimally complex (eg, with animations, or interactions) was cumbersome and error prone.</p>

<p>Today this process is a lot easier if you enlist your AI agent of choice as a helping hand. We’ve built ours using Claude and <a href="https://github.com/coredevices/pebble-watchface-agent-skill">the official Pebble-development skill</a>.</p>

<p>Even if you use a clanker for the heavy lifting, it’s a good idea to manually go though <a href="https://developer.repebble.com/tutorials/watchface-tutorial/part1/">the official tutorial</a> first, which helps you familiarize with several low-level pebble concepts that ure useful to know when designing your apps.</p>

<p>An important point to consider is that there are a lot more Pebble models now that there were back in the 2010s, each with different characteristics. For example: different screen resolutions, colored or black-and-white displays, or the newest model even has touch support. The SDK designates each of them as a <em>platform</em> with a codename (see <a href="https://developer.rebble.io/guides/tools-and-resources/hardware-information/">the relevant docs</a>).</p>

<p>In our case, we initially created our apps with our watch model as the target platform (<em>flint</em> for Pebble 2 Duo), and afterwards added tweaking for others, with the help of Claude. You can use <a href="https://developer.rebble.io/guides/tools-and-resources/pebble-tool/#installing-watchapps">the provided emulators in the SDK</a> to test how it would look in each different platform.</p>

<h2 id="more-than-just-apps">More than just apps</h2>

<p>Pebble is under very active development at the moment, so the landscape is changing very quickly with new and exciting capabilities. There’s <a href="https://cloudpebble.repebble.com/">a cloud IDE</a> with integrated SDK and emulators, new models with touch capabilities and compatible with <a href="https://developer.repebble.com/tutorials/alloy-watchface-tutorial/part1/">apps developed in JS</a>, and there’s a <a href="https://repebble.com/index">companion smart-ring</a> that is currently in the works.</p>

<p>But the best part of it is that this time <a href="https://ericmigi.com/blog/pebble-watch-software-is-now-100percent-open-source/">absolutely everything is open sourced</a>, even the firmware and hardware schematics. This is great news, as it allows the community to get involved in ways other than simply writing apps, but also guarantees that this time pebble will not go away as easily as before, even if the Core Devices company ceases its operations.</p>

<p>We’re very excited about the Pebble comeback and their new direction, and if our time allows we’ll continue to develop more apps for the platform in the future.</p>]]></content><author><name>Mar Bartolome</name></author><category term="hardware" /><category term="pebble" /><category term="hardware" /><category term="smartwatch" /><summary type="html"><![CDATA[The Pebble smartwatch is back, and we've been building apps for it]]></summary></entry><entry><title type="html">Minilos: a device for intentional listening in the digital age</title><link href="https://coconauts.net/blog/blog/2026/04/30/minilos/" rel="alternate" type="text/html" title="Minilos: a device for intentional listening in the digital age" /><published>2026-04-30T00:00:00+00:00</published><updated>2026-04-30T00:00:00+00:00</updated><id>https://coconauts.net/blog/blog/2026/04/30/minilos</id><content type="html" xml:base="https://coconauts.net/blog/blog/2026/04/30/minilos/"><![CDATA[<p>It’s funny how in the age of digital music, <a href="https://en.wikipedia.org/wiki/Vinyl_revival">vinyl sales are soaring</a>. Sure, Spotify and the likes put all the music in the world at our grasp - but we’ve lost something along the way. We end up just listening to whatever the algorithm fancies, rather than curating our own musical choices. Which is why people are turning to the physical experience of collecting records and playing them intentionally.</p>

<p>That’s all very romantic, but impractical: vinyls are expensive to buy (and more so now that they have turned into collector’s items), and let’s be real, they don’t have the best sound quality (although some people actually prefer it that way).</p>

<p>So, we invented our own solution: <em>minilos</em>. A device that uses mini vinyl records as triggers to play digital music from a speaker. Read on for all the details about the implementation.</p>

<p><img src="/images/posts/minilos/minilos.jpg" alt="The minilos device" style="display: block; margin: 0 auto; text-align: center;" /></p>

<!--more-->

<h2 id="first-prototype-with-raspberry-pi">First prototype, with Raspberry Pi</h2>

<p>If you’ve been following our blog closely, you’ll notice a lot of similarities with another project we’ve shown you before: <a href="https://coconauts.net/blog/2025/07/25/nfc-floppy-disks/">the NFC floppy disk launcher</a>. Indeed, minilos follows exactly the same approach, only applied to music.</p>

<p>We did a first version of this project several years ago actually. At that time, we played music at home through a <a href="https://en.wikipedia.org/wiki/Google_Nest_(smart_speakers)">Google smart speaker</a>, casted from Spotify. The process was kind of a PITA, since it involved opening the Spotify app on the phone, searching for the music you want to listen to, and then casting to the speaker, and praying that it works.</p>

<p>At some point we discovered <a href="https://es.aliexpress.com/item/1005003818148615.html">some cute coasters on Aliexpress in the shape of mini vinyl records</a>, and we thought, wouldn’t it be cool to play music from these instead?</p>

<p>And thus, we devised a system to bridge both ends: we sticked NFC tags into the mini-vinyls, and used a <a href="https://www.raspberrypi.com/">Raspberry Pi</a> running a python script to read them, match each tag with a spotify album ID, and then tell the <a href="https://developer.spotify.com/documentation/web-api">Spotify API</a> to play it in our Google Speaker. We made a little plywood case to enclose the RPi, and place the <em>minilo</em> on top - so it all felt like you were playing an old-school record.</p>

<p><img src="/images/posts/minilos/old_minilos.jpg" alt="The original minilos prototype" style="display: block; margin: 0 auto; text-align: center;" /></p>

<p>The full code and BOM for this version are <a href="https://github.com/coconauts/minilos">on Github</a>.</p>

<h2 id="revision-with-esphome-and-domotics">Revision, with ESPHome and domotics</h2>

<p>The device worked just nicely, but after some time, we started progressively <a href="https://coconauts.net/blog/2025/10/28/backup-internet-setup/">incorporating domotics into our home</a>, to the point where most of our devices are now connected with a <a href="https://www.home-assistant.io/">Home Assistant</a> instance. And it turns out we could migrate the logic of the device into different parts of our domotics system.</p>

<p>First, we replaced with Raspberry Pi with an <a href="https://en.wikipedia.org/wiki/ESP32">ESP32 board</a> running the <a href="https://esphome.io/">ESPHome firmware</a>. This way, with just a bit of config (describing a <a href="https://esphome.io/components/binary_sensor/pn532/">pn532 NFC component</a>, and <a href="https://esphome.io/components/text_sensor/template/">a text sensor</a>), we can continuously read from the NFC and publish to a HA entity:</p>

<div class="language-yaml highlighter-rouge"><div class="highlight"><pre class="highlight"><code><span class="na">text_sensor</span><span class="pi">:</span>
  <span class="pi">-</span> <span class="na">platform</span><span class="pi">:</span> <span class="s">template</span>
    <span class="na">id</span><span class="pi">:</span> <span class="s">last_tag</span>
    <span class="na">name</span><span class="pi">:</span> <span class="s2">"</span><span class="s">Last</span><span class="nv"> </span><span class="s">NFC</span><span class="nv"> </span><span class="s">Tag"</span>

<span class="na">pn532_i2c</span><span class="pi">:</span>
  <span class="na">update_interval</span><span class="pi">:</span> <span class="s">2s</span>
  <span class="na">on_tag</span><span class="pi">:</span>
    <span class="na">then</span><span class="pi">:</span>
      <span class="pi">-</span> <span class="na">lambda</span><span class="pi">:</span> <span class="pi">|-</span>
          <span class="s">ESP_LOGI("pn532", "Tag scanned: %s", x.c_str());</span>
          <span class="s">id(last_tag).publish_state(x);</span>
  <span class="na">on_tag_removed</span><span class="pi">:</span>
    <span class="na">then</span><span class="pi">:</span>
      <span class="pi">-</span> <span class="na">lambda</span><span class="pi">:</span> <span class="pi">|-</span>
          <span class="s">ESP_LOGI("pn532", "Tag removed");</span>
          <span class="s">id(last_tag).publish_state("None");</span>
</code></pre></div></div>

<div class="img-with-text" style="display: block; margin: 0 auto; text-align: center;">
    <img src="/images/posts/minilos/HA_last_nfc_tag.png" alt="Last NFC Tag value on HA" />
    <p>Last NFC Tag value now accessible from HA</p>
</div>

<p>Then, our <a href="https://nodered.org/">Node-RED</a> instance has a workflow that monitors that entity, and triggers when its value changes.</p>

<p><img src="/images/posts/minilos/nodered_minilos.png" alt="Minilos workflow in Node-RED" style="display: block; margin: 0 auto; text-align: center;" /></p>

<p><code class="language-plaintext highlighter-rouge">Set playlist</code> is a custom function that contains the mapping between NFC ids and Spotify album ids:</p>

<div class="language-javascript highlighter-rouge"><div class="highlight"><pre class="highlight"><code><span class="kd">function</span> <span class="nx">translate</span> <span class="p">(</span><span class="nx">payload</span><span class="p">)</span> <span class="p">{</span>
    <span class="nx">node</span><span class="p">.</span><span class="nx">warn</span><span class="p">(</span><span class="s2">`Reading minilo ID </span><span class="p">${</span><span class="nx">msg</span><span class="p">.</span><span class="nx">payload</span><span class="p">}</span><span class="s2">`</span><span class="p">)</span>
    <span class="k">switch</span><span class="p">(</span><span class="nx">msg</span><span class="p">.</span><span class="nx">payload</span><span class="p">){</span>

        <span class="k">case</span> <span class="dl">'</span><span class="s1">04-59-4A-3A-BC-2B-80</span><span class="dl">'</span><span class="p">:</span> <span class="k">return</span> <span class="dl">'</span><span class="s1">3ai8NgXP53ehLXGcA839CF</span><span class="dl">'</span><span class="p">;</span> 
        <span class="k">case</span> <span class="dl">'</span><span class="s1">04-5C-4A-3A-BC-2B-80</span><span class="dl">'</span><span class="p">:</span> <span class="k">return</span> <span class="dl">'</span><span class="s1">37i9dQZF1DZ06evO0ENBD2</span><span class="dl">'</span><span class="p">;</span> 
        <span class="k">case</span> <span class="dl">'</span><span class="s1">04-FB-7F-72-5D-67-80</span><span class="dl">'</span><span class="p">:</span> <span class="k">return</span> <span class="dl">'</span><span class="s1">2uQmaiOrGukfHhZAm15x4K</span><span class="dl">'</span><span class="p">;</span> 
        <span class="k">case</span> <span class="dl">'</span><span class="s1">04-EA-7D-72-5D-67-80</span><span class="dl">'</span><span class="p">:</span> <span class="k">return</span> <span class="dl">'</span><span class="s1">1SwyMhnJyMEvpel7ystCEB</span><span class="dl">'</span><span class="p">;</span> 
        <span class="k">case</span> <span class="dl">'</span><span class="s1">04-2C-C9-6A-28-73-81</span><span class="dl">'</span><span class="p">:</span> <span class="k">return</span> <span class="dl">'</span><span class="s1">0lWFpTETkmMBmy5xt1Ujtv</span><span class="dl">'</span><span class="p">;</span> 
        <span class="k">case</span> <span class="dl">'</span><span class="s1">04-20-C9-6A-28-73-81</span><span class="dl">'</span><span class="p">:</span> <span class="k">return</span> <span class="dl">'</span><span class="s1">7fxPnuKXtJ3STCfWcqTLup</span><span class="dl">'</span><span class="p">;</span> 
        <span class="k">case</span> <span class="dl">'</span><span class="s1">04-5B-4A-3A-BC-2B-80</span><span class="dl">'</span><span class="p">:</span> <span class="k">return</span> <span class="dl">'</span><span class="s1">2P5BwSSmpZUgOBLLuSbZzB</span><span class="dl">'</span><span class="p">;</span> 
        <span class="nl">default</span><span class="p">:</span> 
            <span class="nx">node</span><span class="p">.</span><span class="nx">warn</span><span class="p">(</span><span class="s2">`Missing minilo ID </span><span class="p">${</span><span class="nx">msg</span><span class="p">.</span><span class="nx">payload</span><span class="p">}</span><span class="s2">`</span><span class="p">)</span>
            <span class="k">return</span> <span class="kc">null</span> 

    <span class="p">}</span>

<span class="p">}</span>
<span class="kd">const</span> <span class="nx">playlist</span> <span class="o">=</span> <span class="nx">translate</span><span class="p">(</span><span class="nx">msg</span><span class="p">.</span><span class="nx">payload</span><span class="p">)</span>
<span class="nx">msg</span><span class="p">.</span><span class="nx">payload</span> <span class="o">=</span> <span class="nx">playlist</span>
<span class="k">return</span> <span class="nx">msg</span><span class="p">;</span>
</code></pre></div></div>

<p>Then our self-hosted <a href="https://www.music-assistant.io/">MusicAssistant</a> instance gets called to play the Spotify album in our Google Speaker (both have been previously configured there as providers <a href="https://www.music-assistant.io/music-providers/spotify/">[1]</a><a href="https://www.music-assistant.io/player-support/google-cast/">[2]</a>).</p>

<p>It works just the same from an end user perspective, but updating the mapping to add new <em>minilos</em> is now easier, and it integrates seamlessly with other automations (eg, stop the music when we leave home).</p>

<h2 id="form-factor">Form factor</h2>

<p>The original wooden box was not very elegant, but the mini-vinyl coasters came with an equally cute holder base in the shape of a record player. The ESP32 board was small enough the fit underneath, so we did just that, and now it serves as the device case.</p>

<p><img src="/images/posts/minilos/ESP32_minilos.jpg" alt="ESP32 and NFC reader concealed under the miniplayer" style="display: block; margin: 0 auto; text-align: center;" /></p>

<p>To craft the <em>minilos</em> themselves, we just conceal the NFC tag underneath a sticker that serves as the record label. We use <a href="https://github.com/coconauts/minilos/blob/main/cover.xcf">a GIMP template</a> to adapt the label image to the correct size for the <em>minilo</em> stickers, and then we print it into glossy sticker paper. Then we print it on glossy sticker paper, concealing the NFC tag under the label.</p>

<p><img src="/images/posts/minilos/minilo_records.jpg" alt="Minilo records" style="display: block; margin: 0 auto; text-align: center;" /></p>

<p>Each <em>minilo</em> needs a dummy read first, to obtain the NFC id, and then we need to update the mapping function in Node-RED for it to trigger the right music the next time it’s played.</p>

<h2 id="future">Future</h2>

<p>This setup works well for us, since it’s neatly integrated with our home system, but is not easily replicable, and it has too many moving parts. So we would like to rework this project to turn it into a standalone device, without the need of a Google Speaker, Spotify, or domotics - stay tuned!</p>

<p>If you enjoyed this post, you’ll also appreciate its cousin project: <a href="https://coconauts.net/blog/2025/07/25/nfc-floppy-disks/">the NFC floppy disk game launcher</a>.</p>]]></content><author><name>Mar Bartolome</name></author><category term="hardware" /><category term="raspberrypi" /><category term="esp32" /><category term="domotics" /><category term="nfc" /><category term="hardware" /><summary type="html"><![CDATA[The vinyl experience, with digital music]]></summary></entry><entry><title type="html">Pizza&amp;amp;Peli: personal movie session planner and tracker</title><link href="https://coconauts.net/blog/blog/2026/02/05/pizzaypeli/" rel="alternate" type="text/html" title="Pizza&amp;amp;Peli: personal movie session planner and tracker" /><published>2026-02-05T00:00:00+00:00</published><updated>2026-02-05T00:00:00+00:00</updated><id>https://coconauts.net/blog/blog/2026/02/05/pizzaypeli</id><content type="html" xml:base="https://coconauts.net/blog/blog/2026/02/05/pizzaypeli/"><![CDATA[<p>At home we do a weekly movie session with the kids, which is met with high anticipation. But we’re not the kind of folks that just pop open Netflix of Disney+ and watch whatever is there - no, we take our children’s education seriously, and as hopeless geeks, that obviously includes carefully curating the selection of movies we consume, so that we expose them to cinematic gems at an age-appropriate rate.</p>

<p>We used to just keep a list in <a href="https://obsidian.md/">Obsidian</a> with movie ideas as they came along, but as the list grew longer it became difficult to manage. Also, often other parents ask for recommendations on which movies we’ve watched and liked, but we had to rely on our memory to recall them.</p>

<p>So, we’ve built an app to manage both usecases: Pizza&amp;Peli.</p>

<div class="img-with-text" style="display: block; margin: 0 auto; text-align: center;">
    <img src="/images/posts/pizzaypeli/pizzaypeli.png" alt="Pizza&amp;Peli app screenshot" style="max-width: 600px; width: 100%;" />
    <p>Named after the way we call our movie sessions at home 🍕</p>
</div>

<!--more-->

<p>It’s a <a href="https://www.djangoproject.com/">Django app</a> that uses <a href="https://github.com/tveronesi/imdbinfo">scraped metadata from iMDB</a>, and allows to keep track of the upcoming and previously shown movies in our home sessions. We self-host it in our home server, and pop it up every time we have a new idea for a movie to add to the list, and also to keep of what movies we’ve watched and when.</p>

<p><a href="https://github.com/coconauts/pizzaypeli">The source code is on Github</a>. Currently it’s an MVP, but we plan to add more features, like trailers, PG rating, or multiple accounts (so we can use it to keep track of our grown-up movie sessions too).</p>

<p>The app was developed as an experiment to code with the aid of <a href="https://code.claude.com/">claude code</a>, which allowed for a much faster development than if it would have been written from scratch. I’ve kept <a href="https://github.com/coconauts/pizzaypeli/blob/main/claude_log/prompts.md">a log of the evolution of the app</a>, with prompts and screenshots.</p>]]></content><author><name>Mar Bartolome</name></author><category term="software" /><category term="django" /><category term="webdev" /><category term="movies" /><summary type="html"><![CDATA[We built our own personal movie session planner app]]></summary></entry><entry><title type="html">My journey as a Djangonaut - from zero to contributor in one space mission</title><link href="https://coconauts.net/blog/blog/2025/11/06/my-journey-as-a-djangonaut/" rel="alternate" type="text/html" title="My journey as a Djangonaut - from zero to contributor in one space mission" /><published>2025-11-06T10:00:00+00:00</published><updated>2025-11-06T10:00:00+00:00</updated><id>https://coconauts.net/blog/blog/2025/11/06/my-journey-as-a-djangonaut</id><content type="html" xml:base="https://coconauts.net/blog/blog/2025/11/06/my-journey-as-a-djangonaut/"><![CDATA[<p>Disclaimer: I’m a fan of open source. The spirit of openness and collaboration just makes software better, and hackers happier. The benefits of open source are noticeable even if you’re just a user - but multiply when you become a contributor as well.</p>

<p>However, contributing into an existing project is always daunting. Specially when it comes to popular projects, with a huge codebase and thousands of participants - such as <a href="https://www.djangoproject.com/">the Django project</a>, for example. It’s hard to know where to start, how to proceed, and how to get your changes accepted. For all the years I’ve been working as a software engineer, contributing to open source is something that has always been on my wishlist, but never got to achieve.</p>

<p>But as it turns out, Django has an amazing community and runs a periodic program to help aspiring contributors along their journey into their first contribution to the project: <a href="https://djangonaut.space/">the Djangonauts program</a>. I joined <a href="https://djangonaut.space/sessions/2025-session-5/">session 5, running October-November 2025</a>.</p>

<div class="img-with-text" style="display: block; margin: 0 auto; text-align: center;">
    <img src="/images/posts/djangonauts/logo.png" alt="djangonauts logo" />
    <p>Similarity to the Coconauts name purely coincidental 😬</p>
</div>

<!--more-->

<h2 id="ready-for-takeoff">Ready for takeoff</h2>

<p>The program is whimsically themed around a space mission, so I’m following the same convention through this post. Djangonauts (which are the participants who want to become contributors) are placed into teams leaded by a Captain and a Navigator (which are respectively, experienced members of the community and stablished contributors, whose role is to guide the Djangonauts along their journey). Each team is focused around a Django subproject: there are teams for the Django framework itself, but also for the <a href="https://github.com/django-commons/django-debug-toolbar">debug toolbar</a>, <a href="https://github.com/DjangoGirls/djangogirls">Django Girls</a> or in my case, my team was working on <a href="https://github.com/django-cms/django-cms">Django CMS</a>.</p>

<p>The spirit of the program is that of low-structured guidance and support from senior members of the community to aspiring ones, and between the Djangonaut peers themselves. During the program, each Djangonaut is expected to achieve a contribution into their assigned projects, even if it’s a small one - as more important than the contribution itself, is the experience of the contribution process and the integration into the community.</p>

<h2 id="start-the-engines">Start the engines</h2>

<p>The first week of the program is used to familiarise ourselves with the project - <a href="https://www.django-cms.org/en/">Django CMS</a> is not as popular as it’s big brother, and none of the Djangonauts in the team were acquainted with it. So the first thing to do was spending some time going through tutorials, documentation and setting up a sample project before we do any hacking.</p>

<p>Going through a project onboarding with a contributor mindset is extremely valuable: it’s only the first time that you go through the introductory materials that you get to experience them with fresh eyes, and are able to evaluate it’s effectiveness. So simply going through this learning process, before writing any code, allowed to identify some areas where the documentation was confusing. And as new contributors, we’re encouraged to fix it!</p>

<p>The process of making a change to an Open Source process, even it it’s in the docs, goes through <strong>discussion and collaboration with the existing project maintainers</strong>. They need to evaluate your change and guide the direction to be taken. So the first step is to <a href="https://github.com/django-cms/django-cms/issues/8361">raise tickets</a> for <a href="https://github.com/django-cms/djangocms-frontend/issues/312#issuecomment-3442345184">the issues that you encountered</a>. Those tickets (or <em>issues</em>, as Github calls them) might give way into <a href="https://github.com/django-cms/djangocms-frontend/pull/317">pull requests implementing the proposed changes</a> - which might not necessarily be implemented by the same person! <strong>Publishing a ticket/issue</strong> helps current and future contributors become aware of a bug, a possible enhancement, or even feature ideas, and is in essence another useful way of contributing to open source, without writing any code.</p>

<p><img src="/images/posts/djangonauts/issue.png" alt="Github issue" style="display: block; margin: 0 auto; text-align: center;" /></p>

<p>For example, later during the program, we discovered a bug in Django CMS. <a href="https://github.com/django-cms/djangocms-frontend/issues/318">I raised a ticket reporting it</a>, and <a href="https://github.com/django-cms/djangocms-frontend/issues/318">our navigator promptly pushed a fix</a>.</p>

<h2 id="launch">Launch!</h2>

<p>And now comes the time to really get started: our navigator offered a curated list of tickets that are approachable for newcomers into the project, and we are to pick one and start hacking.</p>

<p>This is perhaps the biggest barrier of entry for aspiring contributors in most OS projects - when you are lacking the project context, most tickets won’t even make any sense to you. And here’s where community and curation come to the rescue: many projects use tags for their issues, which can be used for example to tell apart features, from bugs, from documentation. Or a common pattern is to use them to <strong>mark tickets that are friendlier to new contributors</strong>, with names such as <strong>“easy pickings”</strong> or <strong>“good first issue”</strong>.</p>

<p><img src="/images/posts/djangonauts/issuestags.png" alt="Tagged github issues" style="display: block; margin: 0 auto; text-align: center;" /></p>

<p>In my case, I went for <a href="https://github.com/django-cms/djangocms-frontend/issues/250">a bug ticket</a>, which was marked as “easy pickings”. The ticket had a very clear description on how to reproduce the bug, with even screenshots included - so I settled into doing just that.</p>

<p>And sure enough, reproducing the bug locally was pretty straightforward. But then discovering the source of the bug was a different matter… It turned out to be a tricky one, rather than an easy picking! It required plenty of discussion with our navigator to be able to triage the bug, and decide on a solution - which does not fix the source of the bug, but at least is an UI improvement.</p>

<p>These changes were implemented and <a href="https://github.com/django-cms/djangocms-frontend/pull/316">raised as a feature pull request</a>. The pull request had a bit of back and forth to get the automated CI system to give it the green light, as well as a passing review from our navigator, which helped make sure the changes were backwards compatible and wouldn’t break existing instances of djangocms. <a href="https://en.wikipedia.org/wiki/Move_fast_and_break_things">Moving fast and breaking things</a> is not the way of open source!</p>

<div class="img-with-text" style="display: block; margin: 0 auto; text-align: center;">
    <img src="/images/posts/djangonauts/mergedPR.png" alt="Merged pull request" />
    <p>Success!</p>
</div>

<p>Once again, the key takeout is that <strong>collaboration with a project maintainer</strong> was essential during the process.</p>

<h2 id="work-as-a-crew">Work as a crew</h2>

<p>The Djangonauts is not a solo mission: the spirit of the program is collaboration not only with your mentors, but also with the other Djangonauts. There’s a lot of diversity in the participants: not just in terms of geography of demographics, but also there’s people from very disparate backgrounds. There’s people who are already active members of the Python/django community, as well as people with very little exposure to the project, and there’s experienced developers alongside people who are newer to programming. Just like in open source projects in the wild, if you think about it!</p>

<p>The magic of open source is that <strong>every part of the process is open, and anyone can collaborate</strong>. So even if a ticket is mainly driven by one contributor, it doesn’t mean that others can’t lend a hand as well. As the famous quote goes: <a href="https://en.wikipedia.org/wiki/Linus%27s_law"><em>given enough eyeballs, all bugs are shallow</em></a> - i.e., more people have a broader view.</p>

<p>Djangonauts are encouraged to “chip in” into their peer’s doings, not just to help, but also to learn further. Peeking into you peer’s tickets and pull requests is a great way to learn, but also gives you the necessary context to help them if they get stuck - via chat discussions or even live <a href="https://en.wikipedia.org/wiki/Pair_programming">pair programming</a> sessions.</p>

<p><img src="/images/posts/djangonauts/pair.png" alt="Djangonauts pair programming" style="display: block; margin: 0 auto; text-align: center;" /></p>

<p>There’s nothing stopping you from adding comments into other people’s pull requests in fact, to provide further help or feedback. Or even having multiple people collaborating by pushing code into the same branch (with prior coordination, to avoid <a href="https://docs.github.com/en/pull-requests/collaborating-with-pull-requests/addressing-merge-conflicts/about-merge-conflicts">conflicts!</a>).</p>

<h2 id="to-infinity-and-beyond">To infinity and beyond</h2>

<p>We’re still halfway through the program, but already I feel like it’s been a rewarding experience. It taught me valuable etiquette and best practices that will guide my future open source efforts, and most importantly, it helped me break that first barrier of making <a href="(https://github.com/django-cms/djangocms-frontend/pull/316)">my first successful code contribution to an open source project</a>, which has given me the necessary confidence to keep going at it.</p>

<p>I’m really grateful to the Django community for their welcomeness and dedication - it comes to show that when you cultivate a great community, you grow a great project!</p>

<p>This is just the first mission, but I’m sure more adventures in Django an open source will follow! 🚀</p>]]></content><author><name>Mar Bartolome</name></author><category term="software" /><summary type="html"><![CDATA[Disclaimer: I’m a fan of open source. The spirit of openness and collaboration just makes software better, and hackers happier. The benefits of open source are noticeable even if you’re just a user - but multiply when you become a contributor as well. However, contributing into an existing project is always daunting. Specially when it comes to popular projects, with a huge codebase and thousands of participants - such as the Django project, for example. It’s hard to know where to start, how to proceed, and how to get your changes accepted. For all the years I’ve been working as a software engineer, contributing to open source is something that has always been on my wishlist, but never got to achieve. But as it turns out, Django has an amazing community and runs a periodic program to help aspiring contributors along their journey into their first contribution to the project: the Djangonauts program. I joined session 5, running October-November 2025. Similarity to the Coconauts name purely coincidental 😬]]></summary></entry><entry><title type="html">Backup Internet Setup for Emergencies</title><link href="https://coconauts.net/blog/blog/2025/10/28/backup-internet-setup/" rel="alternate" type="text/html" title="Backup Internet Setup for Emergencies" /><published>2025-10-28T10:00:00+00:00</published><updated>2025-10-28T10:00:00+00:00</updated><id>https://coconauts.net/blog/blog/2025/10/28/backup-internet-setup</id><content type="html" xml:base="https://coconauts.net/blog/blog/2025/10/28/backup-internet-setup/"><![CDATA[<p>We take so many things for granted in life when they are working fine, but when they fail, you suddenly realize they hanging by a thread - like, literally, THE INTERNET.</p>

<p>At home, we get our Internet from a fiber connection, which, as it turns out, it’s just light pulses coming thru a cable down the street. And this is a single point of failure, ready to be attacked by unlikely adversaries…</p>

<!--more-->

<p><img src="/images/posts/rat.webp" alt="A cheeky rat" style="display: block; margin: 0 auto; text-align: center;" /></p>

<p>Rats! These pesky critters happen to co-live in our neighborhood, and for mysterious reasons they love chewing on the fiber Internet cables - so light pulses no longer reach our home: the LED pilots fade out in our router, and despair looms, for we are now isolated from the digital world.</p>

<div class="img-with-text" style="display: block; margin: 0 auto; text-align: center;">
    <img src="/images/posts/ohnointernet.png" alt="Router lights out" />
</div>

<p>Our Internet provider eventually sends a technician to fix the broken cables and bring us back to civilization, but sometimes they take a few days (or even weeks!). They are nice enough to give us complimentary 100GBs of mobile data per day (ie 4G/5G), so we can get going with our lives as we wait.</p>

<h2 id="but-the-problem-escalates">But the problem escalates…</h2>

<p>However, this solution is severely limited for our needs. We can only tap into this connection with a mobile phone, and use it to provide a WiFi hotspot using tethering. This is an acceptable solution if you just need temporary internet on a laptop to work, or a tablet to watch Netflix. But in our case, we don’t just use the internet for work and leisure: we need it for our house to function.</p>

<p>We’re the kind of geeks that are fond of domotics and home automations, and our house is riddled with smart devices to the point of ridiculous: we have around a hundred devices connected to our network, each of them with a fixed IP, integrated with <a href="https://www.home-assistant.io/">Home Assistant</a>, <a href="https://nodered.org/">node-red</a>, <a href="https://uptime.kuma.pet/">kuma</a>, and more… They rely on a local DHCP server that lives in a secondary router, so when that router can’t get Internet, nothing works: we don’t have a doorbell, our blinds don’t roll, our garden doesn’t get watered, our heat pump does not trigger… Reconfiguring all this would be absolutely hellish.</p>

<p><img src="/images/posts/network_broken.png" alt="Broken network diagram" style="display: block; margin: 0 auto; text-align: center;" /></p>

<h2 id="solution-the-single-responsibility-principle">Solution: the single responsibility principle</h2>

<p>There was a simple solution to all this: we purchased <a href="https://www.amazon.com/dp/B07RM95YFC">a 4G router</a> to act as an Internet gateway, in stead of our regular fiber router. This router works by inserting a SIM card, and connects to the Internet via the 4G network, like smartphones do, but other than that it acts like any regular router.</p>

<p>Because the responsibility of the main router in our case is limited to just be a dumb proxy for internet access, it’s completely replaceable: we can choose to use the fiber or 4G router as Internet provider as the need arises. The rest of the network setup remains intact, and our house can keep business as usual during the outage with zero effort.</p>

<p><img src="/images/posts/network_fixed.png" alt="Fixed network diagram" style="display: block; margin: 0 auto; text-align: center;" /></p>

<p>In order to keep using my phone normally, I requested a <a href="https://en.wikipedia.org/wiki/Multi-SIM_card">multi-SIM</a> to my network operator, so that I could have two SIM cards with the same account, one on my phone and another one on the 4G router.</p>

<p>The 4G connection is obviously not as good as the fiber, and we’re still limited to 100GB per day. But by cutting downloads and streaming we get a near-normal Internet experience until the fiber can get fixed.</p>

<div class="img-with-text" style="display: block; margin: 0 auto; text-align: center;">
    <img src="/images/posts/spaghetti.jpg" alt="spaghetti cables" />
    <p>If you dread spaghetti code, try spaghetti cables</p>
</div>

<p>Then we simply swap the entry routers again, and it’s as if nothing ever happened.</p>]]></content><author><name>Mar Bartolome</name></author><category term="hardware" /><summary type="html"><![CDATA[We take so many things for granted in life when they are working fine, but when they fail, you suddenly realize they hanging by a thread - like, literally, THE INTERNET. At home, we get our Internet from a fiber connection, which, as it turns out, it’s just light pulses coming thru a cable down the street. And this is a single point of failure, ready to be attacked by unlikely adversaries…]]></summary></entry><entry><title type="html">NFC Floppy Disk Game Launcher</title><link href="https://coconauts.net/blog/blog/2025/07/25/nfc-floppy-disks/" rel="alternate" type="text/html" title="NFC Floppy Disk Game Launcher" /><published>2025-07-25T10:00:00+00:00</published><updated>2025-07-25T10:00:00+00:00</updated><id>https://coconauts.net/blog/blog/2025/07/25/nfc-floppy-disks</id><content type="html" xml:base="https://coconauts.net/blog/blog/2025/07/25/nfc-floppy-disks/"><![CDATA[<p>As retro-gaming enthusiasts, we have a broad collection of old PC game files that we can conveniently play on modern PCs via DOSBox, SCUMMVM, and other utilities. But when playing on modern hardware, you lose some of the “magic” - for the <em>real</em> retro experience, those who are true purists will actually go and find some old hardware, set it up with an old DOS or Windows 3.1 build, and then install the actual games there. But this is very impractical… so, what if there was a way to simulate the retro experience, with modern technology?</p>

<p>That is exactly what we’ve done: we’re built ourselves a retro PC, using a 386x case, but with a modern PC inside. On it, we’ve installed a fake floppy drive that loads games using NFC - but seemingly, it looks as if they are magically loading from the floppy disks. Read on to learn how!</p>

<video width="400" height="600" controls="" style="display: block; margin: 0 auto; text-align: center;">
  <source src="/images/posts/nfc-floppy/demo.mp4" type="video/mp4" />
  Your browser does not support the video tag.
</video>

<!--more-->

<h2 id="in-a-nutshell">In a nutshell</h2>

<p>As you can imagine, there’s nothing more to this than using retro facades to hide modern hardware: we replaced the innards of the floppy drive with an Arduino hooked to an NFC reader module; Then, each floppy disk has an NFC sticker, that when inserted in the drive gets it’s ID read.</p>

<p>The Arduino program is continuously reading for IDs, and sends them to the PC through the USB-serial port. On the PC, a python script runs in the background reading this port, and has a hardcoded list of NFC ids, each mapped to an execution command that gets run on a subprocess.</p>

<h2 id="hardware">Hardware</h2>

<p><img src="/images/posts/nfc-floppy/mfrc522.png" alt="MFRC522 module" style="display: block; margin: 0 auto; text-align: center;" /></p>

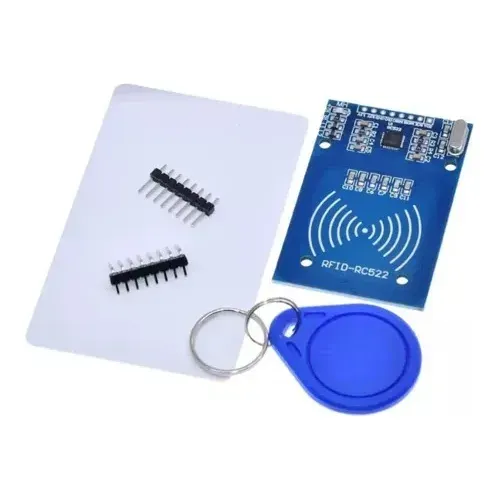
<p>We used an <em>Arduino UNO</em>, with an MFRC522 NFC/RFID module running at 13.56MHz, which supports ISO/IEC 14443 Type A cards, MIFARE, and NTAG formats and has a reading range of 1-3cm. And most importantly, <a href="https://github.com/miguelbalboa/rfid">there’s a community-maintained Arduino library</a> for these modules.</p>

<p>The MFRC522 module needs to be positioned where it can reliably read NFC tags inside inserted floppy disks. However, we found that the metallic shell holding the disks in place was interfering with the readings, so we had to replace it with a more inert material - including the insertion/ejection button. We made a replacement structure out of LEGO building blocks - it was incredibly simple to put together and works like a charm!</p>

<p>&lt;video width=”600” height=”400” controls style=”display: block; margin: 0 auto; text-align: center;&gt;</p>
<source src="/images/posts/nfc-floppy/lego.mp4" type="video/mp4" />

<p>Your browser does not support the video tag.
&lt;/video&gt;</p>

<p>The NFC is connected to the Arduino with the following pinage:</p>
<ul>
  <li>VCC → 3.3V (important: not 5V!)</li>
  <li>GND → Ground</li>
  <li>RST → Digital Pin 9</li>
  <li>SS → Digital Pin 10</li>
  <li>MOSI → Pin 11 (SPI)</li>
  <li>MISO → Pin 12 (SPI)</li>
  <li>SCK → Pin 13 (SPI)</li>
</ul>

<p>And the Arduino itself is connected to the computer via USB for both power and serial communication.</p>

<h2 id="software">Software</h2>

<p>The Arduino is running a script that continuously polls for NFC tags using the aforementioned <a href="https://github.com/miguelbalboa/rfid">MFRC522 library</a> (needs installing as a prerequisite) and sends their unique identifiers via serial communication.</p>

<div class="language-cpp highlighter-rouge"><div class="highlight"><pre class="highlight"><code><span class="cp">#include</span> <span class="cpf">&lt;SPI.h&gt;</span><span class="cp">
#include</span> <span class="cpf">&lt;MFRC522.h&gt;</span><span class="cp">
#include</span> <span class="cpf">&lt;Wire.h&gt;</span><span class="cp">
</span>
<span class="cp">#define SS_PIN 10
#define RST_PIN 9
</span>
<span class="n">MFRC522</span> <span class="nf">mfrc522</span><span class="p">(</span><span class="n">SS_PIN</span><span class="p">,</span> <span class="n">RST_PIN</span><span class="p">);</span>

<span class="kt">void</span> <span class="nf">setup</span><span class="p">()</span> <span class="p">{</span>
  <span class="n">Serial</span><span class="p">.</span><span class="n">begin</span><span class="p">(</span><span class="mi">9600</span><span class="p">);</span>
  <span class="n">SPI</span><span class="p">.</span><span class="n">begin</span><span class="p">();</span>
  <span class="n">mfrc522</span><span class="p">.</span><span class="n">PCD_Init</span><span class="p">();</span>
  <span class="n">Serial</span><span class="p">.</span><span class="n">println</span><span class="p">(</span><span class="s">"NFC Floppy Reader Ready"</span><span class="p">);</span>
<span class="p">}</span>

<span class="kt">void</span> <span class="n">loop</span><span class="p">()</span> <span class="p">{</span>
  <span class="k">if</span> <span class="p">(</span><span class="o">!</span><span class="n">mfrc522</span><span class="p">.</span><span class="n">PICC_IsNewCardPresent</span><span class="p">())</span> <span class="p">{</span>
    <span class="k">return</span><span class="p">;</span>
  <span class="p">}</span>

  <span class="k">if</span> <span class="p">(</span><span class="o">!</span><span class="n">mfrc522</span><span class="p">.</span><span class="n">PICC_ReadCardSerial</span><span class="p">())</span> <span class="p">{</span>
    <span class="k">return</span><span class="p">;</span>
  <span class="p">}</span>

  <span class="c1">// Send UID via serial</span>
  <span class="k">for</span> <span class="p">(</span><span class="n">byte</span> <span class="n">i</span> <span class="o">=</span> <span class="mi">0</span><span class="p">;</span> <span class="n">i</span> <span class="o">&lt;</span> <span class="n">mfrc522</span><span class="p">.</span><span class="n">uid</span><span class="p">.</span><span class="n">size</span><span class="p">;</span> <span class="n">i</span><span class="o">++</span><span class="p">)</span> <span class="p">{</span>
    <span class="n">Serial</span><span class="p">.</span><span class="n">print</span><span class="p">(</span><span class="n">mfrc522</span><span class="p">.</span><span class="n">uid</span><span class="p">.</span><span class="n">uidByte</span><span class="p">[</span><span class="n">i</span><span class="p">]</span> <span class="o">&lt;</span> <span class="mh">0x10</span> <span class="o">?</span> <span class="s">"0"</span> <span class="o">:</span> <span class="s">""</span><span class="p">);</span>
    <span class="n">Serial</span><span class="p">.</span><span class="n">print</span><span class="p">(</span><span class="n">mfrc522</span><span class="p">.</span><span class="n">uid</span><span class="p">.</span><span class="n">uidByte</span><span class="p">[</span><span class="n">i</span><span class="p">],</span> <span class="n">HEX</span><span class="p">);</span>
  <span class="p">}</span>
  <span class="n">Serial</span><span class="p">.</span><span class="n">println</span><span class="p">();</span>

  <span class="n">mfrc522</span><span class="p">.</span><span class="n">PICC_HaltA</span><span class="p">();</span>
  <span class="n">delay</span><span class="p">(</span><span class="mi">1000</span><span class="p">);</span>
<span class="p">}</span>
</code></pre></div></div>

<p>And the PC is running a Python script that monitors the serial port, mapping the NFC tag IDs to different followup commands, to launch the games or applications. Uses the <a href="https://pypi.org/project/pyserial/">pyserial</a> library, which you’ll need to install too.</p>

<div class="language-python highlighter-rouge"><div class="highlight"><pre class="highlight"><code><span class="kn">import</span> <span class="nn">serial</span>
<span class="kn">import</span> <span class="nn">subprocess</span>
<span class="c1"># Mapping NFC tag UIDs to games/applications
</span><span class="n">rfid_to_game</span> <span class="o">=</span> <span class="p">{</span>
    <span class="s">"04a1b2c3"</span><span class="p">:</span> <span class="s">"wine ~/.wine/drive_c/Games/DoomII/doom2.exe"</span><span class="p">,</span>
    <span class="s">"05d4e5f6"</span><span class="p">:</span> <span class="s">"/usr/games/dosbox ~/Games/Commander_Keen/keen.exe"</span><span class="p">,</span>
    <span class="s">"06g7h8i9"</span><span class="p">:</span> <span class="s">"steam steam://rungameid/12345"</span><span class="p">,</span>
    <span class="s">"07j8k9l0"</span><span class="p">:</span> <span class="s">"/home/user/scripts/launch_emulator.sh"</span>
<span class="p">}</span>
<span class="k">try</span><span class="p">:</span>
    <span class="n">arduino</span> <span class="o">=</span> <span class="n">serial</span><span class="p">.</span><span class="n">Serial</span><span class="p">(</span><span class="s">'/dev/ttyUSB0'</span><span class="p">,</span> <span class="mi">9600</span><span class="p">,</span> <span class="n">timeout</span><span class="o">=</span><span class="mi">1</span><span class="p">)</span>
    <span class="k">print</span><span class="p">(</span><span class="s">"Connected to NFC Floppy Reader"</span><span class="p">)</span>
    
    <span class="k">while</span> <span class="bp">True</span><span class="p">:</span>
        <span class="k">if</span> <span class="n">arduino</span><span class="p">.</span><span class="n">in_waiting</span> <span class="o">&gt;</span> <span class="mi">0</span><span class="p">:</span>
            <span class="n">tag_id</span> <span class="o">=</span> <span class="n">arduino</span><span class="p">.</span><span class="n">readline</span><span class="p">().</span><span class="n">decode</span><span class="p">(</span><span class="s">'utf-8'</span><span class="p">).</span><span class="n">strip</span><span class="p">().</span><span class="n">lower</span><span class="p">()</span>
            
            <span class="k">if</span> <span class="n">tag_id</span> <span class="ow">in</span> <span class="n">rfid_to_game</span><span class="p">:</span>
                <span class="k">print</span><span class="p">(</span><span class="sa">f</span><span class="s">"Launching game for tag: </span><span class="si">{</span><span class="n">tag_id</span><span class="si">}</span><span class="s">"</span><span class="p">)</span>
                <span class="n">subprocess</span><span class="p">.</span><span class="n">run</span><span class="p">(</span><span class="n">rfid_to_game</span><span class="p">[</span><span class="n">tag_id</span><span class="p">],</span> <span class="n">shell</span><span class="o">=</span><span class="bp">True</span><span class="p">)</span>
            <span class="k">else</span><span class="p">:</span>
                <span class="k">print</span><span class="p">(</span><span class="sa">f</span><span class="s">"Unknown tag: </span><span class="si">{</span><span class="n">tag_id</span><span class="si">}</span><span class="s">"</span><span class="p">)</span>
                
<span class="k">except</span> <span class="nb">KeyboardInterrupt</span><span class="p">:</span>
    <span class="k">print</span><span class="p">(</span><span class="s">"Shutting down..."</span><span class="p">)</span>
<span class="k">finally</span><span class="p">:</span>
    <span class="n">arduino</span><span class="p">.</span><span class="n">close</span><span class="p">()</span>
</code></pre></div></div>

<p>This approach allows for maximun flexibility: a game can use wine, while another can run on DosBOX, or even if you need a sequence of commands, you can map to a custom shell script. The script spawns a subprocess shell to run the game launch command, and that’s it.</p>

<p>We’re using Ubuntu on the PC, so these commands are run in the default shell (bash). The script is setup to autoload at system startup using crontab. But we’ll leave all the details of the retro-pc for another post.</p>

<h2 id="creating-game-disks">Creating Game Disks</h2>

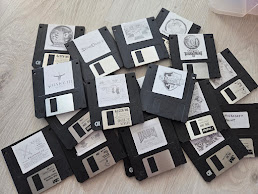
<p>Arguably, the most fun part of the project is creating the game collection. We used old floppy disks, and attached an NFC tag on the back of each of them - and of course, a sticker label on the front. We use a mini thermal printer for the stickers, which also give them a clunky retro feel.</p>

<p>For each disk, we’ll need to know the NFC tag ID so that we can add it to the hardcoded list on the python script. When the script reads an unknown tag, it prints the ID in the log, so we can copy and then paste it in the mapping list with the adequate command.</p>

<p><img src="/images/posts/nfc-floppy/disks.jpg" alt="Floppy disks" /></p>

<h2 id="final-experience">Final experience</h2>

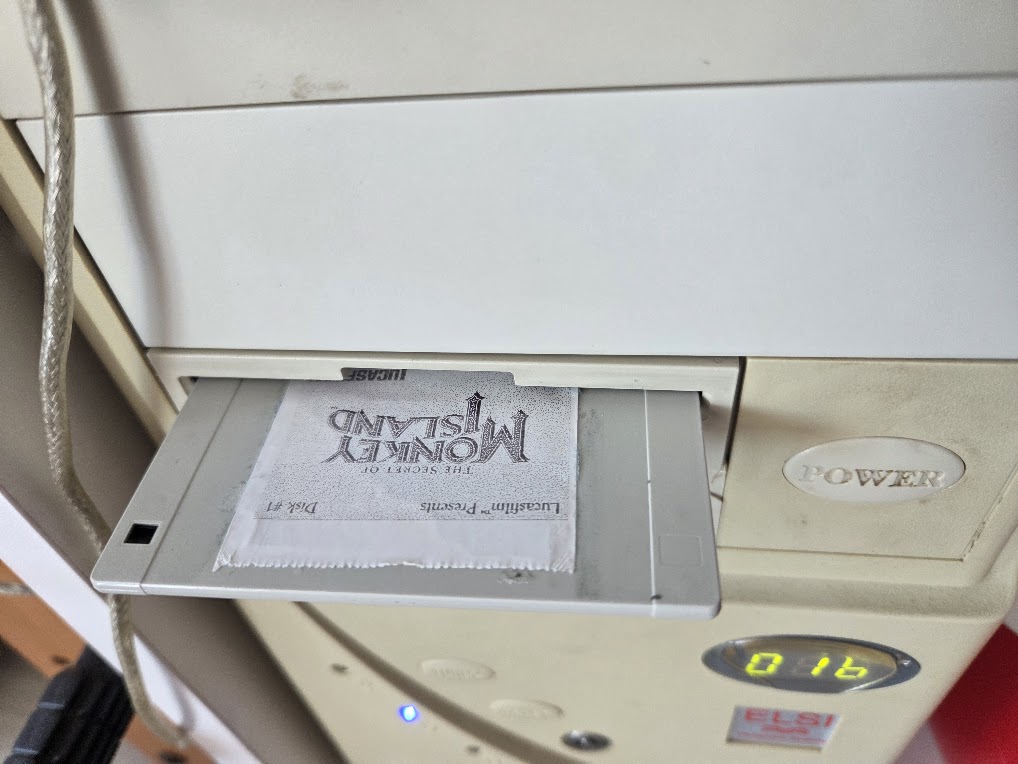
<p>The whole thing is mounted on an old 386x case, keeping the floppy drive frontal panel, so it looks completely inconspicuous. We have the experience of the look and feel of a retro-PC, with the games magically loading instantly. And with the convenience of a modern OS with emulators for installation and maintenance.</p>

<p><img src="/images/posts/nfc-floppy/final.jpg" alt="How it looks" /></p>

<p>For reference, you can find <a href="https://github.com/rephus/nfc-floppy-disk-reader">the updated source code for this project on GitHub</a>. We’d love to know if you build your own!</p>]]></content><author><name>Mar Bartolome</name></author><category term="hardware" /><category term="arduino" /><category term="nfc" /><category term="retro" /><category term="gaming" /><category term="hardware" /><summary type="html"><![CDATA[Using hidden NFC tags and reader to simulate physically loading retro games]]></summary></entry><entry><title type="html">Hiring Demystified</title><link href="https://coconauts.net/blog/blog/2021/09/28/hiring-demystified/" rel="alternate" type="text/html" title="Hiring Demystified" /><published>2021-09-28T12:00:14+00:00</published><updated>2021-09-28T12:00:14+00:00</updated><id>https://coconauts.net/blog/blog/2021/09/28/hiring-demystified</id><content type="html" xml:base="https://coconauts.net/blog/blog/2021/09/28/hiring-demystified/"><![CDATA[<p>It’s not secret that the hardest problems in computer science are cache invalidation and naming things… oh, and hiring. In our industry we’ve developed a culture and a mysticism around hiring, with certain rituals and practices which are often so detached from reality that you see numerous jokes and memes about the subject.</p>

<p>Hiring is a difficult problem, yet important to get right. Many developers are faced with the challenge of hiring other team members, without much clue into how to proceed, and end up just copying the well known rituals without stopping to analyse their effectiveness or implications. Often, this results in hindering both companies and candidates, especially those of under represented demographics.</p>

<p>In this talk I gave at EuroPython 2021, I share my experiences and personal opinions both as a candidate and as an interviewer, analyze the implications of popular hiring tactics, and discuss what I consider effective ones, in order to hire the right developers for your team with minimum hassle for both sides.</p>

<iframe width="560" height="315" src="https://www.youtube.com/embed/mnzX3LhZ0VI?si=L4mtK5I4A33q2TCe" title="YouTube video player" frameborder="0" allow="accelerometer; autoplay; clipboard-write; encrypted-media; gyroscope; picture-in-picture; web-share" referrerpolicy="strict-origin-when-cross-origin" allowfullscreen="" style="display: block; margin: 20px auto; text-align: center;"></iframe>

<p>This talk is actually an updated version of <a href="https://www.youtube.com/embed/UBLTaQ_tRl4">the one I gave a year earlier at PyConES</a>.</p>]]></content><author><name>Mar Bartolome</name></author><category term="software" /><category term="speaking" /><category term="talks" /><category term="hiring" /><category term="companies" /><category term="pycon" /><summary type="html"><![CDATA[A talk at EuroPython 2021 about engineering hiring practices]]></summary></entry><entry><title type="html">Microservices: the small print</title><link href="https://coconauts.net/blog/blog/2020/11/18/microservices-the-small-print/" rel="alternate" type="text/html" title="Microservices: the small print" /><published>2020-11-18T12:00:14+00:00</published><updated>2020-11-18T12:00:14+00:00</updated><id>https://coconauts.net/blog/blog/2020/11/18/microservices-the-small-print</id><content type="html" xml:base="https://coconauts.net/blog/blog/2020/11/18/microservices-the-small-print/"><![CDATA[<p>Microservices get a lot of sales talk, which leads many teams to adopt them eagerly. However, people are not always aware that they come at a price.</p>

<p>In this talk I gave at PyconES 2018 I discuss the basic theory around microservices architectures, and go over the common pain points that they bring, and how they often get you in the opposite direction than you intended with them.</p>

<iframe width="560" height="315" src="https://www.youtube.com/embed/ch0A_lcaPG0" frameborder="0" allow="accelerometer; autoplay; clipboard-write; encrypted-media; gyroscope; picture-in-picture" allowfullscreen="" style="display: block; margin: 20px auto; text-align: center;"></iframe>]]></content><author><name>Mar Bartolome</name></author><category term="software" /><category term="microservices" /><category term="speaking" /><category term="talks" /><category term="pycon" /><summary type="html"><![CDATA[A talk at pyconES 2018 about the hidden cost of microservices]]></summary></entry><entry><title type="html">Paint walls in VR</title><link href="https://coconauts.net/blog/blog/2019/01/19/paint-rooms-vr/" rel="alternate" type="text/html" title="Paint walls in VR" /><published>2019-01-19T01:00:14+00:00</published><updated>2019-01-19T01:00:14+00:00</updated><id>https://coconauts.net/blog/blog/2019/01/19/paint-rooms-vr</id><content type="html" xml:base="https://coconauts.net/blog/blog/2019/01/19/paint-rooms-vr/"><![CDATA[<p>Have you ever wanted to paint a room but did not decide which color to choose ?</p>

<p>We found an easy and cool solution, all you need is a phone (mainly an Android, but if you IOS, just replace the apps and locations with the IOS equivalent) and an image editor to paint your room in Virtual Reality.</p>

<p><img src="/images/posts/2019-01-19-paint-rooms-vr/before.vr.jpg" alt="before" />
<img src="/images/posts/2019-01-19-paint-rooms-vr/after.vr.jpg" alt="after" /></p>

<!--more-->

<h2 id="create-your-360-picture">Create your 360 picture</h2>

<p>First, download the <a href="https://play.google.com/store/apps/details?id=com.google.samples.apps.cardboarddemo">Google cardboard</a> app for Android.</p>

<p>Open the app, (after a few configuration steps), and go to <code class="language-plaintext highlighter-rouge">cardboard camera</code> and take the picture by rotating the phone slowly.</p>

<p>The picture will be stored in <code class="language-plaintext highlighter-rouge">sdcard/DCIM/CarboardCamera</code> with a .vr.jpg extension. Copy that file into your computer.</p>

<p><img src="/images/posts/2019-01-19-paint-rooms-vr/before.vr.jpg" alt="before" /></p>

<h2 id="export-_left-and-_right-images">Export <code class="language-plaintext highlighter-rouge">_left</code> and <code class="language-plaintext highlighter-rouge">_right</code> images</h2>

<p>Although the image taken by the cardboard camera looks like a normal jpg image, it contains some metadata that allows the app to support VR.</p>

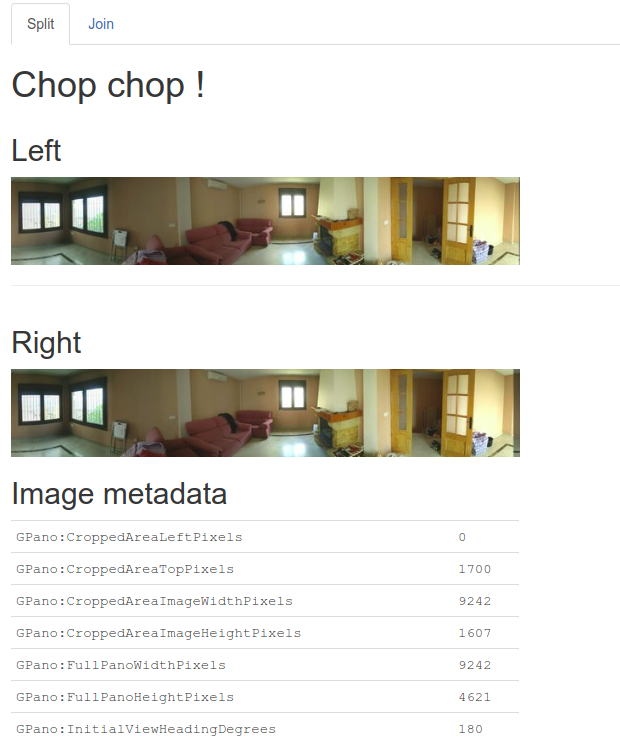
<p>Because of this, we need to export the .vr.jpg into two separate images using https://cctoolkit.vectorcult.com/#, this step is key to the whole process.</p>

<p>Upload your picture into that website and it will get splitted into two (one for each eye). Right click on the images and save them on your computer with <code class="language-plaintext highlighter-rouge">_left</code> and <code class="language-plaintext highlighter-rouge">_right</code> names.</p>

<p><img src="/images/posts/2019-01-19-paint-rooms-vr/split.png" alt="split" /></p>

<h2 id="editing-the-vr-picture">Editing the VR picture</h2>

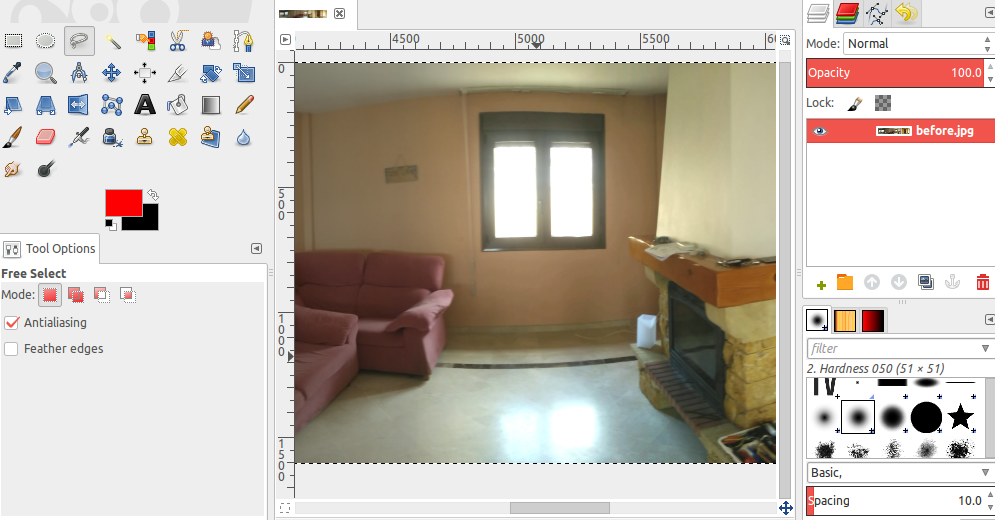
<p>We used GIMP to edit the image, but you can use photoshop or any other image editor, just open both <code class="language-plaintext highlighter-rouge">_left</code> and <code class="language-plaintext highlighter-rouge">_right</code> images you exported before with it and you will see a plain wide image.</p>

<p><img src="/images/posts/2019-01-19-paint-rooms-vr/gimp.png" alt="gimp" /></p>

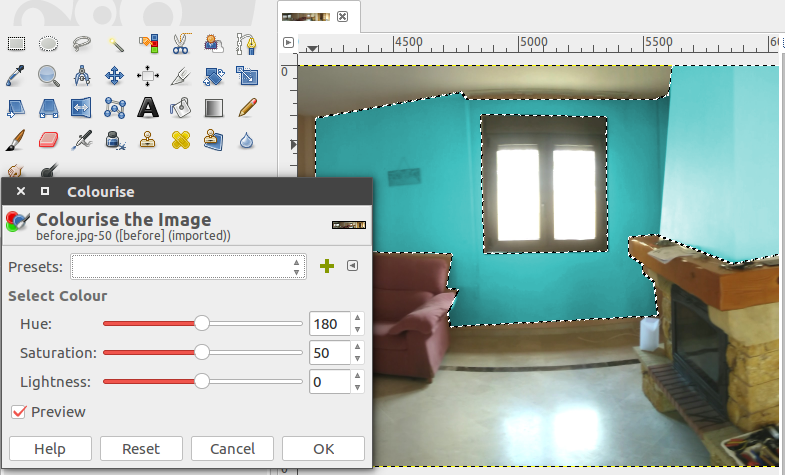
<p>Now you can edit the images in any way you want, what I did was to use the different select tools to select just (and only) the walls on the room, then move it to another layer (for easier management) and then used the <code class="language-plaintext highlighter-rouge">colourise</code> tool to change the color.</p>

<p><img src="/images/posts/2019-01-19-paint-rooms-vr/colourise.png" alt="colourise" /></p>

<p>You need to repeat this operation for both images. Once you’re done, save both images and be ready to combine them together again.</p>

<h2 id="generate-new-vr-image">Generate new VR image</h2>

<p>Go back to the same website as before https://cctoolkit.vectorcult.com/# and join both images this time, remember to keep the <code class="language-plaintext highlighter-rouge">_left</code> and <code class="language-plaintext highlighter-rouge">_right</code> names before uploading.</p>

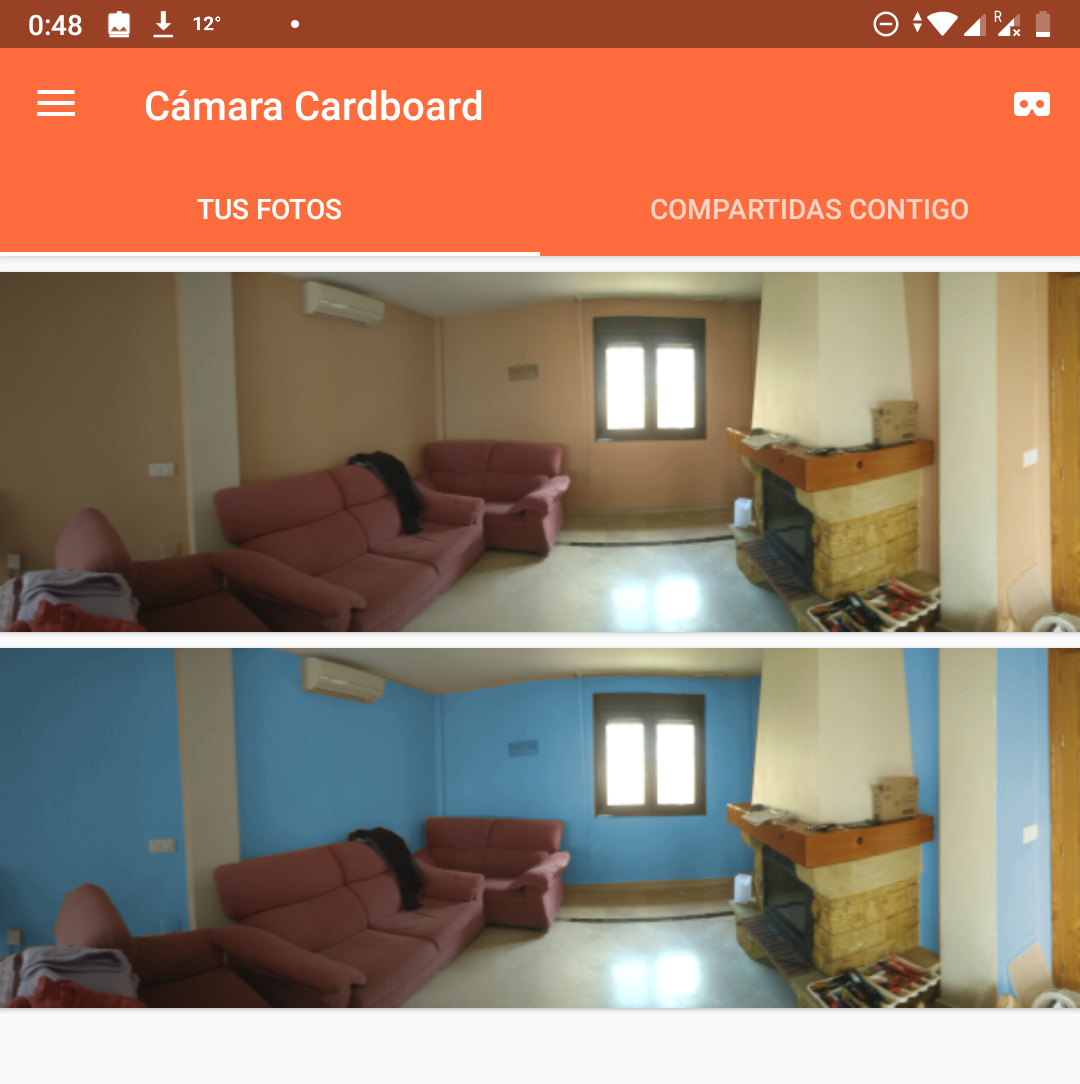
<p>This will generate a new .vr.jpg page. Copy the image back on <code class="language-plaintext highlighter-rouge">DCIM/CardboardCamera</code>. If you did everything correctly, you will see both pictures (the new one and the old one) on the cardboard. If you upload a non-vr image, it won’t show on the app.</p>

<p><img src="/images/posts/2019-01-19-paint-rooms-vr/cardboard.png" alt="cardboard" /></p>

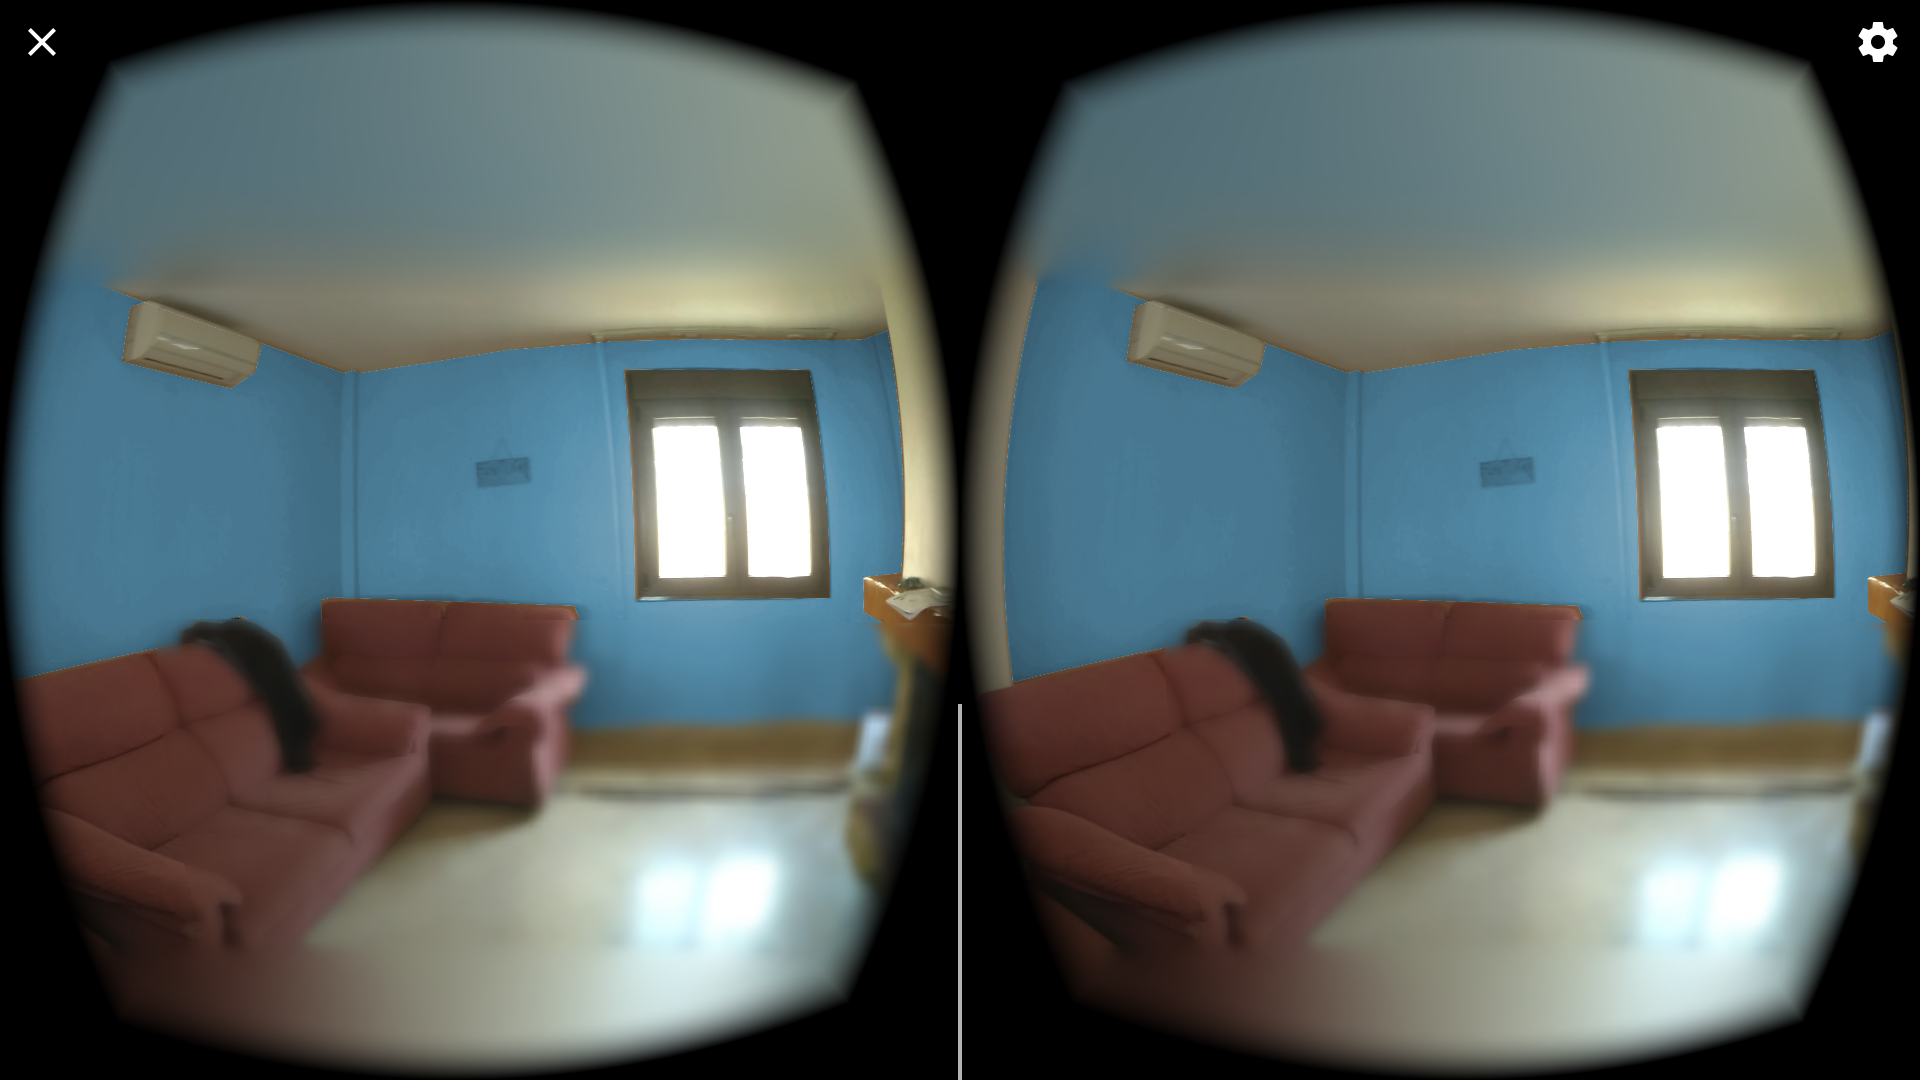
<p>Click on the image and you will see it on VR. That’s it, enjoy.</p>

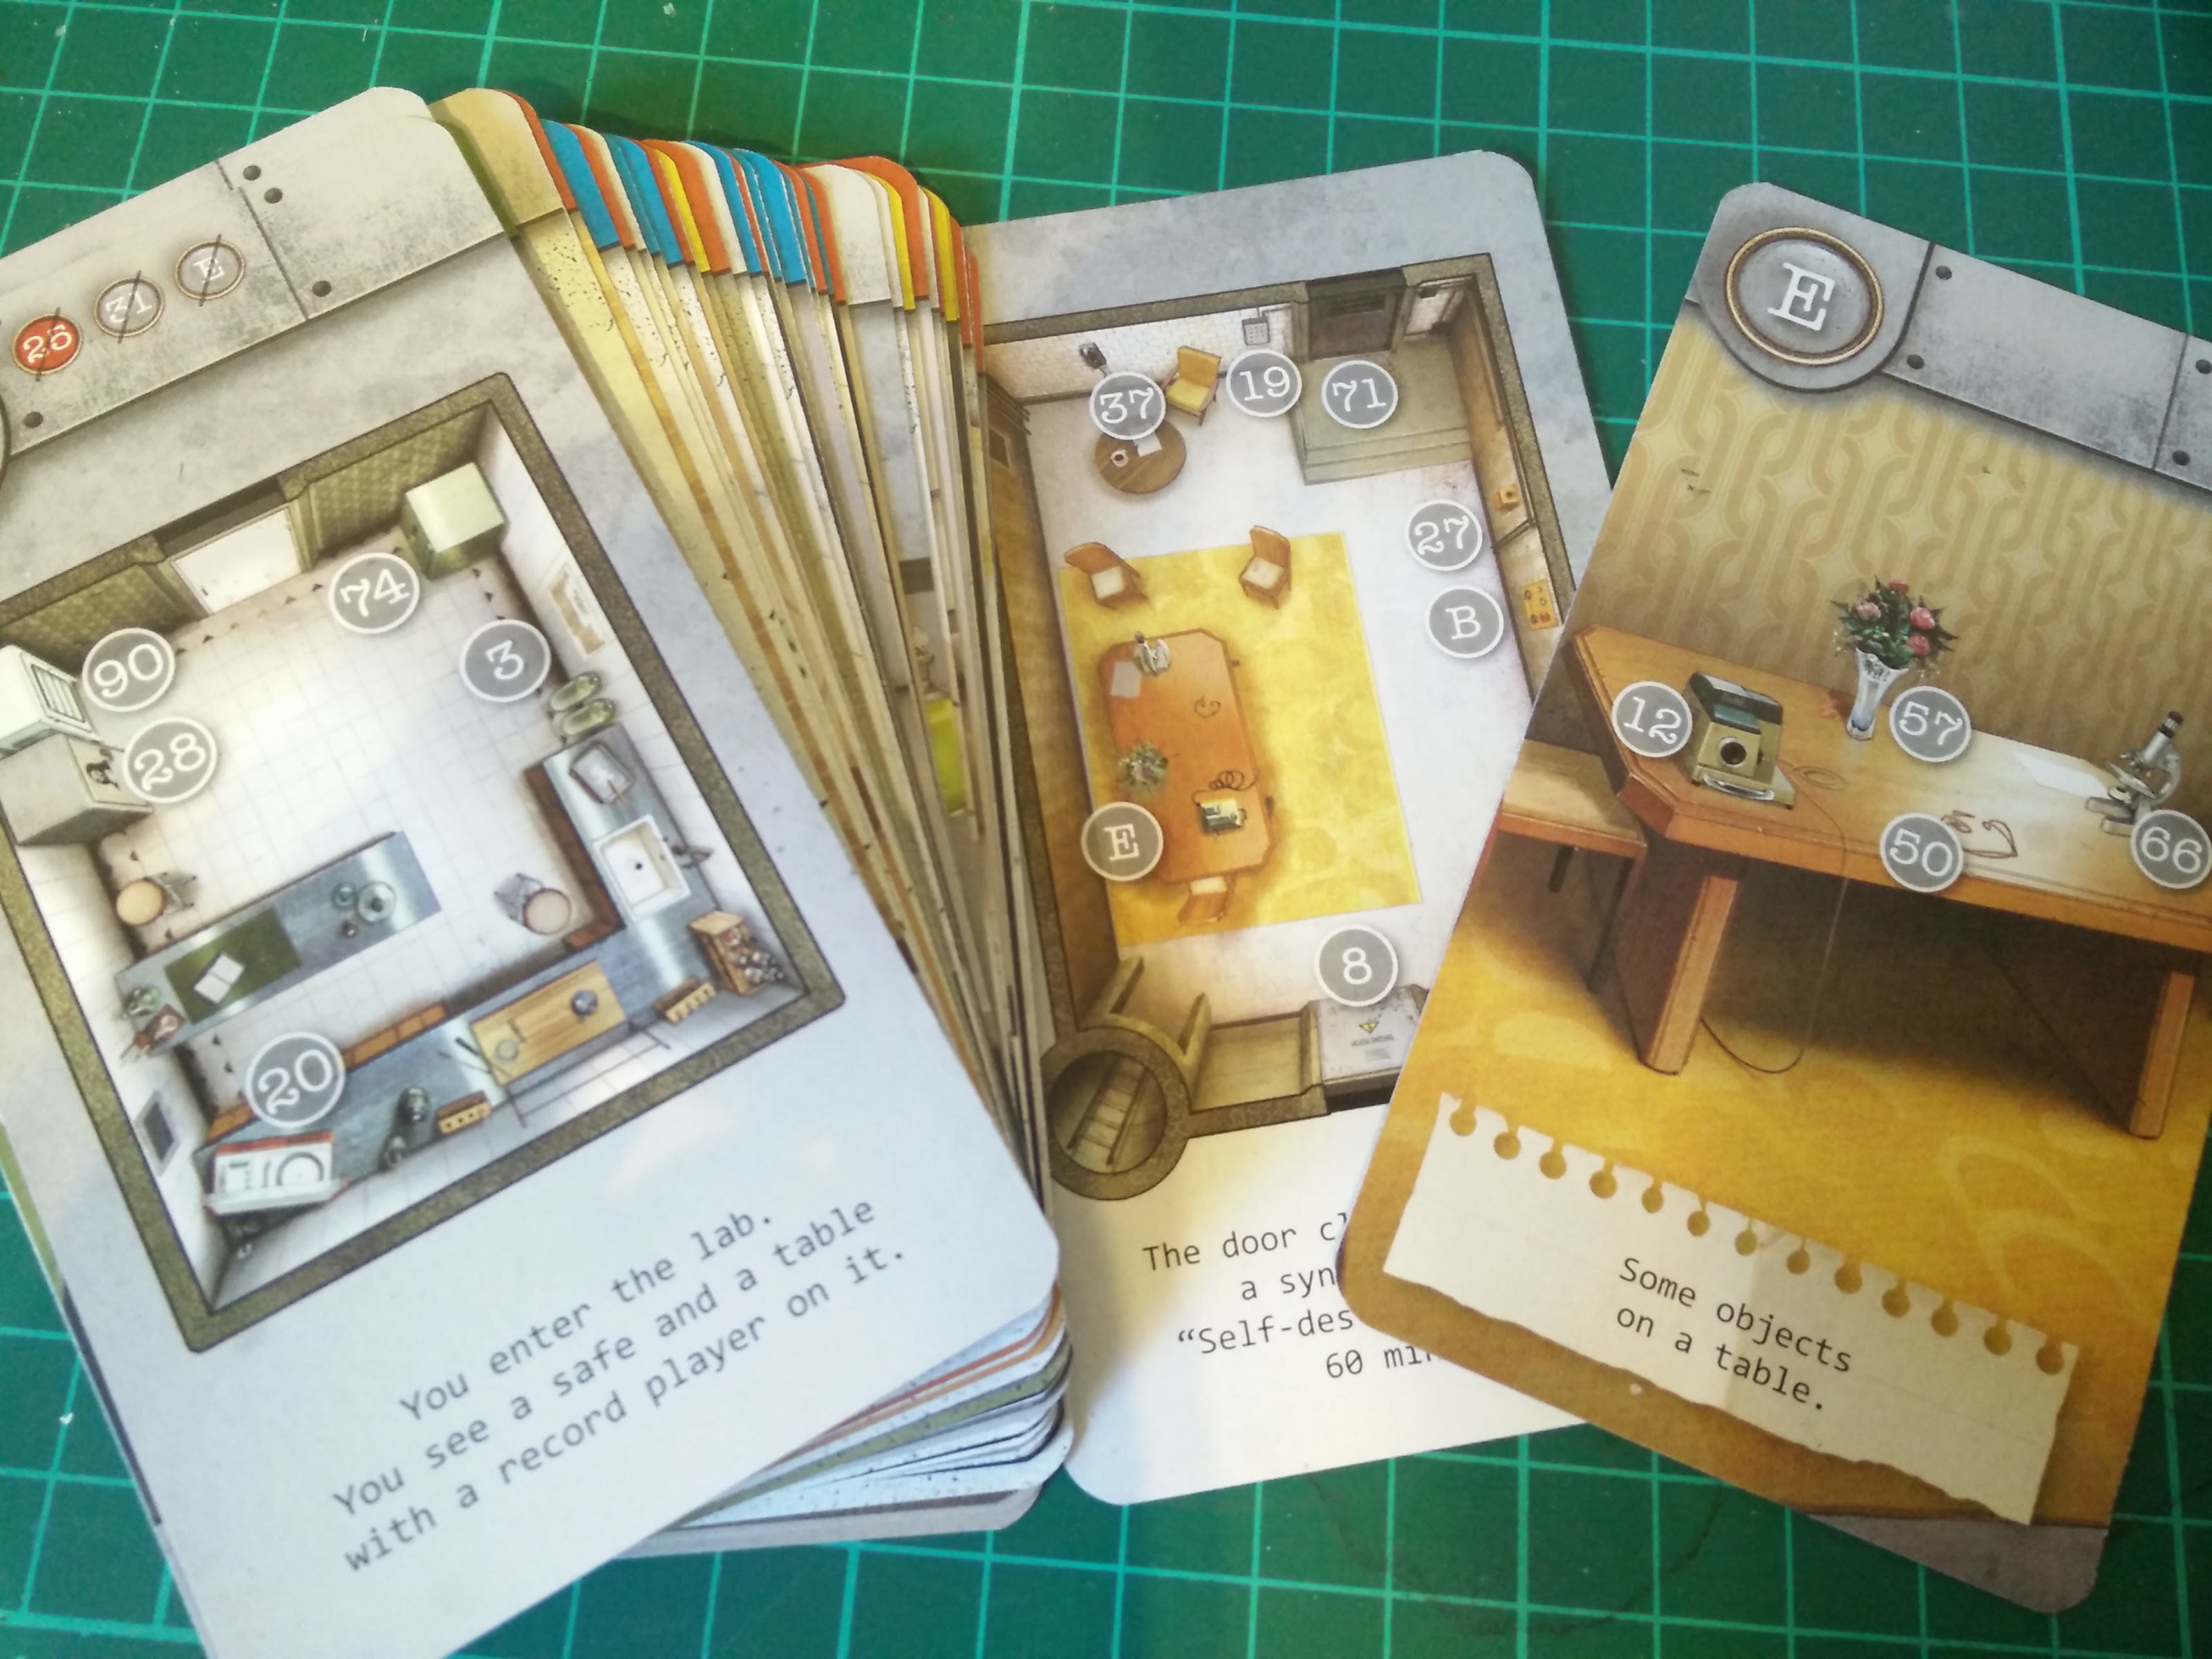
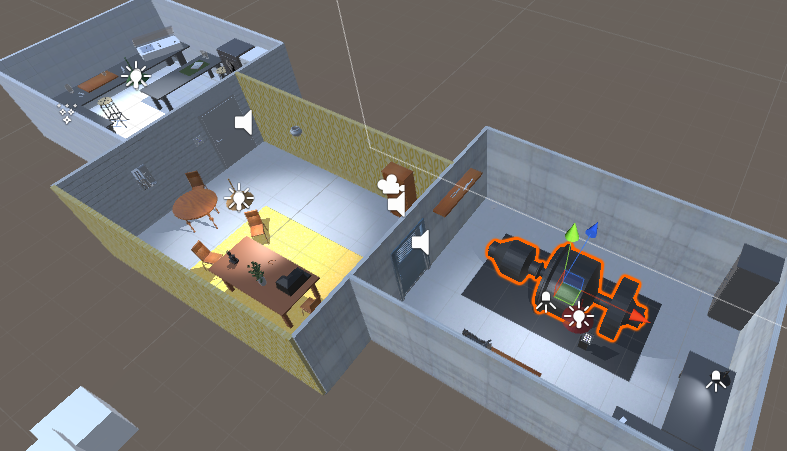
<p><img src="/images/posts/2019-01-19-paint-rooms-vr/vr.png" alt="vr" /></p>]]></content><author><name>Javier Rengel</name></author><category term="software" /><category term="vr" /><summary type="html"><![CDATA[Paint room walls in virtual reality]]></summary></entry><entry><title type="html">Escaperoom x unlock</title><link href="https://coconauts.net/blog/blog/2018/09/07/escape-room-demo/" rel="alternate" type="text/html" title="Escaperoom x unlock" /><published>2018-09-07T14:00:14+00:00</published><updated>2018-09-07T14:00:14+00:00</updated><id>https://coconauts.net/blog/blog/2018/09/07/escape-room-demo</id><content type="html" xml:base="https://coconauts.net/blog/blog/2018/09/07/escape-room-demo/"><![CDATA[<p>A year ago we showed you a <a href="">generative escaperoom</a> game on Unity3D. Based on that formula, we decided to create some manually-crafted levels to make the game even better. So we decided to copy the first level design of a card based escaperoom game called <a href="https://boardgamegeek.com/boardgame/213460/unlock-escape-adventures">Unlock</a>. And the result was as good as we expected.</p>

<p><img src="/images/posts/2018-09-07-escape-room-demo/unlock-cards.jpg" alt="unlock" /></p>

<p><img src="/images/posts/2018-09-07-escape-room-demo/overview.png" alt="uniy3d-design" /></p>

<p>The game is not yet finished, but because we are going to move to a different project, we thought about showing you a demo of what we’ve built so far.</p>

<!--more-->

<h2 id="demo">Demo</h2>

<p>This is a first look of the mechanics of the game</p>

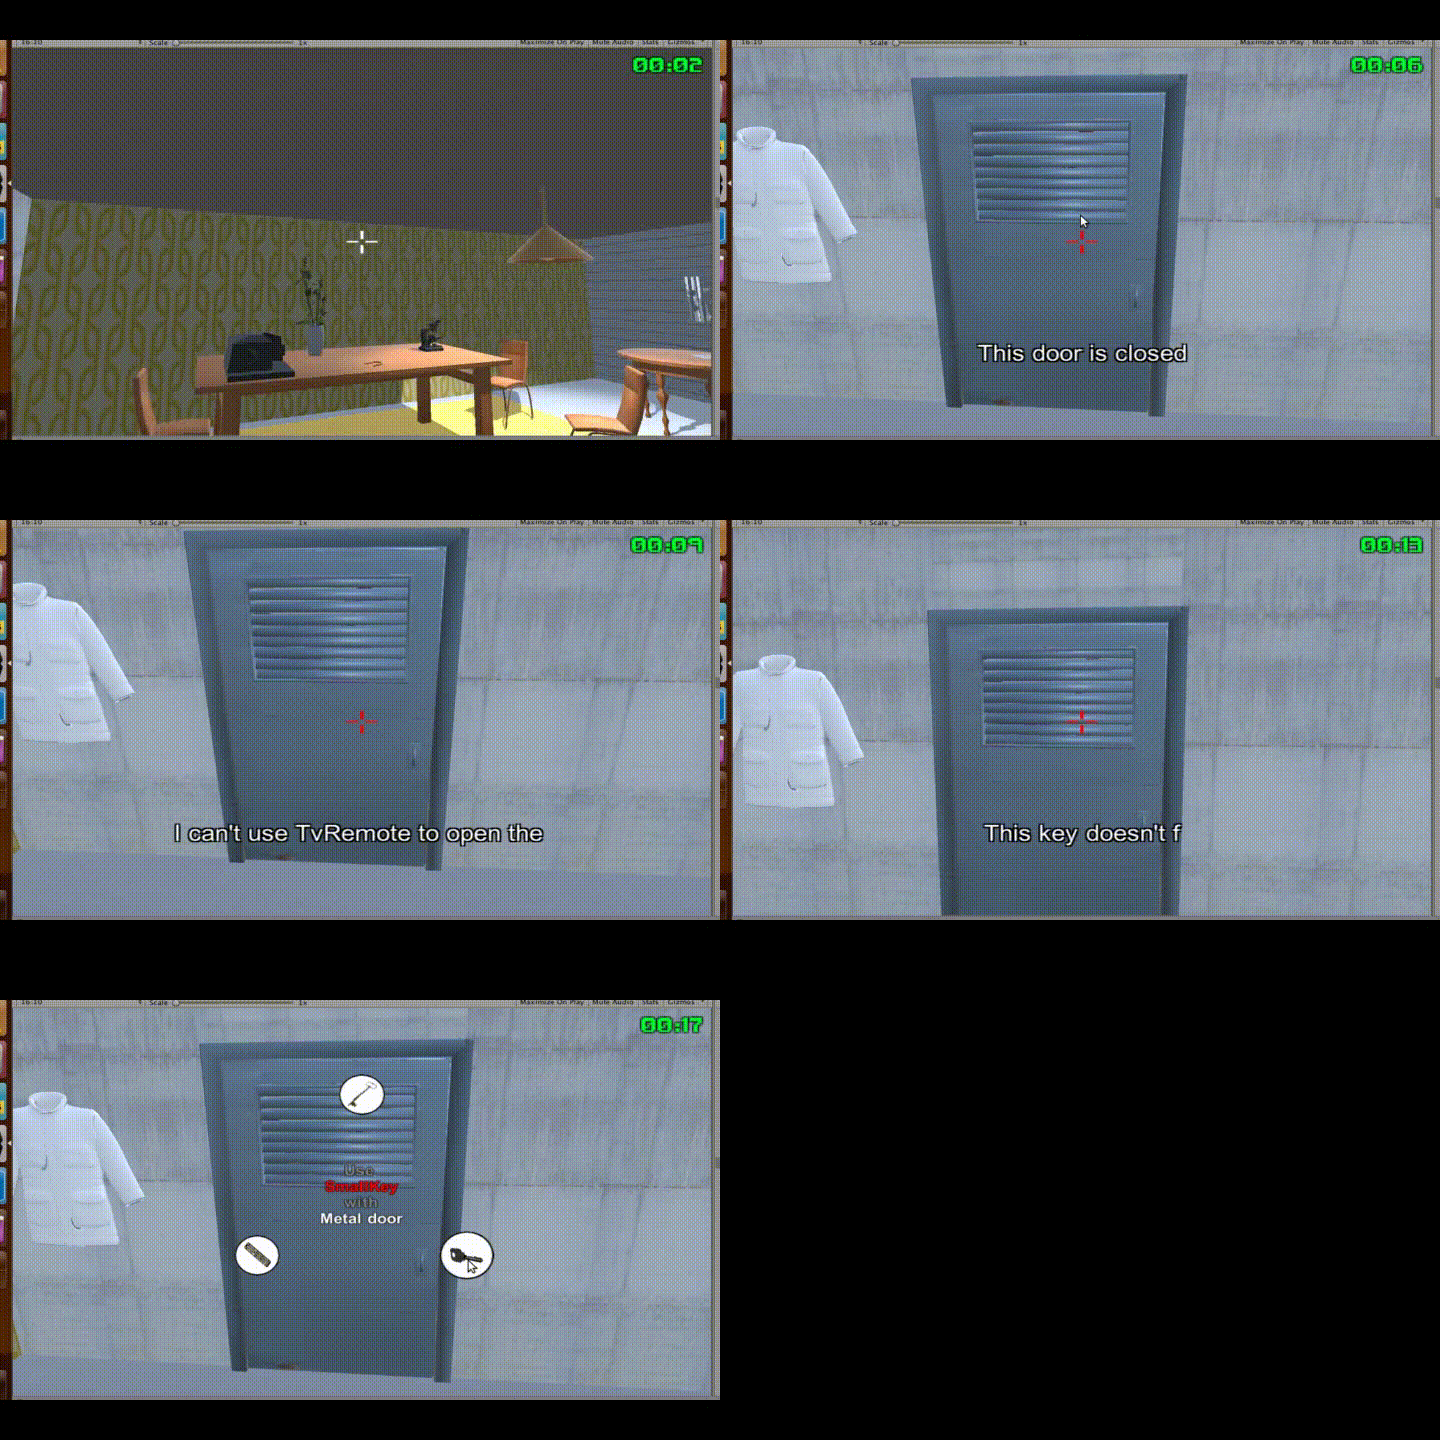
<p><img src="/images/posts/2018-09-07-escape-room-demo/level1.gif" alt="demo" /></p>

<p>You can play this demo in here http://unity3d.coconauts.net/escaperoom-unlock/. Remember, it is not finished so it could be buggy and you will not be able to finish the level.</p>

<h2 id="level-design">Level design</h2>

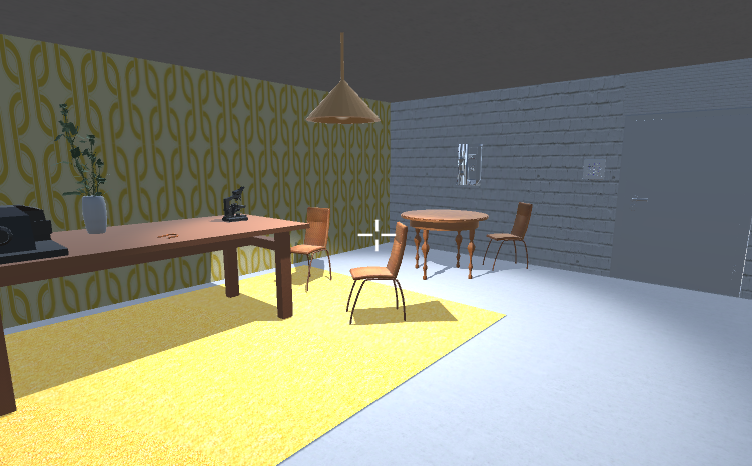
<p>We copied the gameplay of the first level of the unlock game, with the same clues, same objects, similar text entries  and even the similar wall textures.</p>

<p><img src="/images/posts/2018-09-07-escape-room-demo/main-room.png" alt="main-room" /></p>

<h2 id="the-inventory-system">The inventory system</h2>

<p>We added to this game a new inventory wheel system, where you pick items and you use them on any other object in the scene using the right click, showing all the items you have on a wheel.</p>

<p><img src="/images/posts/2018-09-07-escape-room-demo/inventory.gif" alt="uniy3d-design" /></p>

<p>But of course, different items will have a different effect on the item you’re trying to use it on.</p>

<h2 id="conclussions">Conclussions</h2>

<p>It takes a lot to generate the 3d models, implement the logic and replace the card-only mechanics into a 3D videogame; but the result is worth it.</p>

<p>I think, (now that we have proved the concept with a working level design) we could start building our own  levels, adding more interactive puzzles (like the laptop one in our previous game).</p>

<p>However, we will pause this project for a while to start working on different stuff, but let us know if you have any interest on playing a game like this at some point in the future.</p>

<p>What do you think about the game?
Your feedback is really valuable to us! so please let us know on the comments or <a href="http://twitter.com/coconauts">on twitter</a>.</p>]]></content><author><name>Javier Rengel</name></author><category term="games" /><category term="unity3d" /><category term="escaperoom" /><category term="unlock" /><summary type="html"><![CDATA[Escaperoom game on unity3d based on unlock! level design]]></summary></entry></feed>